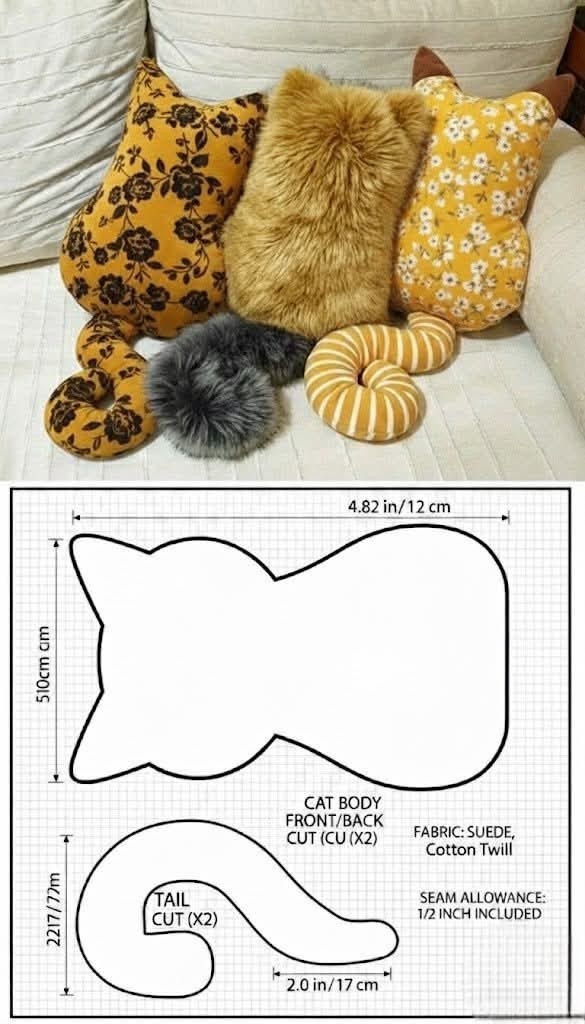
Cat Pillow Pattern

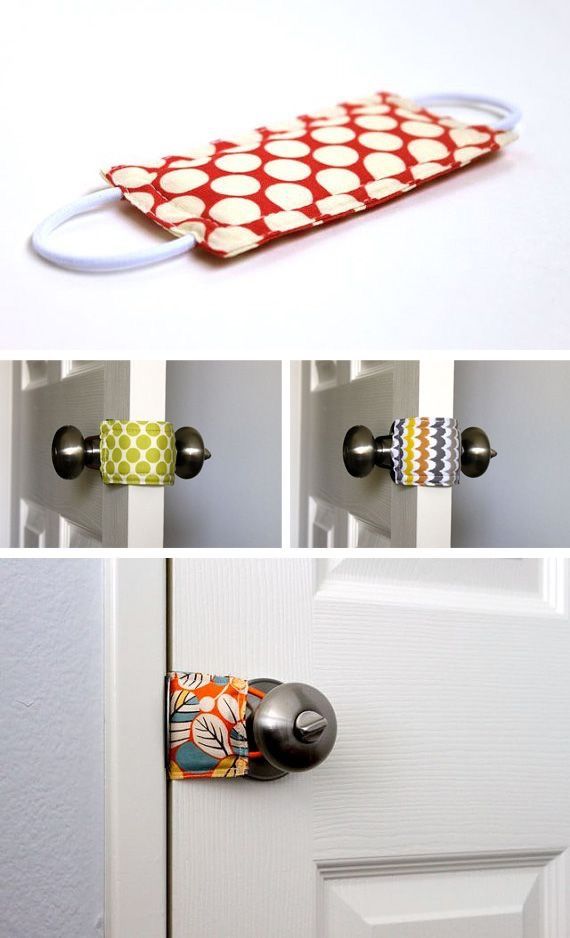
The Fabric Door Silencer – Tutorial is a practical and creative sewing project designed to reduce noise, protect surfaces, and add a soft decorative touch to your home. Whether you are a beginner learning basic sewing techniques or an experienced quilter looking for a quick and useful project, following a Fabric Door Silencer – Tutorial is both simple and rewarding.
Creating a Fabric Door Silencer – Tutorial allows you to transform fabric into a functional solution that prevents doors from slamming and minimizes unwanted noise. This is especially helpful in homes with children, shared living spaces, or areas where quiet is essential.
One of the best advantages of the Fabric Door Silencer – Tutorial is its simplicity and adaptability. You can customize the design, size, and fabric to match your home décor while solving a common everyday problem. In this guide, you will learn how to create your own fabric door silencer step by step.
Selecting the right materials is the first step to creating an effective Fabric Door Silencer – Tutorial. Since this project is meant to absorb impact and reduce sound, both softness and durability are important.
Cotton fabric is a popular choice because it is easy to sew, widely available, and comfortable to handle. It works well for both decorative and practical designs.
For extra durability, you can use canvas or heavier fabric blends. These materials help the silencer withstand repeated use without wearing out quickly.
Soft filling materials such as polyester fiberfill, foam, or batting are essential. These provide the cushioning needed to absorb impact when the door closes.
Optional materials include Velcro, snaps, or ties, depending on how you want to attach the silencer to the door handle or frame.
Basic sewing tools such as thread, scissors, pins, and a sewing machine will also be required to complete your Fabric Door Silencer – Tutorial successfully.
Before starting your project, it is important to understand how a Fabric Door Silencer – Tutorial works. The design is typically simple but highly effective.
Most door silencers are made in a padded rectangular or cylindrical shape that wraps around the door handle or sits between the door and frame.
The main goal is to create a soft barrier that absorbs the force when the door closes, preventing loud impact sounds.
Some designs include adjustable straps or closures, allowing the silencer to fit different door sizes and handle types.
The size of the silencer can vary depending on your needs. Larger designs provide more cushioning, while smaller ones are more discreet.
Understanding the structure beforehand helps ensure your Fabric Door Silencer – Tutorial is both functional and visually appealing.
Once your materials are prepared, you can begin creating your Fabric Door Silencer – Tutorial. Careful preparation and accurate sewing will lead to a clean and durable result.
Start by measuring the area where the silencer will be placed. This helps determine the correct size for your project.
Cut the fabric pieces according to your measurements. You will typically need two outer fabric pieces and optional lining or interfacing.
If using batting or foam, cut it to match the fabric size. This will form the inner cushioning layer.
Place the fabric pieces together with the right sides facing inward, and sew around the edges, leaving a small opening for turning and filling.
Turn the fabric right side out and insert the filling evenly. Make sure the padding is well distributed to provide consistent cushioning.
Close the opening using a neat stitch, and add any closures such as Velcro or ties if your design includes them.
Your Fabric Door Silencer – Tutorial is now complete and ready to use.
The final stage is where your Fabric Door Silencer – Tutorial becomes unique and personalized. Creative details can turn a simple item into a decorative accent.
Choosing patterned or colorful fabrics can help the silencer blend with your home décor or stand out as a decorative piece.
You can add patchwork designs using fabric scraps for a quilted appearance and extra texture.
Embroidery is another great way to personalize your project. Adding small designs, initials, or patterns can make it more unique.
Decorative trims, piping, or buttons can enhance the overall look while adding a professional finish.
Seasonal themes are also a fun option. You can create different silencers for holidays or special occasions.
The versatility of the Fabric Door Silencer – Tutorial allows you to combine practicality with creativity in a simple project.
Yes, this is a very beginner-friendly project because it involves simple cutting and straight sewing techniques.
Polyester fiberfill, foam, or batting are commonly used because they provide effective cushioning and durability.
You can use Velcro, ties, snaps, or simply place it between the door and frame depending on your design.
Yes, most cotton-based silencers can be machine washed. It is best to air dry to maintain shape.
This project can usually be completed in under an hour, making it a quick and practical sewing task.
Yes, many crafters sell practical home items like door silencers, especially when they feature unique designs and high-quality finishing.
Creating a Fabric Door Silencer – Tutorial is a simple yet highly useful sewing project that combines functionality with creativity. From selecting the right materials and understanding the design to sewing and customizing your piece, every step contributes to a practical and attractive result.
This project is perfect for improving home comfort, creating thoughtful handmade gifts, or even starting a small craft business. A well-made fabric door silencer helps reduce noise while adding a personal touch to your space.
FREE PATTERN VIDEO:
We hope this guide has inspired you to create your own Fabric Door Silencer – Tutorial with confidence. If you try this project, feel free to share your honest opinion and suggestions—we would love to hear your ideas and creative experiences.