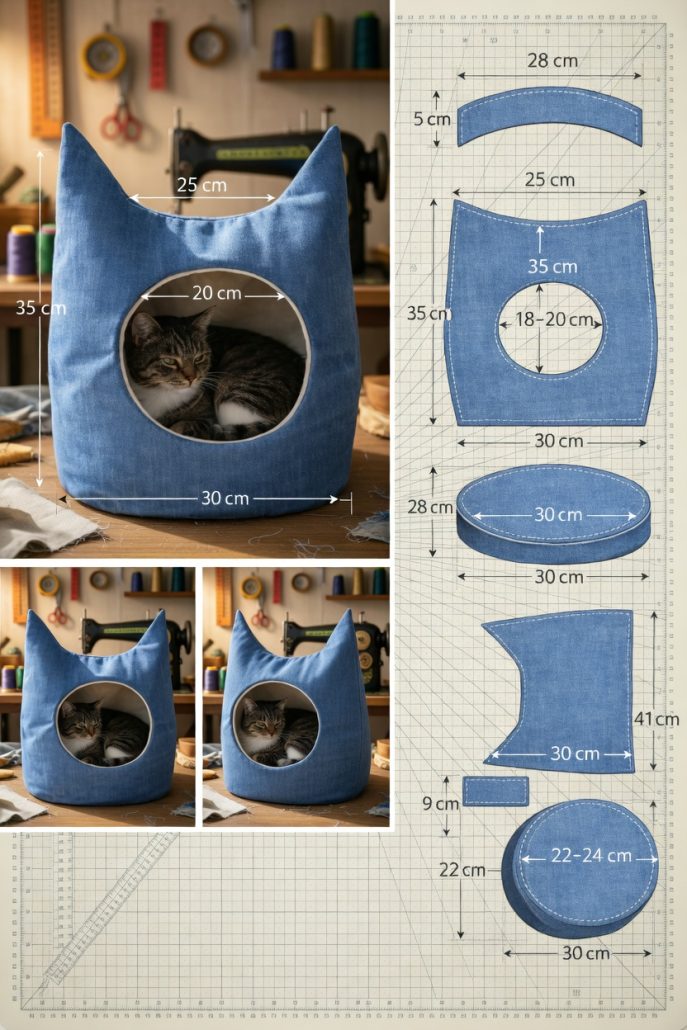
Sewing a Pet House - TUTORIAL

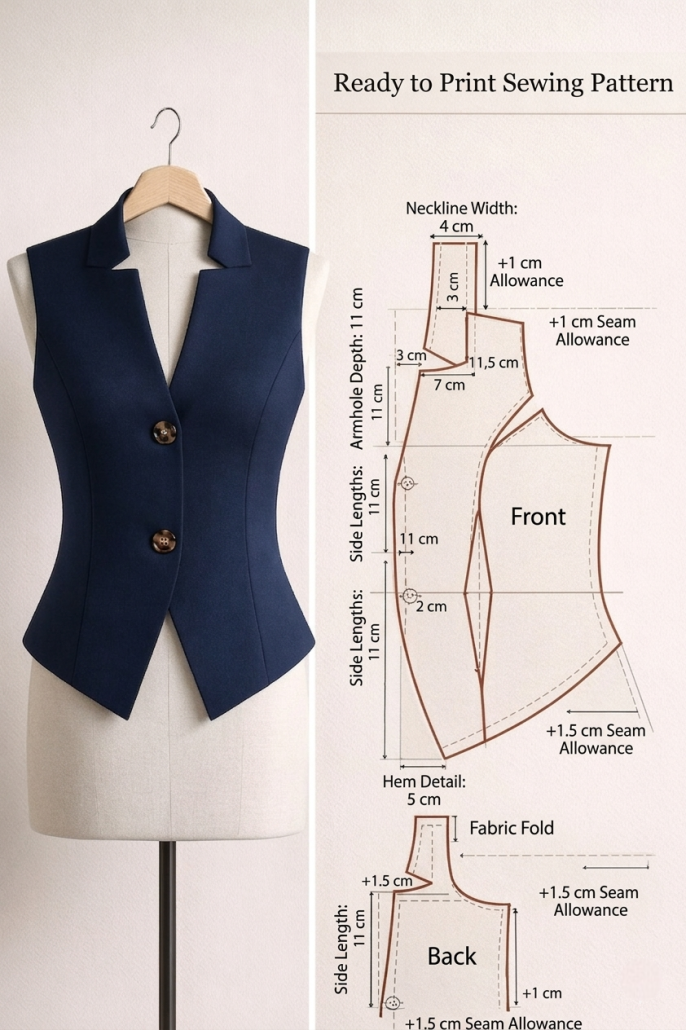
The Tailored vest – TUTORIAL is a sophisticated and practical quilting and sewing project that allows you to create a timeless wardrobe piece with a personalized touch. A well-fitted vest adds structure and elegance to any outfit, making it a versatile addition for both casual and formal occasions.
By following the Tailored vest – TUTORIAL, you can design a garment that fits your body perfectly while reflecting your personal style. From fabric selection to finishing details, every step of the process gives you creative control and ensures a unique final result.
In this complete guide, you will learn how to make a Tailored vest – TUTORIAL step by step. Whether you are new to garment sewing or have experience with quilting techniques, this tutorial will help you achieve a polished and professional finish.
To begin your Tailored vest – TUTORIAL, selecting the right fabric is essential. Medium-weight fabrics such as cotton, linen, wool blends, or quilted textiles work well for creating structure and comfort.
Choosing a lining fabric is equally important. A smooth lining not only improves comfort but also gives your vest a refined and professional appearance.
You will need basic sewing tools such as scissors, pins, a sewing machine, measuring tape, and high-quality thread. These tools help ensure precise cutting and strong seams.
Interfacing is another key material. It adds stability to areas like the front panels and collar, helping your Tailored vest – TUTORIAL maintain its shape.
Accurate body measurements are crucial before starting. Measure your chest, waist, and torso length to ensure a proper fit.
Finally, prepare a pattern template. You can use a commercial pattern or draft your own to guide the cutting and assembly process.
The construction of the Tailored vest – TUTORIAL begins with cutting your fabric pieces according to the pattern. These typically include front panels, a back panel, and lining pieces.
Start by assembling the outer fabric. Sew the shoulder seams first, followed by the side seams, to create the main structure of the vest.
Next, repeat the process with the lining pieces. Keeping the lining separate at this stage ensures a clean and professional finish later.
Attach interfacing to the necessary areas, such as the front edges and collar. This step adds structure and helps maintain the vest’s tailored look.
Once both outer and lining pieces are ready, join them together. Sew around the edges, leaving an opening for turning the garment right side out.
After turning, press the seams carefully. This step defines the shape and enhances the overall appearance of your Tailored vest – TUTORIAL.
One of the most exciting aspects of the Tailored vest – TUTORIAL is the opportunity for customization. You can experiment with different fabrics, colors, and textures to create a unique garment.
For a classic look, choose neutral tones such as black, gray, or beige. These colors are versatile and suitable for various occasions.
If you prefer a more creative style, consider using quilted fabrics or patchwork designs. This adds texture and visual interest to your vest.
You can also add functional details such as pockets, buttons, or zippers. These elements enhance both the appearance and practicality of your vest.
Adjusting the length and fit is another way to personalize your design. A cropped vest offers a modern look, while a longer version provides a more formal style.
Decorative stitching or topstitching can further elevate your Tailored vest – TUTORIAL, giving it a professional and stylish finish.
Finishing your Tailored vest – TUTORIAL properly ensures durability and a polished appearance. Start by closing any openings with a neat hand stitch.
Press all seams thoroughly. This step helps the vest maintain its structure and gives it a crisp, tailored look.
Attach closures such as buttons or hooks. Make sure they are aligned correctly for both functionality and aesthetics.
Try on the vest and make any final adjustments. Ensuring a proper fit is key to achieving a professional result.
The Tailored vest – TUTORIAL offers many benefits. It allows you to create a custom garment that fits perfectly and reflects your personal style.
Additionally, making your own vest can be more sustainable and cost-effective than buying ready-made clothing.
Is this project suitable for beginners?
Yes, the Tailored vest – TUTORIAL can be adapted for beginners with simple designs and clear instructions.
What fabric is best for a tailored vest?
Medium-weight fabrics like cotton, linen, or wool blends are ideal for structure and comfort.
Do I need a lining?
A lining is recommended for a professional finish and added comfort.
How do I ensure a good fit?
Take accurate measurements and adjust the pattern as needed before cutting your fabric.
Can I add pockets?
Yes, pockets can be added for both style and functionality.
How long does it take to complete?
Depending on experience, it can take several hours to a full day.
The Tailored vest – TUTORIAL is a rewarding sewing project that combines creativity, skill, and practicality. In this guide, you’ve learned how to select materials, assemble the vest, customize your design, and apply finishing techniques for a professional result.
This project allows you to create a versatile garment that enhances your wardrobe while reflecting your personal style. With endless customization options, your vest can be truly one of a kind.
PATTERN VIDEO:
Now it’s your turn to try the Tailored vest – TUTORIAL. Share your honest feedback and leave your suggestions—your ideas can inspire even more creative sewing and quilting projects!