Crocheted Basket - Tutorial

If you’re looking for the perfect project to celebrate spooky season, the Fun Bag for Halloween – PATTERN is just what you need! This creative and festive crochet idea lets you make your very own Halloween-themed bag—perfect for holding candy, decorations, or even small gifts. Whether you’re crafting it for kids, trick-or-treating, or as a fun seasonal accessory, this pattern combines creativity, function, and the Halloween spirit all in one.
The best part about making your own Fun Bag for Halloween – PATTERN is that it’s fully customizable. You can choose your favorite Halloween colors, like orange, black, purple, or green, and even add details like ghosts, pumpkins, or bats. This crochet project is easy enough for beginners but can also be enhanced by experienced crocheters who want to add their own spooky flair. It’s a great way to practice different stitches and color changes while creating something useful and festive.
This tutorial will guide you step-by-step through the process of making your Fun Bag for Halloween – PATTERN. You’ll learn how to select the right yarn, crochet the base and handles, decorate it with Halloween designs, and finish your bag with neat, durable stitches. It’s a fun, relaxing project that’s perfect for getting into the holiday spirit while crafting something you’ll actually use or gift.
Before starting your Fun Bag for Halloween – PATTERN, gather all the materials you’ll need. The most important choice is the yarn. For durability and structure, medium-weight cotton yarn is ideal—it holds shape well and is easy to clean. Acrylic yarn also works if you prefer a lighter or more colorful finish. Choose classic Halloween shades like orange, black, and purple for a festive touch.
You’ll also need a suitable crochet hook. For most medium-weight yarns, a 4 mm to 5 mm hook works well. Be sure to check your yarn label for the recommended hook size. Using the correct size helps your stitches stay even and keeps the bag sturdy enough to hold treats or decorations.
For added decoration, consider using felt pieces, safety eyes, or small crochet appliqués to create Halloween characters. You can add pumpkins, spiders, or even cute ghosts for a whimsical effect. Small fabric paints or buttons can also enhance the spooky theme.
If you want your bag to have more structure, you can use a fabric lining. This will make it stronger and prevent smaller items from poking through the stitches. A simple cotton or polyester lining is easy to sew in and helps your bag last longer.
Don’t forget the basic crochet tools—scissors, yarn needles, and stitch markers will make your project smoother. The stitch markers, especially, are helpful for keeping track of rounds and ensuring your bag stays symmetrical.
Finally, before you start crocheting, plan the size of your Fun Bag for Halloween – PATTERN. You can make a small version for decoration or a larger one for trick-or-treating. Customizing the dimensions makes the project perfect for your needs.
To begin your Fun Bag for Halloween – PATTERN, start with the base. A circular or rectangular base works best, depending on your desired bag shape. For a round base, make a magic ring and crochet in continuous rounds, increasing evenly until the base is as wide as you want. For a rectangular base, chain the desired width and work rows of single crochet or half-double crochet stitches until it reaches the right length.
Once the base is complete, it’s time to build the sides. Crochet around the base without increasing—this will make the sides rise vertically. Continue working in rounds using single crochet or half-double crochet stitches. The height depends on your preference; around 7 to 9 inches tall is a good size for most bags.
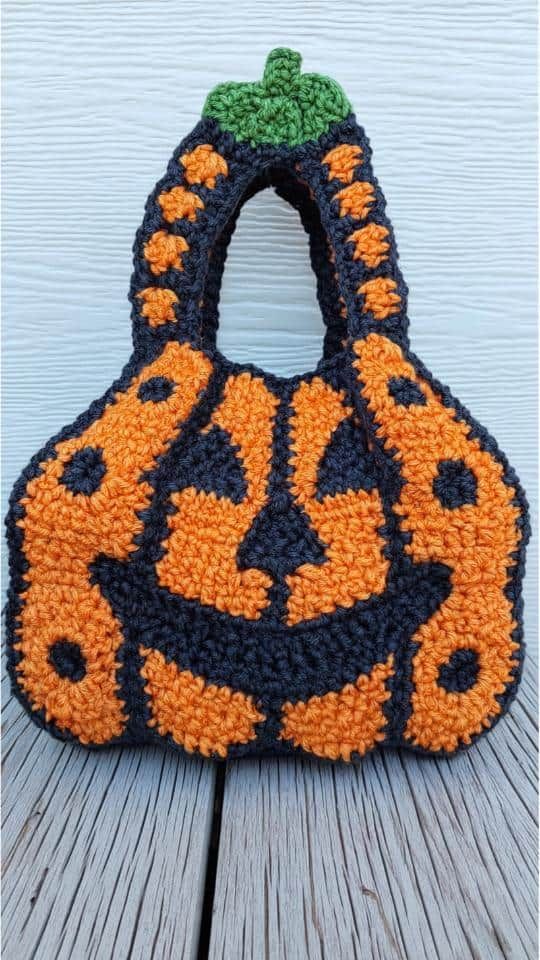
To make your bag more festive, alternate yarn colors every few rows. Stripes of orange and black give a classic Halloween look, while adding a touch of green or purple can make it more playful. You can even crochet motifs like bats or spiderwebs directly into the design using tapestry crochet techniques.
If you want a sturdier structure, you can crochet through the back loop only for the first few rows of the body. This creates a firm edge between the base and sides, helping the bag stand upright.
For beginners, remember to keep your tension consistent. Uneven tension can make your bag wavy or lopsided. Take your time and count your stitches at the end of each round to ensure accuracy.
Once you reach your desired height, stop adding rows and prepare to create the handles or drawstring section, depending on the bag style you prefer.
One of the most enjoyable parts of making the Fun Bag for Halloween – PATTERN is adding handles and decorations. There are several ways to make handles. You can crochet two long straps and sew them on each side, or create a drawstring closure using a chain of stitches. For the drawstring, thread it through the upper row of stitches and tie both ends in a bow for an adjustable opening.
Handles can be made with single crochet stitches to ensure they are thick and strong enough to hold weight. If you’re making a trick-or-treat bag for children, double up the yarn while crocheting the handles to make them extra durable.
Now comes the fun part—decorating! You can crochet small Halloween appliqués such as pumpkins, black cats, or ghosts and sew them onto the bag. Alternatively, use felt cutouts glued or stitched onto the front. Adding little touches like googly eyes or glitter thread gives your bag a magical and playful vibe.
If you’re confident in colorwork, try incorporating a jack-o’-lantern face directly into the design. Use black yarn to create eyes and a mouth on an orange background, giving your bag a true Halloween charm.
For those who prefer minimalism, you can still make your bag festive with a simple pattern of stripes or alternating textured stitches. Even subtle changes in stitch type—like switching between double crochet and puff stitch—can create an interesting design.
Once all the decorations are added, check your work carefully. Make sure all appliqués and handles are securely attached, and trim any loose yarn ends. This ensures your Fun Bag for Halloween – PATTERN looks polished and ready for use.
After finishing the crochet work, it’s important to give your Fun Bag for Halloween – PATTERN a final touch-up. Start by blocking the bag if necessary—this helps even out the stitches and gives it a professional finish. Lightly mist the bag with water and shape it to your liking, then let it dry completely.
If you added a lining, hand-sew it inside the bag at this stage. This step is optional but recommended if you plan to use the bag for carrying candies or heavier items. The lining helps reinforce the structure and keeps the bag from stretching too much.
When storing or washing your bag, handle it gently. Hand wash in cool water with mild detergent and lay it flat to dry. Avoid wringing or twisting the bag to maintain its shape. Cotton and acrylic yarns are generally easy to clean and maintain, making them perfect for seasonal projects like this one.
If you’re gifting your bag, consider adding a small handmade tag with your name or a short Halloween message. It adds a personal and thoughtful touch to your crochet creation.
Your finished Fun Bag for Halloween – PATTERN can be used in many ways—carry candies, display as part of your home decor, or use it to hold small gifts during a Halloween party. Its versatility makes it a must-have seasonal item for every crafter.
Lastly, remember to store your Halloween bag properly when the season ends. Keep it in a dry place away from sunlight to prevent fading or damage, so it’s ready to use again next year.
Q: Is the Fun Bag for Halloween – PATTERN beginner-friendly?
A: Yes! This pattern is simple enough for beginners and can be easily adjusted in size and decoration depending on your skill level.
Q: What type of yarn works best for this pattern?
A: Medium-weight cotton or acrylic yarn works perfectly. Cotton gives a firmer texture, while acrylic is softer and more colorful.
Q: Can I make this pattern in different sizes?
A: Absolutely! Simply increase or decrease the number of stitches and rounds to make your bag smaller or larger.
Q: How can I make the bag more structured?
A: You can use tighter stitches, add a fabric lining, or insert a piece of interfacing at the base to help it stand upright.
Q: What decorations work best for Halloween bags?
A: Crochet appliqués like pumpkins, bats, and ghosts are perfect. You can also use felt shapes, buttons, or embroidery for extra flair.
Q: Can I wash my Halloween bag?
A: Yes, if made with washable yarns like cotton or acrylic. Hand wash gently in cool water and lay flat to dry.
The Fun Bag for Halloween – PATTERN is a delightful crochet project that combines festive spirit with practicality. You’ve learned how to choose the right materials, crochet the base and body, add fun decorations, and care for your finished creation.
This handmade bag is perfect for trick-or-treating, gifting, or simply decorating your home during the spooky season. If you decide to make it, we’d love to hear your honest feedback and suggestions—what colors or designs did you use? Share your ideas below and inspire others to create their own Halloween masterpiece!