Crochet Heart Pattern – Tutorial

Crocheted Hair Bow – Tutorial is a charming and versatile crochet project that allows makers to create delicate, stylish accessories using simple techniques. Crochet hair bows are loved for their quick construction, endless customization options, and ability to add a handmade touch to everyday looks. This project is perfect for crocheters who enjoy small, satisfying creations with big visual appeal.
One of the highlights of the Crocheted Hair Bow – Tutorial is how accessible it is. Even with basic crochet knowledge, you can create beautiful bows suitable for children, teens, and adults. These bows work well for casual wear, special occasions, and thoughtful handmade gifts.
In this article, you will find a complete, well-structured, and humanized guide to the Crocheted Hair Bow – Tutorial. The content walks you through understanding the pattern, choosing materials, creating the bow, and customizing it for different uses.
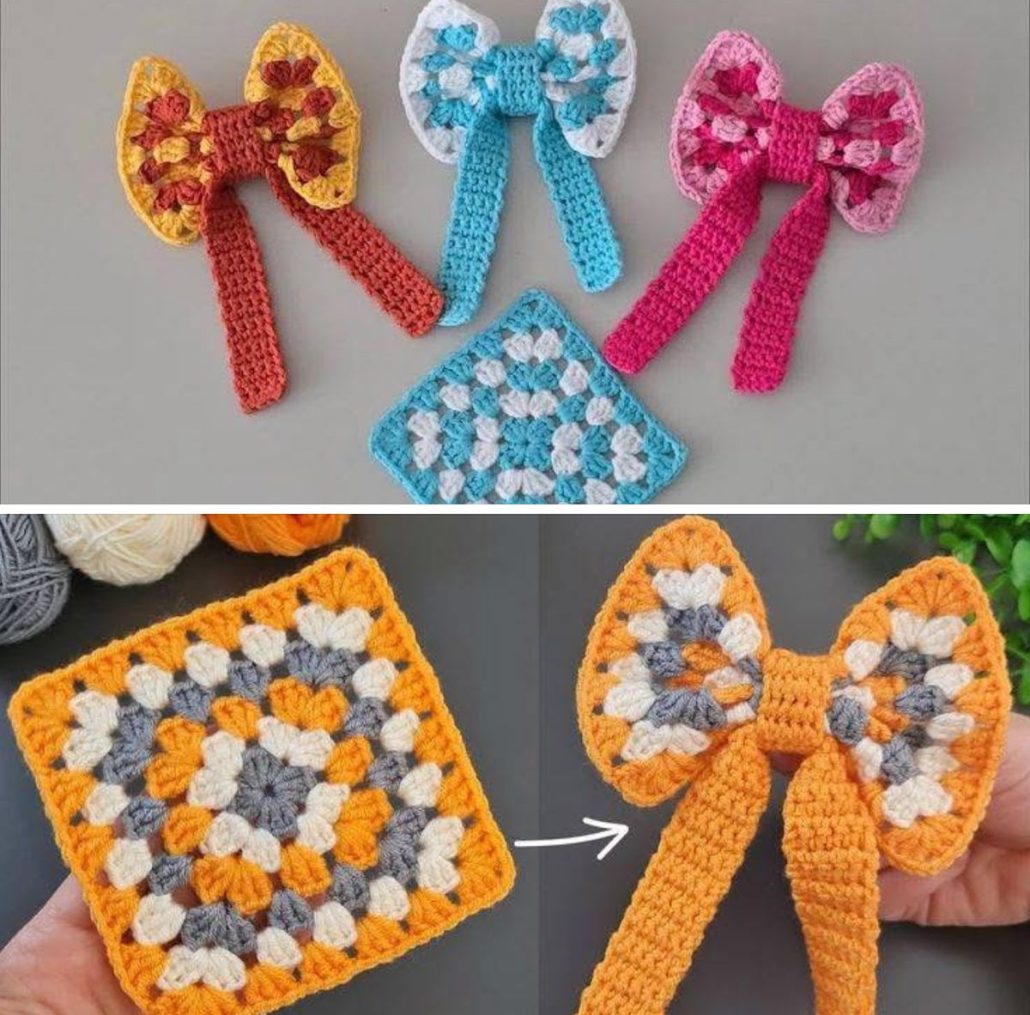
The Crocheted Hair Bow – Tutorial focuses on creating a fabric rectangle or shape that is later folded and secured to resemble a bow. This construction method keeps the project simple and efficient.
Most crochet hair bows are worked flat, making them easy to follow and quick to complete. The simplicity of the structure allows crocheters to focus on stitch consistency and neat finishing.
Despite their small size, crochet hair bows can showcase beautiful stitch patterns, textures, and color combinations.
The Crocheted Hair Bow – Tutorial is especially popular because it can be completed in a short amount of time, often in under an hour.
These bows are lightweight and comfortable to wear, making them suitable for all ages.
Overall, the Crocheted Hair Bow – Tutorial is an enjoyable way to create practical accessories while practicing basic crochet skills.
Choosing the right yarn is essential for the Crocheted Hair Bow – Tutorial. Lightweight or medium-weight yarns are commonly used to keep the bow soft and flexible.
Cotton yarn is a popular choice because it holds shape well and provides a clean, polished look. Acrylic yarns are also widely used due to their affordability and variety of colors.
Color selection plays a major role in the final appearance. Solid colors offer a classic look, while variegated yarns add playful character.
A crochet hook that matches the yarn weight helps maintain even stitches and a smooth texture.
Additional materials include scissors, a yarn needle, and hair accessories such as clips, elastics, or headbands.
Having all supplies ready before starting the Crocheted Hair Bow – Tutorial ensures a smooth crafting experience.
The Crocheted Hair Bow – Tutorial usually begins with creating a flat crochet piece using basic stitches such as single crochet or double crochet.
Once the base piece is complete, it is folded or pinched in the center to form the bow shape.
A small crochet strip or yarn wrap is then used to secure the center, giving the bow its classic look.
Careful stitching or wrapping ensures the bow holds its shape while remaining soft and flexible.
After shaping the bow, it is attached to a hair clip, elastic, or headband using a yarn needle or secure stitching.
The final step involves weaving in all loose ends neatly to create a polished and professional finish.
Customization is one of the most enjoyable parts of the Crocheted Hair Bow – Tutorial. You can easily adjust the size to create small bows for babies or larger bows for adults.
Adding decorative details such as buttons, beads, or embroidery can give each bow a unique style.
These crochet hair bows work beautifully for everyday wear, parties, school accessories, and handmade gifts.
They are also popular items for craft fairs and small handmade businesses due to their quick production time.
Caring for crochet hair bows is simple. Gentle hand washing helps maintain their shape and color.
Storing bows flat or clipped together prevents stretching and keeps them looking neat.
Is the Crocheted Hair Bow – Tutorial beginner-friendly?
Yes, it is ideal for beginners who know basic crochet stitches.
How long does it take to make one hair bow?
Most crochet hair bows can be completed in 30 to 60 minutes.
Can I use leftover yarn for this project?
Yes, this is a perfect project for using small yarn scraps.
What yarn works best for crochet hair bows?
Cotton and lightweight acrylic yarns work best for shape and durability.
Can these bows be used for babies?
Yes, when securely attached and made with soft yarn, they are suitable for babies.
How do I attach the bow to a hair clip or elastic?
The bow can be sewn directly onto the accessory using a yarn needle.
This Crocheted Hair Bow – Tutorial article explored the concept, materials, construction steps, and customization options for creating beautiful crochet hair bows. From understanding the simple structure to attaching the finished bow to hair accessories, you now have a clear overview of the entire process.
The Crocheted Hair Bow – Tutorial is a delightful project that combines creativity, practicality, and speed, making it perfect for gifts, personal use, or creative crafting sessions.
PATTERN VIDEO:
We invite you to leave your honest opinion and share your suggestions. Your feedback helps improve our tutorials and inspires future crochet accessory ideas.