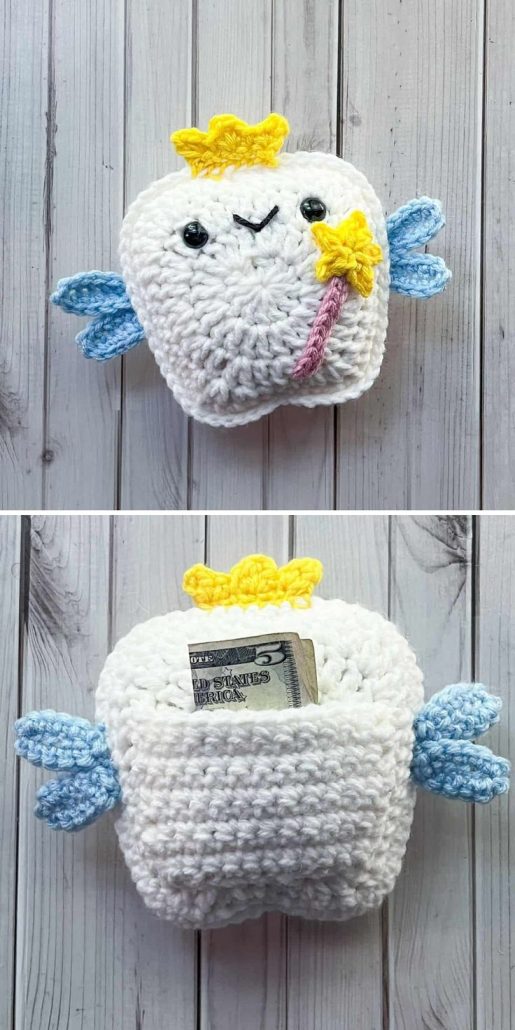
Crochet Tooth Fairy Pillow Pattern

The Crochet Tooth Fairy Pillow Pattern is a magical and meaningful project that transforms a simple crochet creation into a treasured childhood keepsake. Designed with a tiny pocket to safely hold a lost tooth, this charming pillow adds excitement and wonder to an important milestone.
Perfect for children, parents, and gift makers, the Crochet Tooth Fairy Pillow Pattern combines creativity with sentiment. It’s a small project that carries big emotional value — often becoming a memory that families cherish for years.
In this complete guide, you’ll learn how to choose the right materials, shape the pillow, add a secure tooth pocket, and personalize your design for a truly special result.
When creating a Crochet Tooth Fairy Pillow Pattern, comfort and durability are equally important. Since this pillow will be handled frequently by little hands, selecting the right yarn makes a big difference.
Soft acrylic yarn is a popular choice because it’s gentle on the skin and easy to wash. Cotton yarn provides excellent stitch definition and durability. For extra softness, you can choose a plush or velvet-style yarn, but remember to use tight stitches to maintain structure.
You will typically need:
Medium-weight yarn
Crochet hook appropriate for your yarn
Fiberfill stuffing
Yarn needle
Scissors
Stitch markers
Optional: embroidery thread for facial features
Choosing light colors like white, cream, or pastel shades enhances the traditional tooth shape. However, playful color options such as pink, blue, or lavender can make the pillow even more exciting for children.
The heart of the Crochet Tooth Fairy Pillow Pattern is, of course, the tooth shape itself.
Most designs begin with two identical tooth-shaped panels. These are crocheted flat in rows, carefully increasing and decreasing stitches to form rounded top edges and small “roots” at the bottom.
Maintaining even tension ensures both panels match perfectly in size and shape. After completing both sides, place them together with the right sides facing outward and seam around the edges, leaving a small opening for stuffing.
Fill the pillow with fiberfill until it feels soft but firm enough to maintain its shape. Avoid overstuffing, as this can distort the design.
Once stuffed, close the opening neatly with a yarn needle.
The small pocket is what makes the Crochet Tooth Fairy Pillow Pattern truly functional.
To create the pocket:
Crochet a small rectangular or curved piece.
Position it on the front panel before final assembly.
Secure the sides and bottom tightly, leaving the top open.
The pocket should be snug enough to hold a tooth safely without risk of it slipping out.
You can add decorative details to the pocket such as:
A scalloped edge
A tiny button (securely attached)
Embroidered stars
A contrasting border
For safety, avoid loose embellishments if the pillow is intended for younger children.
One of the most delightful aspects of the Crochet Tooth Fairy Pillow Pattern is personalization.
Many crafters add a friendly face to the tooth. Simple embroidered eyes and a smiling mouth instantly bring the pillow to life. You can also stitch rosy cheeks using pink yarn or embroidery floss.
Other creative ideas include:
Adding small wings to represent the tooth fairy
Crocheting a tiny crown
Attaching a loop for hanging on a doorknob
Embroidering the child’s name on the back
These thoughtful details make the pillow feel extra special and unique.
You can also adjust the size depending on preference. Smaller pillows are perfect for tucking under a pillow at night, while slightly larger versions can double as decorative room accents.
The versatility of the Crochet Tooth Fairy Pillow Pattern allows you to match it to different themes.
Create themed versions such as:
Princess-inspired tooth pillows
Superhero tooth pillows
Pastel nursery versions
Minimalist modern styles
Matching colors to a child’s bedroom décor makes the pillow even more meaningful.
You can also create these as thoughtful handmade gifts for baby showers or birthday celebrations.
Most crochet tooth fairy pillows made with acrylic or cotton yarn are machine washable on a gentle cycle. However, hand washing and air drying help preserve shape and decorative details.
If your pillow includes delicate embellishments, wash carefully and reshape while damp.
Is the Crochet Tooth Fairy Pillow Pattern beginner-friendly
Yes. Confident beginners who know basic stitches and simple shaping can complete this project successfully.
How long does it take to make
Most tooth fairy pillows can be finished in a few hours.
What size should the pillow be
Common sizes range from 5 to 8 inches tall, but you can adjust according to preference.
Is it safe for small children
Yes, as long as all pieces are securely stitched and no loose embellishments are used.
Can I sell finished tooth fairy pillows
If using a purchased pattern, review the designer’s usage terms before selling finished items.
The Crochet Tooth Fairy Pillow Pattern is a heartwarming project that turns a childhood milestone into a magical tradition. With soft yarn, careful shaping, and personalized details, you can create a keepsake that families will treasure for years.
Whether you’re making it for your own child, a grandchild, or as a thoughtful handmade gift, this project combines creativity with meaningful memories.
Have you ever made a tooth fairy pillow? Share your favorite design ideas and color combinations — your inspiration might help someone create their own magical keepsake.