Easy Crocheted Dog Sweater

A Kitty bag is a charming and trendy accessory that has taken the fashion world by storm. It’s a cute, cat-themed bag that adds a playful touch to any outfit. If you’re looking to learn how to make your own Kitty bag, you’re in the right place! In this tutorial, we will guide you through the steps of creating a personalized Kitty bag that reflects your style. Whether you’re a beginner or an experienced crafter, this tutorial will walk you through the process with ease.
A Kitty bag isn’t just for fashion lovers; it’s also a fun DIY project that you can share with friends or give as a unique gift. By following our step-by-step instructions, you’ll be able to create a bag that’s not only functional but also adds a delightful and whimsical element to your wardrobe. So, gather your materials, roll up your sleeves, and let’s start creating your very own Kitty bag!
Before diving into the tutorial, let’s go over a few basic concepts. First, we’ll discuss what exactly a Kitty bag is and why it’s become such a popular trend. After that, we’ll go over the materials you’ll need and the techniques to make your very own. By the end of this tutorial, you’ll have the knowledge to create a Kitty bag that’s perfect for any occasion.
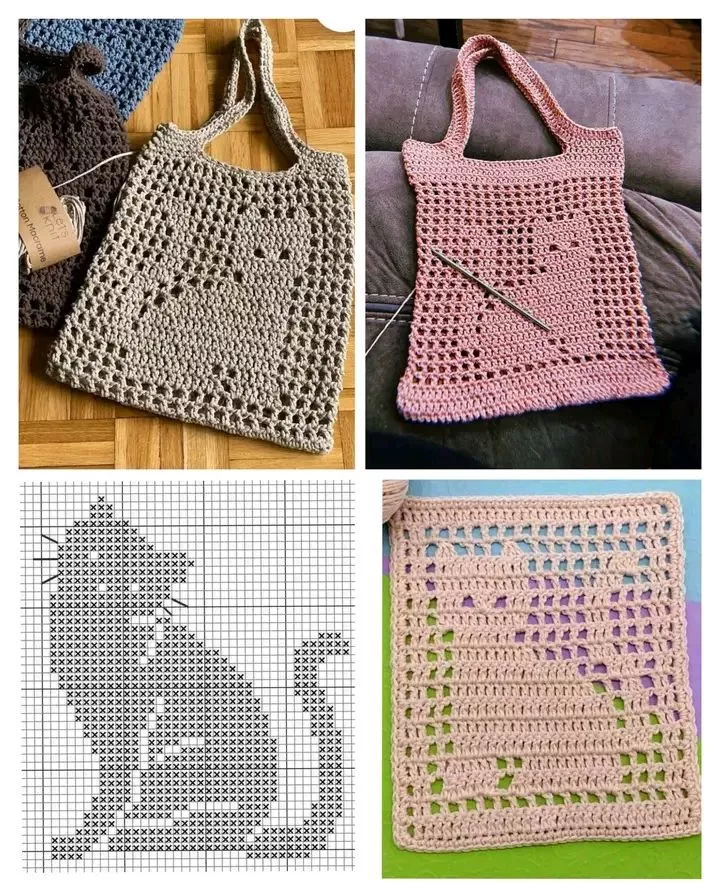
Image From Pinterest
A Kitty bag is a small purse or handbag designed to resemble a cat’s face or features. It often incorporates elements like ears, whiskers, and a cute face, making it a playful and unique fashion accessory. These bags can come in various styles, from minimalist designs with just cat ears to more elaborate creations with detailed embroidery or prints. The versatility of the Kitty bag means it can be made from different materials, including fabric, leather, or even eco-friendly options like cork or felt.
DISCOVER MORE FREE PATTERNS HERE!
The popularity of the Kitty bag has soared due to the rise of playful, animal-inspired accessories in the fashion world. Many people love the whimsy and charm that these bags bring to their outfits. Not only are they fun to wear, but they also make great conversation starters. Whether you’re heading to a casual outing or looking to add a quirky touch to a formal ensemble, the Kitty bag is the perfect addition.
In recent years, the Kitty bag has become a must-have item for animal lovers and fashion enthusiasts alike. Its unique design allows you to showcase your personality while also staying on top of the latest trends. By creating your own Kitty bag, you can personalize it to suit your style and preferences, making it a one-of-a-kind accessory that stands out from the crowd.
Creating your own Kitty bag requires a few basic materials. These materials are easy to find and can be customized based on your personal preferences. Here’s a list of the essential items you’ll need:
These materials are affordable and can be found at most craft stores. You can also use upcycled items like old clothing or fabric scraps to give your Kitty bag a unique and eco-friendly twist.
Now that you have all your materials, it’s time to start creating your Kitty bag. Follow these easy steps to craft a bag that’s both functional and cute:
By following these steps, you’ll have your very own Kitty bag that’s both functional and adorable. The best part is that you can customize the design to fit your personal style and make your bag truly one-of-a-kind.
While the basic steps of creating a Kitty bag are straightforward, there are several ways you can personalize your design to make it even more special. Here are a few tips to help you add a unique touch to your Kitty bag:
Personalizing your Kitty bag is the key to making it uniquely yours. By incorporating your favorite colors, fabrics, and embellishments, you can create a bag that perfectly fits your style and personality.
1. How long will it take to make a Kitty bag?
Depending on your sewing skills and the complexity of your design, creating a Kitty bag can take anywhere from 1 to 3 hours.
2. Can I make a Kitty bag without sewing?
Yes, you can make a no-sew Kitty bag by using fabric glue instead of a needle and thread. This method is ideal for beginners or those who prefer not to sew.
3. What is the best fabric for making a Kitty bag?
Felt is one of the best fabrics for making a Kitty bag due to its softness and ease of handling. However, you can also use cotton, leather, or any other fabric that suits your style.
4. Can I make a Kitty bag for a child?
Absolutely! A Kitty bag can be made in smaller sizes for children. Be sure to adjust the size and materials for safety and comfort.
5. Where can I get a Kitty bag template?
You can find free templates for Kitty bags online. Websites that specialize in sewing patterns often offer downloadable templates.
6. Can I use a Kitty bag for everyday use?
Yes, a Kitty bag can be used for everyday wear. Just make sure it’s the right size and that you choose durable fabrics for long-term use.
In this tutorial, we have walked through the steps to create a cute and functional Kitty bag. We covered everything from the materials needed to the detailed instructions for crafting your own bag. By following these simple steps, you can create a personalized accessory that reflects your style and adds a playful touch to your wardrobe.
We’d love to hear your thoughts on this tutorial! Please feel free to leave a sincere opinion or any suggestions for other DIY projects. Your feedback is always appreciated!