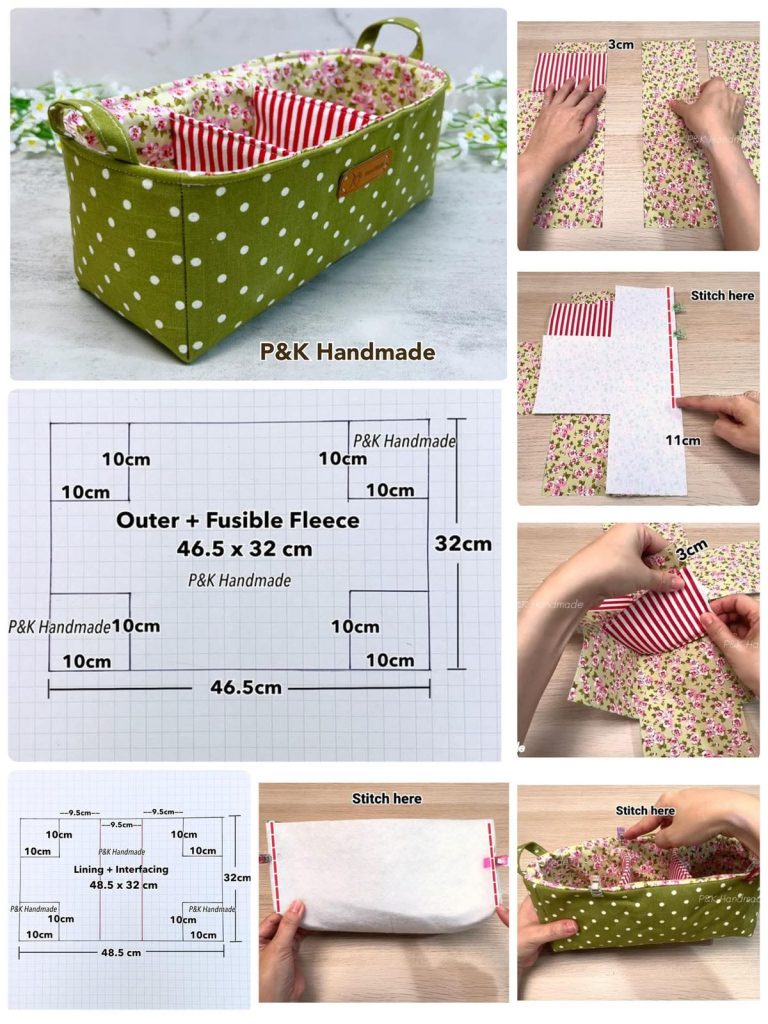
Fabric Basket – TUTORIAL


Unisex Neck Warmer – TUTORIAL is a practical and stylish quilting project designed to provide warmth, comfort, and versatility for all genders and ages. This type of neck warmer is perfect for cooler seasons, offering protection against wind and cold while remaining lightweight and easy to wear. As a quilt-based accessory, it combines functionality with creative fabric choices, making it both useful and visually appealing.
The Unisex Neck Warmer – TUTORIAL is especially popular among quilters who enjoy making quick projects that have real everyday value. Unlike large quilts that take weeks to complete, a neck warmer can be finished in a short amount of time, making it ideal for beginners or for experienced quilters looking for a satisfying weekend project. It also makes a thoughtful handmade gift.
Another key advantage of the Unisex Neck Warmer – TUTORIAL is its adaptability. With the right choice of fabrics, batting, and closures, the same design can be styled to look modern, classic, sporty, or elegant. This flexibility allows quilters to customize each piece to suit personal tastes or specific recipients.
The Unisex Neck Warmer – TUTORIAL focuses on creating a fabric tube or contoured piece designed to sit comfortably around the neck.
It is typically made with quilting cotton on the exterior and a soft lining for added comfort.
Batting or fleece is added between layers to provide insulation and warmth.
The unisex design avoids overly decorative elements, making it suitable for anyone.
This project balances simplicity and usefulness, which is why it is popular in the quilting community.
Overall, it is a functional accessory that showcases quilting skills on a smaller scale.
Selecting the right materials is essential for a successful Unisex Neck Warmer – TUTORIAL.
Quilting cotton is commonly used for the outer layer due to its durability and wide variety of prints.
For the lining, flannel or fleece is often chosen to provide softness and warmth.
Lightweight batting adds insulation without making the neck warmer bulky.
Closures such as snaps, buttons, or Velcro help ensure a secure and adjustable fit.
Neutral colors, plaids, solids, or subtle patterns are ideal for maintaining a unisex appearance.
The Unisex Neck Warmer – TUTORIAL begins with cutting fabric pieces according to the desired size and shape.
Layers are stacked in the correct order: outer fabric, batting, and lining.
Quilting lines can be added for both decorative appeal and structural stability.
After quilting, edges are trimmed and prepared for assembly.
The piece is then sewn together, leaving an opening for turning if necessary.
Finally, closures are attached, and the neck warmer is pressed for a polished finish.
The Unisex Neck Warmer – TUTORIAL is ideal for everyday wear during fall and winter.
It pairs well with jackets, coats, and hoodies without adding bulk.
This accessory is suitable for outdoor activities such as walking, commuting, or light sports.
Caring for a quilted neck warmer is simple and convenient.
Machine washing on a gentle cycle is usually safe, depending on fabric choices.
Air drying helps preserve the shape and longevity of the piece.
Is this tutorial suitable for beginners?
Yes, it uses basic quilting and sewing techniques.
How long does it take to complete?
Most neck warmers can be finished in a few hours.
Can I resize the pattern?
Yes, adjusting length and width is easy and customizable.
What batting works best?
Lightweight batting or fleece is recommended.
Is this project gift-friendly?
Absolutely, it makes a practical and thoughtful handmade gift.
Can I make it reversible?
Yes, using two coordinating fabrics creates a reversible design.
The Unisex Neck Warmer – TUTORIAL is a versatile and rewarding quilting project that combines comfort, style, and practicality. In this article, we covered what a neck warmer is, how to choose materials, the construction process, and tips for use and care.
This tutorial is perfect for quilters who want to create a functional accessory while showcasing their skills. If you found this guide helpful, please leave your honest opinion and share any suggestions you may have. Your feedback is greatly appreciated and helps improve future quilting tutorials.
