Trapper Hat - TUTORIAL

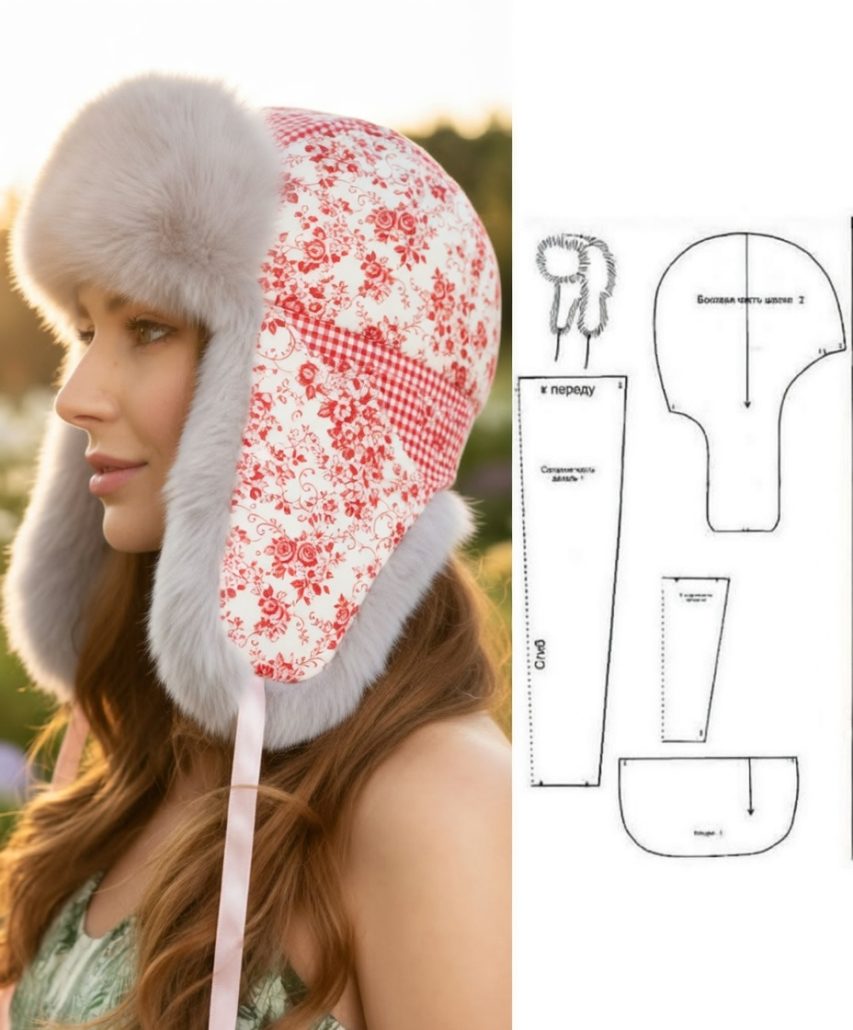
The Trapper Hat – TUTORIAL is a practical and stylish quilting project designed to provide warmth and comfort during colder seasons. Inspired by classic winter headwear, this hat features ear flaps and a structured shape, making it both functional and fashionable.
With the Trapper Hat – TUTORIAL, you can explore quilting techniques, fabric layering, and precise sewing methods. This project is perfect for those who want to create a cozy accessory that combines durability with a handmade touch.
In this complete guide, you will learn how to create your own Trapper Hat – TUTORIAL step by step. Whether you are a beginner or an experienced sewer, this tutorial will help you achieve a well-fitted and professional-looking hat.
To begin your Trapper Hat – TUTORIAL, selecting the right fabric is essential. Quilting cotton, fleece, or faux fur can be used to provide warmth and comfort.
You can mix textures by combining a soft inner lining with a more structured outer fabric.
Basic tools include scissors, pins, a sewing machine, rotary cutter, quilting ruler, and measuring tape.
You will also need batting or interfacing to give the hat structure and insulation.
Thread should match your fabric or contrast for decorative stitching.
Before starting, measure the head circumference to ensure a proper fit for your Trapper Hat – TUTORIAL.
The Trapper Hat – TUTORIAL begins with cutting pattern pieces, including the crown, side panels, ear flaps, and lining.
Carefully cut each piece to ensure symmetry and accuracy.
Sew the crown and side panels together to form the main body of the hat.
Attach the ear flaps, making sure they are evenly positioned on both sides.
Add the lining and sew it to the outer layer, leaving a small opening for turning.
Turn the hat right side out and close the opening to complete the structure of your Trapper Hat – TUTORIAL.
One of the most enjoyable aspects of the Trapper Hat – TUTORIAL is customization. You can experiment with different fabrics and colors to match your personal style.
Adding faux fur or plush lining can enhance warmth and comfort.
You can adjust the size to create hats for children or adults.
Incorporating quilting patterns on the outer fabric can add texture and visual interest.
You might also include ties or buttons to secure the ear flaps under the chin.
Creating matching winter accessories can complement your Trapper Hat – TUTORIAL.
Finishing your Trapper Hat – TUTORIAL properly ensures durability and a polished appearance. Trim all loose threads and press seams carefully.
Topstitching around the edges can add strength and a professional finish.
Ensure all seams are secure, especially around the ear flaps and crown.
This project is both functional and stylish, providing warmth in cold weather.
The Trapper Hat – TUTORIAL also makes a thoughtful handmade gift for friends and family.
Additionally, it helps improve sewing and quilting skills, especially in shaping and assembling wearable items.
Is this project suitable for beginners?
Yes, the Trapper Hat – TUTORIAL can be adapted for beginners with basic sewing skills.
What fabric is best for warmth?
Fleece or faux fur lining combined with cotton or canvas works well.
Do I need batting?
Batting or interfacing is recommended for structure and insulation.
Can I adjust the size?
Yes, you can modify the pattern to fit different head sizes.
How long does it take to complete?
It usually takes a few hours.
Can I customize the design?
Absolutely. Colors, fabrics, and details can all be adjusted.
The Trapper Hat – TUTORIAL is a rewarding quilting project that combines practicality, comfort, and style. In this guide, you’ve learned how to choose materials, assemble the hat, customize your design, and finish it with professional techniques.
With its classic design and versatility, this hat is perfect for staying warm while showcasing your creativity. Whether for personal use or as a gift, it’s a project that delivers both function and satisfaction.
Now it’s your turn to try the Trapper Hat – TUTORIAL. Share your honest feedback and leave your suggestions—your ideas can inspire even more creative quilting projects!