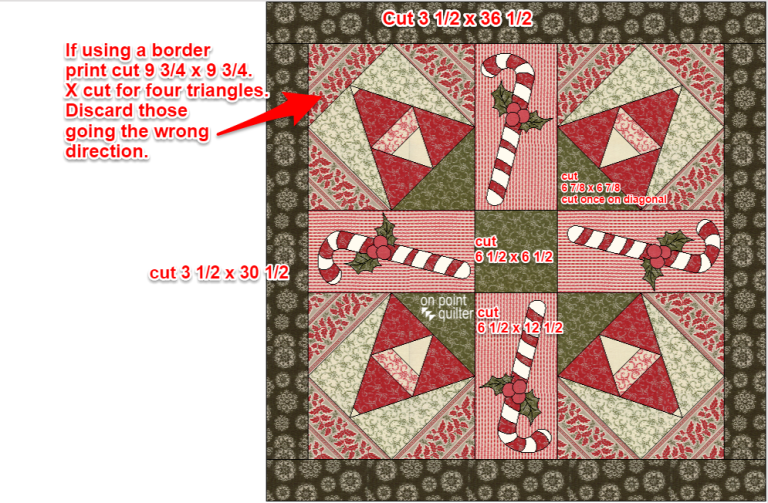
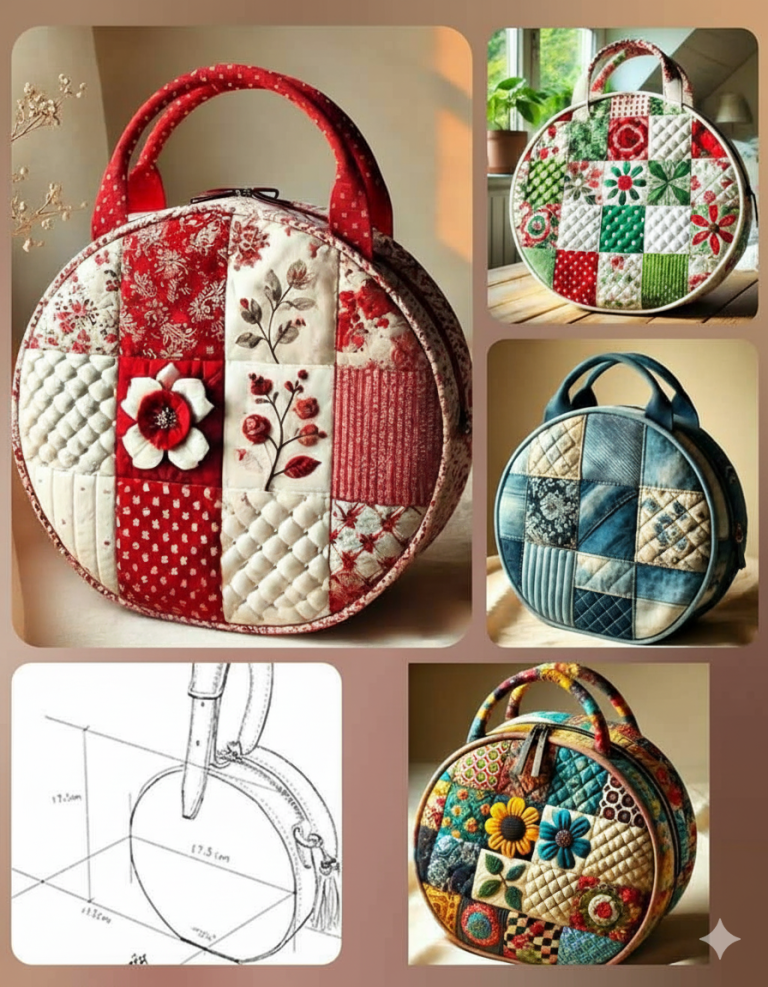
Candy Cane Christmas Quilt - PATTERN


If you love functional and stylish handmade projects, then this Totally Convenient Casserole Carrier – TUTORIAL will become your new favorite. A casserole carrier is one of those practical sewing projects that combine beauty and usefulness, making it ideal for picnics, family gatherings, or potluck dinners. With just a few materials and some easy-to-follow steps, you can create your own casserole carrier that is durable, attractive, and perfectly tailored to your needs.
The great thing about a casserole carrier is that it not only helps you transport your dishes safely but also keeps them warm for longer. By following this Totally Convenient Casserole Carrier – TUTORIAL, you’ll learn how to make a professional-looking item without needing advanced sewing skills. This is a project that beginners can try with confidence while still producing results they’ll be proud of.
In this article, we will walk through everything you need to know about the process, from materials and cutting fabric to assembling the carrier. The tutorial is written in a friendly way so that you can feel comfortable as you create something unique. Let’s dive into the details and discover how this Totally Convenient Casserole Carrier – TUTORIAL can make your kitchen life easier and more enjoyable.
To start this project, you will need a short list of materials that are easy to find. A sturdy cotton fabric or quilted fabric is recommended for durability and heat protection. Having the right supplies will make the process smoother and ensure your casserole carrier holds up for many uses.
In addition to the fabric, you will need basic sewing tools such as scissors, pins, a ruler, and a sewing machine. A walking foot attachment can also be helpful when working with thick layers. For added structure, you may want to include batting or thermal lining to help retain heat.
Handles are another important component. You can make them from the same fabric as the carrier or use durable webbing straps. These handles should be strong enough to carry the weight of a full casserole dish.
Velcro or button fasteners can be used to secure the carrier, keeping the dish stable during transport. Choose whichever option feels easiest for you to sew and use.
It’s also helpful to prepare an iron and ironing board for pressing fabric as you work. Pressing each step helps achieve a polished and professional finish.
Finally, make sure to select a dish or casserole pan to measure your carrier properly. Tailoring the project to the specific dish size ensures a snug and secure fit.
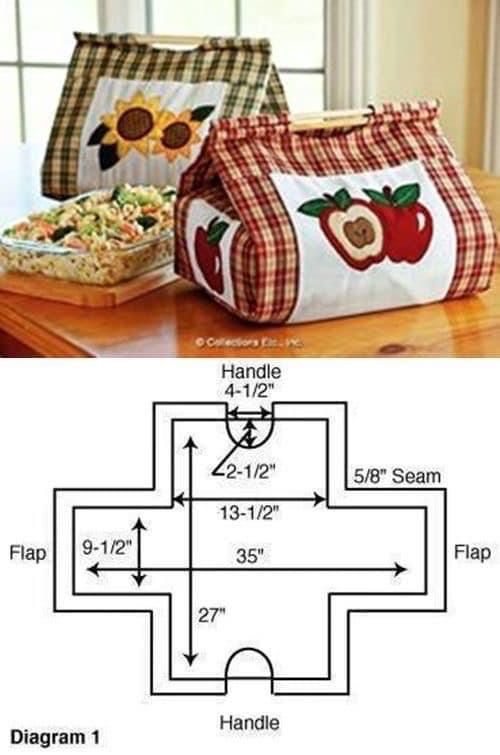
The cutting stage is crucial because it determines the accuracy of your project. Measure your casserole dish carefully, making note of its length, width, and depth. Use these measurements as a guide to cut your fabric pieces.
Typically, you will need two large fabric rectangles for the outer and inner layers. Cutting batting or thermal lining to match these rectangles will provide added insulation. Precise cutting ensures the carrier will hold its shape once assembled.
After cutting, press all fabric pieces with an iron to remove wrinkles. This step helps align layers neatly when sewing and gives your project a cleaner appearance.
You may also want to cut strips of fabric for binding the edges later. Binding adds durability and a decorative finish, preventing the fabric from fraying.
Mark your fabric pieces with chalk or a fabric marker to indicate seam allowances. This simple preparation step makes the sewing process more efficient.
Before moving to assembly, double-check your measurements against your casserole dish to make sure everything lines up properly. Adjustments at this stage are much easier than after sewing.
Begin by layering the outer fabric, batting, and inner fabric together. Pin the layers carefully to prevent shifting while sewing. This sandwiching method creates a sturdy and insulated carrier base.
Stitch around the edges of the layered fabrics, leaving a small opening to turn the piece right side out. After turning, press it flat and close the opening with a topstitch. This provides a neat, professional look.
Next, attach the handles. Measure and position them evenly on both sides of the carrier. Secure them firmly by sewing multiple rows of stitches where they meet the body of the carrier.
Once the handles are in place, you can add the fastening system. Velcro is simple and functional, while buttons can give your carrier a more decorative touch. Attach these closures securely so they can withstand regular use.
At this point, fold the fabric around your casserole dish to test the fit. This step allows you to adjust the placement of seams and closures before finishing.
Finally, topstitch around the edges of the carrier to reinforce durability. This also helps the carrier keep its shape and enhances its overall appearance.
Adding finishing details makes your casserole carrier truly unique. One option is to quilt the layers in simple straight lines or decorative patterns. Quilting adds texture, strength, and a handmade charm.
You can also personalize the carrier by using fabrics that match your kitchen décor or feature seasonal prints. This makes the item fun to use during holidays and special occasions.
If you enjoy embroidery, consider adding initials, a name, or a small motif to the carrier. Personalization not only makes it special but also a wonderful handmade gift idea.
Another great touch is to line the inside with waterproof fabric. This makes the carrier easier to clean and adds practicality, especially if spills occur during transport.
For portability, you could experiment with adjustable straps that allow for carrying in different ways. This turns a simple carrier into a versatile kitchen accessory.
With creativity, the Totally Convenient Casserole Carrier – TUTORIAL becomes more than just a project—it transforms into a reflection of your personal style.
What is the purpose of a casserole carrier?
A casserole carrier is designed to make transporting hot or cold dishes easier, safer, and more convenient. It helps retain temperature and provides a secure way to carry food.
Can beginners follow this tutorial?
Yes, this Totally Convenient Casserole Carrier – TUTORIAL is beginner-friendly. The steps are simple, and with basic sewing tools, anyone can achieve great results.
What fabric works best for a casserole carrier?
Sturdy cotton, quilted fabric, or fabric with thermal lining works best. They provide durability and insulation, making them perfect for this project.
How do I clean a casserole carrier?
Most fabric casserole carriers can be spot-cleaned or machine-washed on a gentle cycle. Always check the fabric type before washing to avoid damage.
Can I make a casserole carrier without batting?
Yes, but batting or insulation helps retain heat and adds structure. Without it, the carrier may feel less sturdy and less effective at keeping dishes warm.
Is this a good project for gifting?
Absolutely. A handmade casserole carrier is thoughtful, useful, and customizable, making it a perfect gift for friends, family, or housewarming parties.
The Totally Convenient Casserole Carrier – TUTORIAL offers a simple and practical way to create a useful kitchen accessory while enjoying the satisfaction of a handmade project. With just a few materials and some sewing time, you can make a carrier that is both functional and beautiful. Whether you keep it for yourself or give it as a gift, this project is a rewarding experience.
We hope this tutorial has inspired you to try sewing your own casserole carrier. Share your thoughts, experiences, or suggestions in the comments—we’d love to hear your honest opinion and see how your project turned out!