How to Cut and Sew a Bucket Hat

The Tiger Quilt Pattern – Tutorial is a striking and creative quilting project designed to help crafters bring the fierce beauty of a tiger into their home décor. With detailed instructions and a thoughtful design, this pattern is perfect for quilters who want to create a project that stands out and tells a story. A tiger quilt is not only a work of fabric art but also a conversation piece that can be cherished for years.
Creating a quilt with a bold animal motif may seem intimidating at first, but with the right guidance and materials, the Tiger Quilt Pattern – Tutorial makes the process achievable and enjoyable. From selecting the perfect color palette to assembling the quilt blocks, this tutorial covers everything step-by-step. The beauty of this project lies in its adaptability; whether you want a realistic tiger design or a stylized, colorful version, the pattern allows you to adjust to your own creative vision.
This project is ideal for quilters who are ready to challenge themselves while still working within a clear, structured plan. The Tiger Quilt Pattern – Tutorial walks you through essential quilting techniques such as precise cutting, piecing intricate shapes, and using shading to add dimension. By the end, you’ll have a stunning quilt that reflects your dedication and artistry.
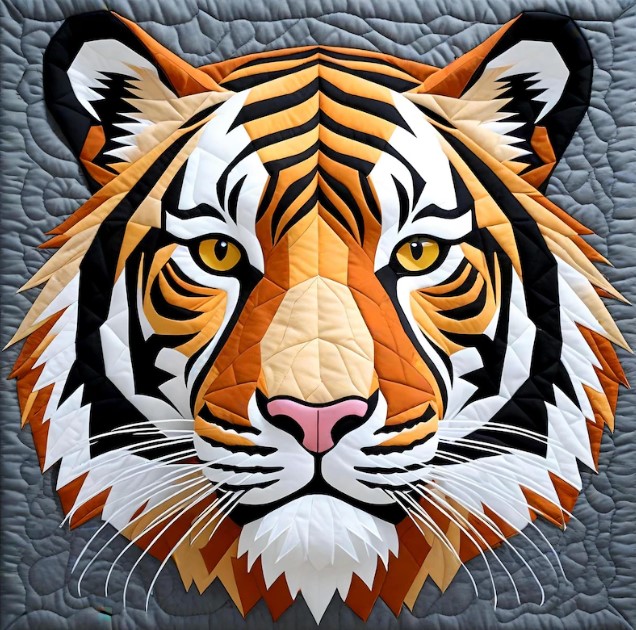
Selecting the right fabrics is crucial for bringing the tiger design to life. You’ll want a mix of warm oranges, deep blacks, and soft whites if you’re aiming for a realistic tiger look. The tutorial also provides suggestions for alternative color schemes, such as blues, purples, or abstract tones, if you prefer a more artistic approach.
Fabrics with subtle prints can add texture and depth to the quilt’s final appearance. For example, using a marbled orange fabric for the tiger’s fur can mimic the natural variation of hair, while a small-scale black print can make the stripes feel more dynamic. The Tiger Quilt Pattern – Tutorial offers guidance on how to combine these textures without overwhelming the design.
It’s also important to choose fabrics of similar weight and quality to ensure smooth piecing. The tutorial explains how to pre-wash and prepare your fabrics to avoid shrinkage or color bleeding, which can distort your quilt after washing. This preparation step may seem small but makes a big difference in the final result.
For beginners, solid colors are often easier to work with when following complex patterns. However, intermediate and advanced quilters might enjoy experimenting with a variety of tones within each color family to create a more lifelike and layered effect.
If you’re planning to hang the quilt as wall art, the background fabric choice becomes even more important. Neutral tones can help the tiger stand out, while bold backgrounds can make the design feel more modern and playful.
Lastly, consider your thread colors. Using matching thread for each section can create a clean, seamless look, while contrasting threads can add an extra layer of visual interest to your Tiger Quilt Pattern – Tutorial.
One of the most essential steps in the Tiger Quilt Pattern – Tutorial is cutting your pieces accurately. Precision here ensures that all your blocks align correctly and that the tiger’s image comes together as intended. The tutorial includes templates for each piece, which you can trace onto your chosen fabrics.
Sharp rotary cutters and a reliable cutting mat are your best tools for this job. A dull blade can fray edges, making it harder to sew precise seams later. The tutorial also gives tips on marking your fabrics without leaving permanent lines.
Labeling each cut piece before starting assembly is another helpful step. This prevents confusion, especially when working with multiple similar shapes and shades. The Tiger Quilt Pattern – Tutorial recommends small sticky notes or fabric-safe marking pens for organization.
Some quilters prefer to cut all pieces before sewing, while others like to cut as they go. The tutorial explains the benefits of both approaches, so you can choose whichever fits your style best.
Pay attention to the grainline of your fabric, as cutting against it can cause pieces to stretch during sewing. The tutorial clearly marks grainline directions on the templates.
Finally, set aside your cut pieces in labeled containers or bags. This makes it easier to keep your workspace tidy and prevents small pieces from getting lost in the process.
The magic of the Tiger Quilt Pattern – Tutorial comes alive during assembly. Here, the individual fabric pieces join to form the tiger’s detailed face and body. Precision in seam allowances is key to keeping the design aligned.
Start by sewing small sections together before moving on to larger blocks. This approach helps maintain accuracy and prevents distortion in the overall image. The tutorial breaks down the assembly into manageable steps so you never feel overwhelmed.
Pressing seams open or to one side at the right moments makes the quilt flatter and easier to quilt later. The tutorial includes pressing tips to keep your tiger design crisp and clean.
When working on the tiger’s facial details, small adjustments can make a big difference in expression. The tutorial suggests pinning pieces together before final stitching so you can check alignment and make changes as needed.
Using a design wall or large flat surface helps you visualize the progress and see how all the blocks fit together. This makes it easier to spot any mismatches early on.
Once the main design is complete, add any background blocks or borders as instructed in the Tiger Quilt Pattern – Tutorial. This frames your tiger and gives the quilt a finished, professional look.
With the quilt top assembled, it’s time to move on to quilting. The Tiger Quilt Pattern – Tutorial offers ideas for both machine and hand quilting, depending on your preference and skill level.
For a realistic tiger, quilting along the stripes can enhance the fur texture. You might also add contour quilting around the face to highlight features. The tutorial explains how to plan your quilting lines for maximum effect.
If you prefer a more artistic interpretation, free-motion quilting allows for creative swirls, patterns, and textures that complement the tiger without strictly following the design lines.
Batting choice is another factor in the quilt’s final look and feel. Thinner batting creates a flatter quilt ideal for wall hangings, while thicker batting adds warmth and dimension for bed quilts.
Binding the edges neatly is the last major step. The tutorial provides instructions for both machine and hand binding to give your quilt a polished finish.
Finally, label your quilt with the date, your name, and any special dedication. This personal touch turns your quilt into a keepsake that tells its own story.
FAQ
Q1: Is the Tiger Quilt Pattern suitable for beginners?
A: While the pattern is best suited for intermediate quilters, confident beginners who are comfortable with precise cutting and piecing can follow it with patience.
Q2: How long does it take to complete the Tiger Quilt?
A: Time varies based on your skill level and available sewing hours, but most quilters finish within 2–4 weeks.
Q3: Can I change the size of the quilt?
A: Yes, the tutorial includes instructions for resizing the pattern to make wall hangings, lap quilts, or full bed quilts.
Q4: Do I need special fabrics for this pattern?
A: No, but using fabrics with texture or subtle prints can enhance the tiger’s realistic look.
Q5: What is the best quilting method for this pattern?
A: Both machine quilting and hand quilting work well. Choose based on your comfort and desired finish.
Conclusion
The Tiger Quilt Pattern – Tutorial offers an exciting opportunity to create a truly unique and eye-catching quilt. From selecting fabrics to the final stitch, every step allows you to express creativity while building valuable quilting skills.
Whether you follow a realistic color scheme or an abstract design, the result will be a quilt that captures attention and admiration. If you try this pattern, share your honest thoughts and suggestions—your feedback helps keep the quilting community inspired and growing.