How to Cut and Sew a Bucket Hat

Sunflowers – PATTERN is a delightful quilt design that captures the warmth, beauty, and vibrancy of sunflowers in bloom. Quilters of all levels love sunflower motifs because they bring a sense of joy, brightness, and nature-inspired charm to any home. Whether you are creating a full quilt, a wall hanging, or smaller projects, the sunflower quilt pattern can add an uplifting touch that never goes out of style. This tutorial will guide you through the basics of working with sunflower designs, choosing fabrics, and sewing with precision, so you can create a quilt that feels both classic and timeless.
The Sunflowers – PATTERN is versatile enough to adapt to different quilting projects. You can use it for bed quilts, table runners, or even as decorative blocks. The bold petals of the sunflower allow quilters to play with color choices, experiment with prints, and bring out their creativity in every stitch. Sunflowers also symbolize happiness, loyalty, and warmth, making this pattern a heartfelt choice for gifting or seasonal décor.
In this article, we’ll break down everything you need to know to make your own sunflower quilt, from fabric selection and cutting techniques to piecing and quilting tips. Whether you’re a beginner or an experienced quilter, following this step-by-step process will help you achieve a polished and stunning quilt project. Let’s dive into the world of quilting with sunshine and petals.

When working on the Sunflowers – PATTERN, fabric selection is one of the most exciting parts. The right fabric can bring your sunflower petals to life and create a striking contrast against the background.
Bright yellows, golden tones, and even oranges work beautifully for the petals. You may choose solid fabrics for a bold look or go with prints that add depth and texture. Each choice will give your sunflower blocks a different personality.
For the centers of the sunflowers, rich browns, dark greens, or even black fabrics make excellent choices. These colors ground the design and create a realistic floral effect. Some quilters even use textured fabrics to mimic the seeds of real sunflowers.
Background fabrics also play a key role. A soft sky blue, crisp white, or even light gray can make the sunflower petals stand out dramatically. Depending on your style, you may want a neutral backdrop or a bold contrast that makes the quilt pop.
Always prewash and iron your fabrics before cutting. This step prevents shrinking and helps ensure accurate measurements when you start sewing. It also makes the fabrics easier to handle and more precise when piecing together your quilt.
Finally, consider mixing prints and solids for more visual interest. Quilts with varied textures and patterns often look more dynamic and engaging, especially when working with floral designs like sunflowers.
The success of the Sunflowers – PATTERN lies in careful preparation. Accurate cutting is essential to achieving neat sunflower petals and centers that align perfectly.
Begin by measuring and marking your fabric with a ruler and fabric pencil. Using a rotary cutter is the best option for achieving crisp, clean cuts that will help your quilt pieces fit together seamlessly.
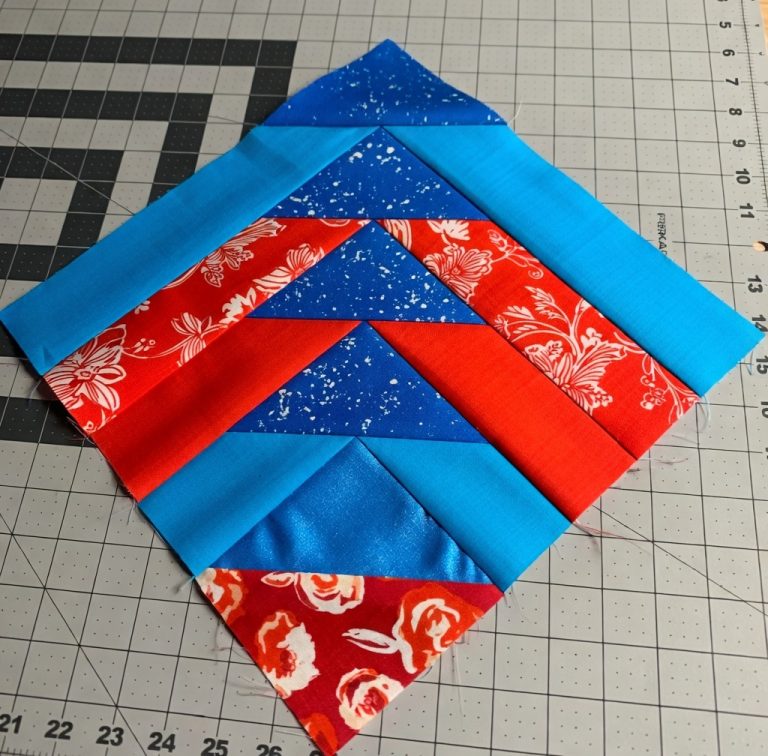
Most sunflower quilt blocks are made of triangles and wedges. These shapes allow you to create petals that radiate outward, forming the circular design that makes sunflowers so iconic. Make sure to cut consistently to avoid uneven edges.
Label each piece after cutting, especially if your sunflower block uses multiple shades of yellow or orange. Keeping pieces organized saves time and prevents mistakes during assembly.
Don’t forget to cut extra pieces of background fabric. These will help frame your sunflower blocks and give your quilt a balanced layout. A good background fabric ensures that each sunflower stands out beautifully.
Before sewing, lay out all your cut pieces on a flat surface or design wall. This helps you visualize how the finished block will look and gives you the chance to make adjustments before stitching everything together.
The heart of the Sunflowers – PATTERN is in the sewing process. This is where your quilt begins to take shape and the sunflower design comes alive.
Start by sewing the petal pieces into pairs, carefully aligning edges and pressing seams as you go. This helps maintain accuracy and prevents bulk in the finished block.
Next, join the petal pairs into larger units until you form a circular sunflower shape. Depending on the pattern variation, you might be working with anywhere from 8 to 16 petals per sunflower. Precision here is key to a smooth finish.
The center circle of the sunflower can be appliquéd or pieced in, depending on your preferred method. Many quilters choose appliqué because it offers more flexibility and a smoother round finish.
After completing the sunflower block, attach the background pieces to frame the flower. This step gives structure to the block and makes it easier to join with others later.
Press your seams carefully after each step. A well-pressed block not only looks cleaner but also makes final assembly easier and more professional-looking.
Repeat the process until you have the number of sunflower blocks you need for your quilt project. Each block will be slightly unique, which adds charm and individuality to your quilt.
Once the sunflower blocks are complete, it’s time to quilt and add finishing touches to your Sunflowers – PATTERN project.
Arrange the sunflower blocks on your design wall or floor to decide on the best layout. You can alternate blocks with plain fabric squares for a balanced look or place sunflowers edge to edge for a bold impact.
Sew the blocks together row by row, then join the rows to create the quilt top. Accuracy in this step ensures that your sunflower designs align perfectly and your quilt looks cohesive.
Layer the quilt top with batting and backing fabric, then baste the layers together. You can use safety pins, basting spray, or long stitches to hold everything in place.
When quilting, consider designs that enhance the sunflower motif. Outlining the petals with quilting stitches or adding swirling patterns around the sunflowers can bring depth and texture.
Finish the quilt with a binding that complements your fabric choices. A deep green or a contrasting yellow works beautifully to frame the quilt and give it a polished appearance.
Finally, add a quilt label with your name, date, and project details. This small touch gives your quilt a personal signature and preserves its story for the future.
What is the best fabric for sunflower petals?
Bright yellows, golds, and oranges are the most popular, but patterned fabrics with hints of texture also work beautifully.
Can beginners make the Sunflowers – PATTERN?
Yes, this pattern is beginner-friendly if you follow step-by-step instructions carefully and start with simple sunflower blocks.
How many sunflower blocks do I need for a quilt?
It depends on the quilt size. A lap quilt may require 9–12 blocks, while a bed quilt could need 20 or more.
Can I use appliqué instead of piecing for the petals?
Absolutely. Appliqué is a great option for those who prefer a simpler method or want more creative freedom in shaping petals.
What quilting designs complement sunflower quilts?
Petal outlines, swirling motifs, or crosshatch designs all enhance the sunflower pattern beautifully.
How do I prevent fabric from shrinking after quilting?
Prewashing fabrics before cutting is the best way to avoid shrinkage and ensure the quilt maintains its shape.
The Sunflowers – PATTERN is a joyful and inspiring quilt project that captures the beauty of nature in fabric form. From choosing bright fabrics and precise cutting to sewing sunflower blocks and quilting with creativity, each step brings you closer to a masterpiece full of warmth and charm.
This design is versatile, beginner-friendly, and perfect for adding sunshine to your quilting journey. If you enjoyed this tutorial, I’d love to hear your honest thoughts and suggestions. Share your opinions in the comments and let’s keep creating beautiful quilts together!