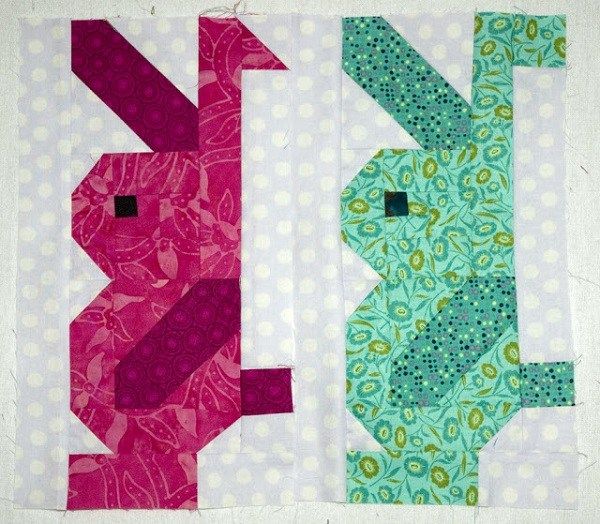
If you love both quilting and bunnies, then the Standing Bunny Rabbit Quilt Block is the perfect project for you! This charming quilt block adds a touch of whimsical charm and warmth to any quilt. Whether you’re preparing for a seasonal project or just adore these cute creatures, this pattern will have you creating an adorable quilt block in no time.
The Standing Bunny Rabbit Quilt Block combines classic quilting techniques with a playful design, making it suitable for quilters of all levels. It’s especially great for beginners looking to practice piecing and applique skills, while more experienced quilters can have fun experimenting with fabric choices and customization.
In this guide, we’ll walk you through how to create this delightful quilt block, offer tips for perfecting your stitching, and show you how to incorporate it into a larger quilt project.Let’s hop right into it and begin creating your own Standing Bunny Rabbit Quilt Block!
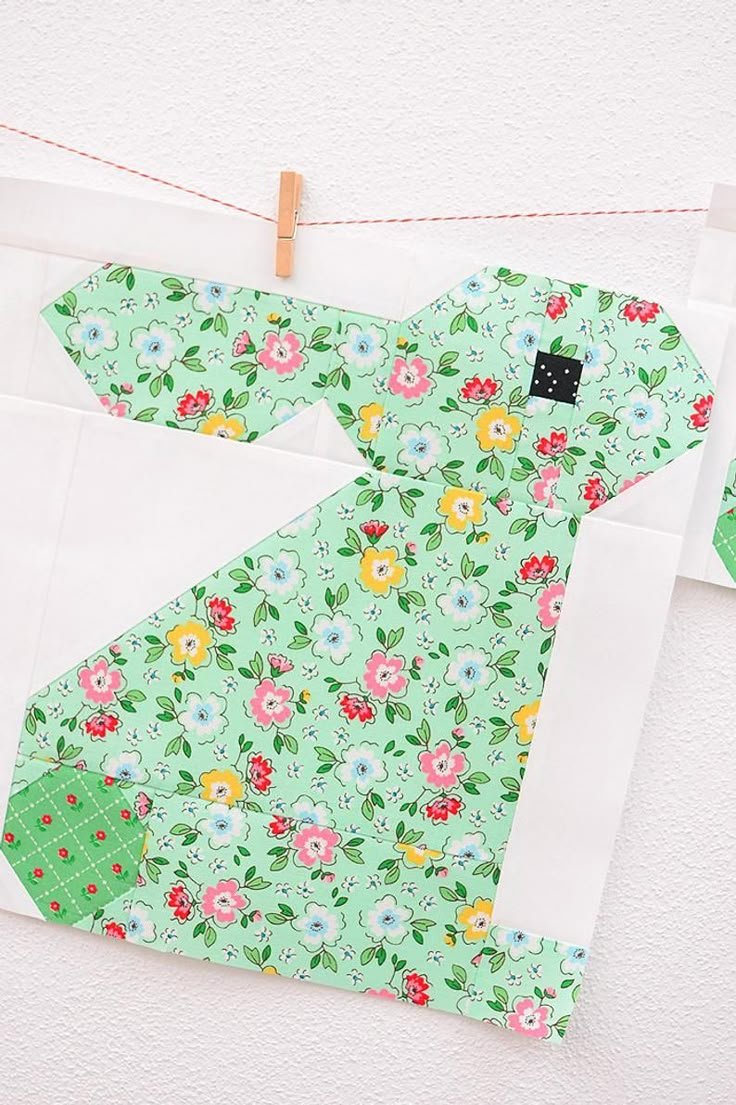
Image From Pinterest
1. Materials You’ll Need for the Standing Bunny Rabbit Quilt Block
Before you begin piecing your Standing Bunny Rabbit Quilt Block, it’s important to gather all the necessary materials. Here’s what you’ll need:
SEE OTHER FACE PATTERNS HERE!
- Fabric: Choose fabrics in neutral colors like gray, brown, or cream for the bunny, and vibrant prints for the background. You’ll need a variety of fabric colors to create the body, ears, paws, and tail of the bunny, as well as for the background and borders.
- Quilt Batting: For the quilt block itself, you can either use lightweight batting or skip the batting until you assemble the entire quilt. It’s not necessary for the block to be too thick, but batting will add structure.
- Rotary Cutter and Mat: A rotary cutter and mat will help you make precise cuts for the fabric pieces, ensuring accuracy in your quilting.
- Quilt Ruler: A clear quilting ruler is essential for measuring and cutting your fabric to the right sizes. This will ensure all your pieces fit perfectly.
- Thread: Select matching thread in neutral colors for piecing and appliqué. You can also use contrasting threads for decorative stitching around the bunny.
- Applique Paper or Fusible Web: If you plan to use appliqué for the bunny features, fusible web or appliqué paper will make your task easier. It allows you to securely attach the bunny’s shape to the background fabric.
- Needles: Use a size 70/10 needle for piecing and a size 90/14 needle if you plan to do heavy stitching or quilting with thicker fabrics.
- Scissors: A pair of sharp fabric scissors will come in handy for trimming small pieces and threads.
2. Step-by-Step Guide to Creating the Standing Bunny Rabbit Quilt Block
Now that you have your materials, let’s dive into the process of creating your Standing Bunny Rabbit Quilt Block. Follow these simple steps, and soon you’ll have a cute bunny ready to join your quilt!
2.1. Cutting Out Your Fabric Pieces
- Prepare the Bunny Shape: Using a quilting ruler, cut the main body of the bunny. This will typically be a simple oval or egg shape. The bunny’s legs can be separate, so cut out pieces for the lower body and paws. You’ll also need to cut two long pieces for the ears and a small circle or oval for the bunny’s tail.
- Cut the Background Fabric: Next, cut the fabric for the background of your block. A square or rectangular background works well for the bunny design. Make sure the background fabric is large enough to frame the bunny, leaving some room around the edges for seams.
- Prepare Other Features: For the bunny’s eyes, nose, and any small details, cut small fabric pieces or use fusible web to cut shapes. You can also add additional elements, such as a bow or a basket, depending on your design.
2.2. Assembling the Bunny
- Piecing the Bunny’s Body: Start by attaching the body and legs. If you’re piecing, use a ¼” seam allowance to join the body pieces and the legs together. Make sure the legs are positioned so the bunny looks like it is standing. Press the seams flat to make the block neat and crisp.
- Attaching the Bunny’s Tail: Using a small circle or oval of fabric, attach the bunny’s tail to the back or side of its body. You can either sew the tail directly onto the fabric or use fusible web to adhere it.
- Adding the Bunny’s Ears: Cut the two pieces for the bunny’s ears and stitch them to the top of the bunny’s head. You can make the ears stand up by folding and pressing them before attaching them to the body.
- Adding Details: Use small pieces of fabric or embroidery floss to add details like the eyes, nose, and mouth. You can create a small nose by cutting out a triangle shape or simply embroidering one onto the fabric. The eyes can be made from black fabric circles or with fabric paint.
2.3. Appliqué (Optional)
If you prefer, you can use appliqué to assemble the bunny. To do this:
- Fusible Web: Cut out the bunny shapes (ears, body, paws, tail) from your fabric and use fusible web to attach them to the background fabric.
- Press and Sew: Press each bunny piece in place using a hot iron to secure the fabric. Then, use a small zigzag stitch or blanket stitch to sew around the edges of each appliquéd shape. This will keep the bunny secure and add a nice finishing touch.
2.4. Completing the Quilt Block
- Sewing the Background: After attaching the bunny to the background fabric, it’s time to sew the two together. Trim any excess fabric if needed to make sure the block is the correct size (usually 12.5″ x 12.5″ for a standard quilt block).
- Add Borders (Optional): You can add a small border around the quilt block to frame the design. Use a complementary fabric to enhance the overall look.
- Press the Quilt Block: Once everything is sewn together, press the block carefully to eliminate any wrinkles and to make the seams crisp. This will make your block look neat and professional.
3. Customizing Your Standing Bunny Rabbit Quilt Block
The Standing Bunny Rabbit Quilt Block is versatile and can be easily customized to suit your preferences. Here are a few ideas for personalizing your bunny quilt block:
- Use Different Colors: While the bunny is traditionally made with neutral tones like gray or brown, feel free to experiment with different colors for a more whimsical look. You can make a pastel bunny, or use vibrant colors for a spring-themed quilt.
- Add Seasonal Accessories: To make the bunny more seasonal, add accessories such as a bow tie for Easter, a small flower for spring, or a scarf for winter. These small details can transform the design to match the time of year.
- Change the Background: The background fabric is a great place to experiment with different prints. You can use floral prints for a spring feel, or go for a solid color to make the bunny stand out more. You can also use a busy fabric for the background, but keep the bunny in neutral tones so it stands out.
- Include Other Animals: If you love animals, why not add more friends for the bunny? You could create a whole bunny family with different sizes and poses, or even add other farm animals, like chickens, to create a fun quilt block scene.
- Incorporate Embellishments: Add extra texture to your quilt block with lace, buttons, or ribbon to decorate the bunny’s outfit or to add detail to the background.
4. Creative Uses for Your Standing Bunny Rabbit Quilt Block
Once your Standing Bunny Rabbit Quilt Block is complete, you’ll want to find fun ways to incorporate it into larger projects. Here are some ideas for how to use your finished block:
- Quilt Projects: The most obvious use for the Standing Bunny Rabbit Quilt Block is to include it as part of a larger quilt. You could make a spring-themed quilt with multiple bunny blocks, or create a cute baby quilt using this design.
- Pillows: Make a pair of decorative pillows using this quilt block design. The adorable bunny is sure to brighten up any couch or bedroom.
- Wall Hanging: A single quilt block could be turned into a charming wall hanging. Add a cute border, and you’ve got a lovely decoration for any room, especially during springtime.
- Table Runner: Make a seasonal table runner by combining several bunny blocks in a row. This would be perfect for Easter or any other occasion where you want to bring a touch of whimsy to your table.
- Apron or Bag: Use your bunny quilt block to create a unique apron or tote bag. The bunny design will add a sweet touch to practical items like these.
FAQ
1. How do I make sure the bunny block fits with other quilt blocks?
To ensure uniformity, use a standard 12.5″ square size for each block. This size will fit easily with other quilt blocks and help create a cohesive design.
Join Now!!
🌟Join our exclusive Quilt broadcast list on Messenger! Receive the best patterns, tips, and updates directly in your inbox. Our team is ready to send you delightful content that will inspire your projects. Don’t miss this opportunity to stay updated and create amazing pieces. Join now and be part of this passionate quilt community!✨📩
2. Can I use machine quilting for the bunny block?
Yes! You can either hand quilt or machine quilt your block. For a machine quilted bunny block, use a quilting stitch to add texture and depth around the bunny design.
3. What type of fabric should I use for the bunny?
For the bunny itself, use cotton
fabric, which is soft and easy to work with. You can choose solid fabrics for a more classic look or patterned fabrics for added whimsy.
4. How can I make my bunny block more dimensional?
To add more texture, try using fabric paints or embroidery stitches to give the bunny’s features more depth. You can also layer fabrics to give the ears and tail a three-dimensional effect.
5. What’s the best way to quilt my finished bunny block?
Once your block is pieced and appliquéd, use a simple quilting stitch like a stitch-in-the-ditch or a meandering pattern to quilt it. This will keep the focus on the bunny while adding texture to the background.
PATTERN HERE
Conclusion
Creating a Standing Bunny Rabbit Quilt Block is a fun and rewarding project that will add a playful, whimsical touch to any quilt. Whether you’re using it for an Easter quilt, a baby quilt, or a decorative piece, this pattern offers plenty of room for creativity and customization.
We hope this guide has inspired you to try your hand at making this cute quilt block! Share your finished projects with us and let us know how you personalized your bunny quilt block. Happy quilting!