Bluebird Patchwork Tote Bag Tutorial

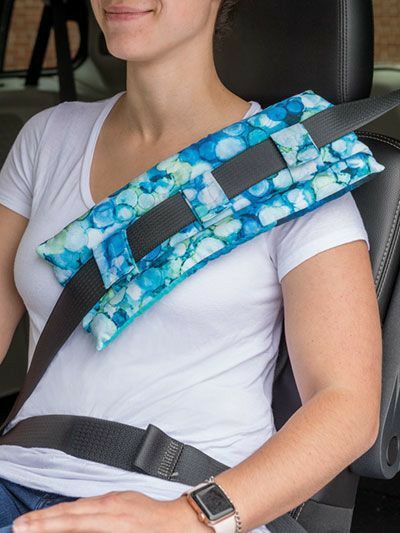
If you’ve ever found your seat belt digging into your shoulder or neck during a long drive, then this Seat Belt Cover – Tutorial is just what you need. Not only does it make your seat belt more comfortable, but it also adds a personal, creative touch to your car’s interior. Whether you’re an experienced quilter or a beginner looking for an easy and practical project, learning how to make a seat belt cover will be a fun and satisfying experience.
Creating your own seat belt cover is simple, affordable, and allows you to express your creativity through fabric choices and quilting techniques. You can match the design to your car’s colors, use leftover fabric scraps, or even make themed covers for different seasons or holidays. This project is a great way to bring both style and comfort to your everyday driving experience.
In this Seat Belt Cover – Tutorial, you’ll learn step-by-step how to sew your own padded cover, including tips on fabric selection, cutting, and quilting. It’s an ideal project for quilters who love functional crafts and quick finishes. You’ll also discover how easy it is to personalize your design with decorative stitches or embellishments, making each cover uniquely yours.
Get ready to transform your car’s look and comfort level with this enjoyable seat belt cover project. Let’s dive into this creative and useful quilt pattern tutorial and see how you can make driving just a bit cozier and more stylish.
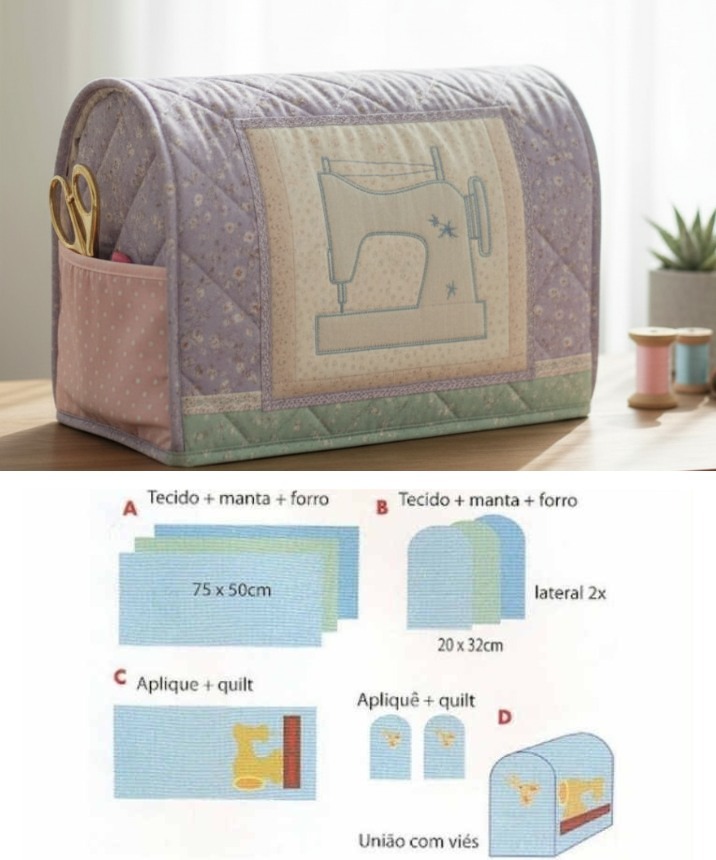
To start your Seat Belt Cover – Tutorial, gather all the necessary materials before beginning. Preparation ensures the process goes smoothly and helps you achieve the best result.
You’ll need two fabric pieces for the outer and inner layers, a piece of batting or fusible fleece for padding, hook-and-loop tape (Velcro) for the closure, and your basic sewing tools like scissors, thread, pins, and a sewing machine. Choose a soft yet durable fabric like cotton or flannel for comfort and easy maintenance.
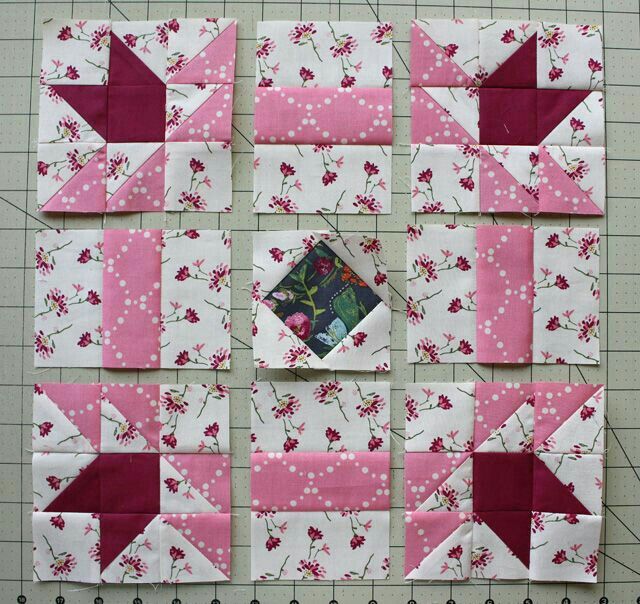
If you’re a quilting enthusiast, consider using a pre-quilted fabric or adding your own quilting stitches. This not only adds texture but also enhances durability. Using scraps from previous quilt projects is another great way to make this pattern eco-friendly and budget-conscious.
Before cutting, wash and press your fabric to prevent shrinkage later. Then, cut rectangles according to your seat belt’s width and desired cover length. A common size is about 6 inches wide by 12 inches long, but you can adjust this as needed.
Place the fabric pieces right sides together with the batting underneath, and sew around the edges, leaving a small opening to turn it right-side out. Once turned, topstitch the edges for a neat finish.
Now that you have your materials prepared, it’s time to put everything together in this Seat Belt Cover – Tutorial. Assembly is quick, and you’ll be surprised by how easily this little project comes to life.
Start by quilting the fabric layers together if you haven’t used pre-quilted fabric. Simple straight lines or diagonal stitches work beautifully for this type of project. The quilting not only adds aesthetic appeal but also helps the layers stay securely in place.
After quilting, position the Velcro strips on the short ends of your cover. One strip goes on the outer fabric, and the matching piece goes on the opposite side of the inner fabric. This allows the cover to wrap snugly around your seat belt and stay secure during use.
Stitch the Velcro firmly using a straight stitch and backstitch at both ends for reinforcement. Once the closure is in place, give your cover one last press to ensure crisp, clean edges.
This project is great for beginners because it uses basic sewing techniques, yet it produces a professional-looking finish. It’s also a thoughtful handmade gift idea for friends or family who spend a lot of time driving.
Remember to test-fit your cover before finalizing it. Adjust the Velcro placement if needed to ensure it sits comfortably on the seat belt.
One of the best parts of this Seat Belt Cover – Tutorial is the endless design possibilities. Since it’s such a small project, you can easily experiment with different fabrics, patterns, and techniques.
Try making themed covers for various occasions—like Christmas prints, floral spring designs, or even patchwork using your favorite quilting scraps. The small size makes it perfect for testing new color combinations or practicing quilting motifs.
If you love hand quilting, this is the perfect project to showcase your stitches. You can also embellish the cover with embroidery, appliqué, or fabric paint to make it more personal.
Consider adding a label or a small tag with your initials for a professional touch. If you’re gifting it, a personalized monogram will make it extra special.
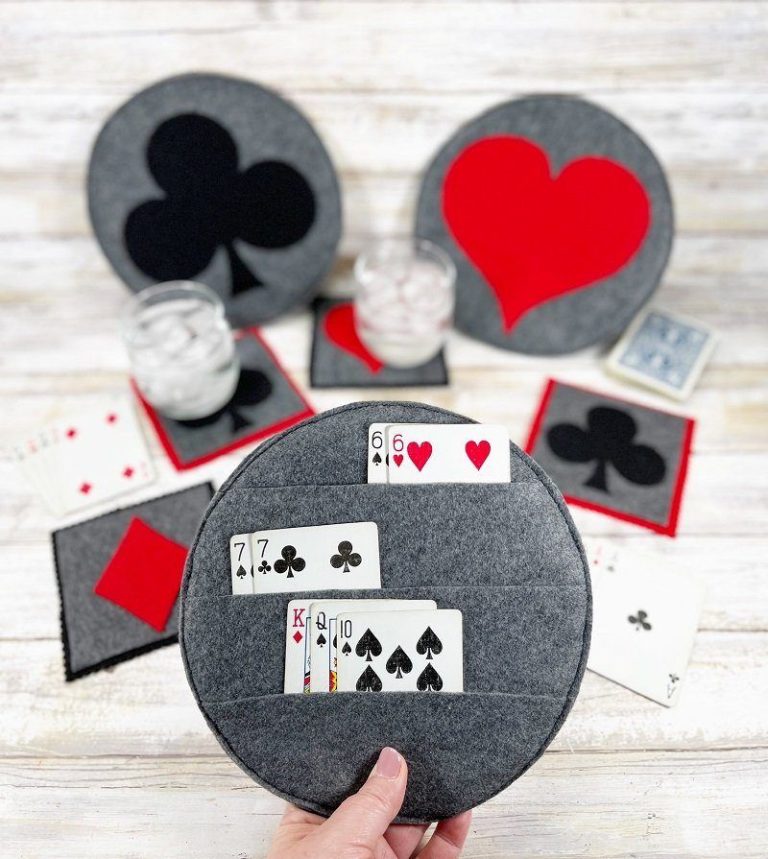
Another idea is to create matching car accessories—like a tissue holder or a key fob—to coordinate with your seat belt cover. These little details make your car space more inviting and reflect your personal style.
Experiment freely and let your creativity shine. Each cover can tell its own story through fabric and design.
Once your Seat Belt Cover – Tutorial project is finished, it’s important to know how to care for it properly to ensure it lasts. The good news is that these covers are easy to maintain and can be cleaned just like any small fabric accessory.
If your cover is machine washable, use a gentle cycle and mild detergent. Avoid harsh chemicals or high heat, which can weaken the fabric and Velcro over time. For covers made with delicate embellishments, hand washing is the safer option.
When drying, air dry flat or tumble dry on low heat to maintain the cover’s shape and softness. Press lightly if needed to restore crisp seams and a smooth surface.
It’s also smart to make a few covers and rotate them, especially if you drive often. This helps them wear evenly and keeps your car looking fresh.
If you notice any frayed seams or loose stitches, repair them promptly with a few quick stitches. Regular care will extend your cover’s lifespan significantly.
Lastly, don’t forget to share your finished work online or with your local quilting group—these projects always inspire others to start sewing!
Q1: What fabric works best for a seat belt cover?
A: Cotton and flannel are excellent choices since they’re soft, durable, and easy to wash.
Q2: Can I make this without a sewing machine?
A: Yes, you can hand-sew it, though it will take longer. Use small, tight stitches for strength.
Q3: How do I keep the cover from slipping?
A: Make sure your Velcro is securely attached and wraps snugly around the belt. You can also add non-slip fabric inside.
Q4: Is this project suitable for beginners?
A: Absolutely! It’s one of the easiest quilting projects for beginners and a great confidence booster.
Q5: Can I add decorative quilting stitches?
A: Yes! Quilting stitches add both design and durability to your seat belt cover.
Q6: Can I sell these covers?
A: Of course! Handmade seat belt covers make wonderful gifts and can be sold at craft fairs or online shops.
The Seat Belt Cover – Tutorial is a simple yet rewarding project that blends comfort, creativity, and practicality. With just a few materials and basic sewing skills, you can craft a beautiful, custom-made cover that elevates your car’s interior while protecting your neck and shoulder. From material selection to design ideas, this guide covered everything you need to get started.
Now it’s your turn to try it out! Share your thoughts in the comments below—did you enjoy making this seat belt cover? We’d love to hear your experience, see your creations, and get your suggestions for future tutorials.