Bunny Backpack - Tutorial

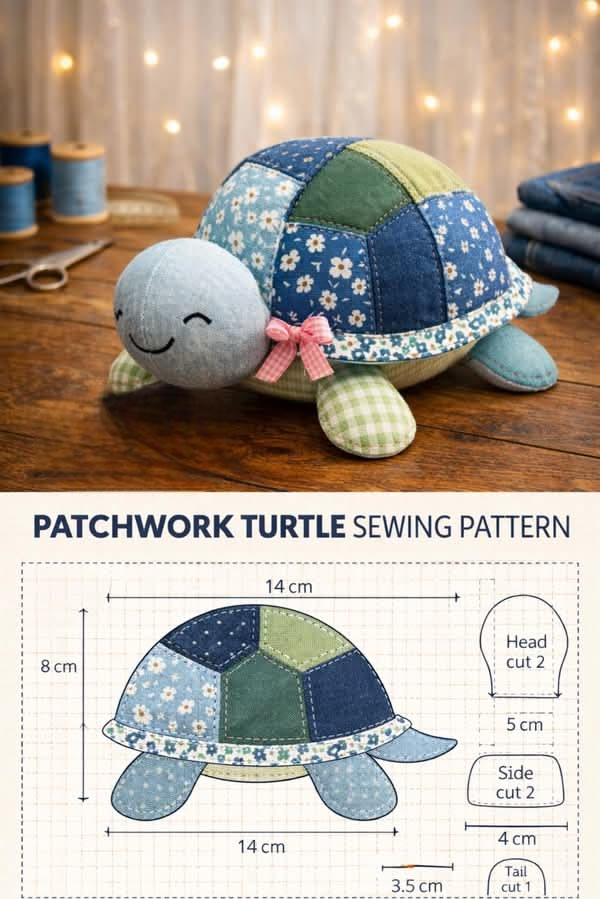
Sea Turtle Doorstop – PATTERN is a creative and functional quilting project that allows you to craft a charming sea turtle while serving a practical purpose in your home. By following the Sea Turtle Doorstop – PATTERN, you can create a weighted decorative piece that keeps doors in place while adding a coastal and handmade touch to your décor.
One of the most delightful aspects of the Sea Turtle Doorstop – PATTERN is its combination of utility and design. The turtle shape brings a relaxing ocean-inspired vibe, while the sturdy construction ensures it performs its function effectively. This project is perfect for quilters who enjoy making items that are both beautiful and useful.
In this complete Sea Turtle Doorstop – PATTERN, you will learn how to select materials, prepare and cut fabric pieces, assemble the turtle shape, and finish it with proper weight and detailing. This guide is suitable for beginners and experienced quilters who want to explore creative and practical sewing projects.
The first step in the Sea Turtle Doorstop – PATTERN is gathering all the necessary materials to ensure a smooth sewing process.
Cotton fabric is highly recommended because it is durable and easy to sew.
Choose green, blue, or neutral tones to reflect the sea turtle theme.
You can use patterned fabric for the shell to create a patchwork effect.
Basic tools such as scissors, pins, a sewing machine, and a measuring tape are essential.
A heavy filling material such as rice, sand (sealed in a pouch), or weighted pellets is needed for the doorstop function.
An iron is important for pressing seams and maintaining accuracy.
Preparation is a key part of the Sea Turtle Doorstop – PATTERN, ensuring all components are ready for assembly.
Start by creating or printing a template for the turtle body, shell, head, legs, and tail.
Trace the template onto your fabric and cut each piece carefully.
In the Sea Turtle Doorstop – PATTERN, accurate cutting ensures the pieces fit together properly.
If you are making a patchwork shell, sew smaller pieces together before cutting the final shell shape.
Press all fabric pieces to remove wrinkles and prepare them for sewing.
Organize your pieces to make the assembly process smoother.
The next stage in the Sea Turtle Doorstop – PATTERN is assembling the turtle structure.
Begin by sewing the shell pieces together if using a patchwork design.
Attach the head, legs, and tail to the main body piece.
In the Sea Turtle Doorstop – PATTERN, careful alignment ensures a balanced and symmetrical result.
Sew the top and bottom pieces together, leaving an opening for filling.
Turn the piece right side out and shape it gently.
Fill the turtle with weighted material and soft stuffing to achieve the desired firmness.
The final stage of the Sea Turtle Doorstop – PATTERN focuses on finishing touches and functionality.
Close the opening securely using strong stitching.
Shape the turtle to ensure it sits flat and stable.
In the Sea Turtle Doorstop – PATTERN, proper weight distribution is essential for effectiveness.
Add decorative details such as embroidery for the eyes or stitching on the shell.
Press lightly if needed to refine the shape.
Once completed, your turtle doorstop is ready to use and display.
Is this project suitable for beginners?
Yes, the Sea Turtle Doorstop – PATTERN is beginner-friendly with basic sewing skills.
What filling works best?
Rice, sand (in a sealed pouch), or weighted pellets are ideal.
Can I make it decorative only?
Yes, you can use soft stuffing if you don’t need it as a doorstop.
How long does it take to complete?
It usually takes a few hours to finish.
Can I customize the design?
Absolutely, you can change colors and add details.
Is this a good gift idea?
Yes, it makes a unique and practical handmade gift.
The Sea Turtle Doorstop – PATTERN is a fun and rewarding quilting project that combines creativity with practicality. It allows you to create a decorative item that also serves a useful purpose in your home.
In this tutorial, you learned how to select materials, prepare fabric pieces, assemble the turtle shape, and finish it with proper weighting and detailing. Each step contributes to a durable and visually appealing final product.
Projects like the Sea Turtle Doorstop – PATTERN show how quilting can transform simple materials into functional and meaningful handmade creations.
PATTERN VIDEO:
If you enjoyed this tutorial, feel free to leave your honest opinion and share your suggestions. Your feedback helps inspire more creative quilting ideas and projects.