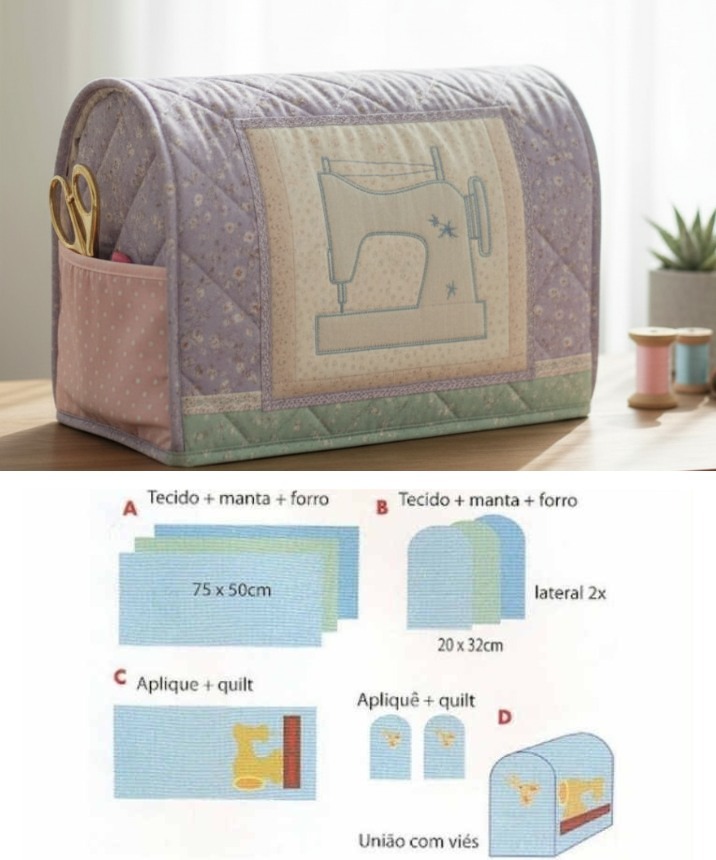
Bluebird Patchwork Tote Bag Tutorial

Round Pencil Case – Tutorial is a practical and creative quilt project that transforms fabric into a stylish and functional accessory. This quilted pencil case stands out because of its rounded shape, which gives it a modern look while offering enough space to organize pencils, pens, markers, or small sewing tools. It is a perfect project for quilters who enjoy combining usefulness with attractive design.
One of the biggest advantages of the Round Pencil Case – Tutorial is its versatility. Although designed as a pencil case, it can easily be adapted for makeup, small craft supplies, or travel essentials. Its compact size makes it ideal for everyday use, school, work, or gifting.
In this article, you will find a complete, well-structured, and humanized guide to the Round Pencil Case – Tutorial. From understanding the design concept to construction and customization, this tutorial is suitable for confident beginners and experienced quilters alike.
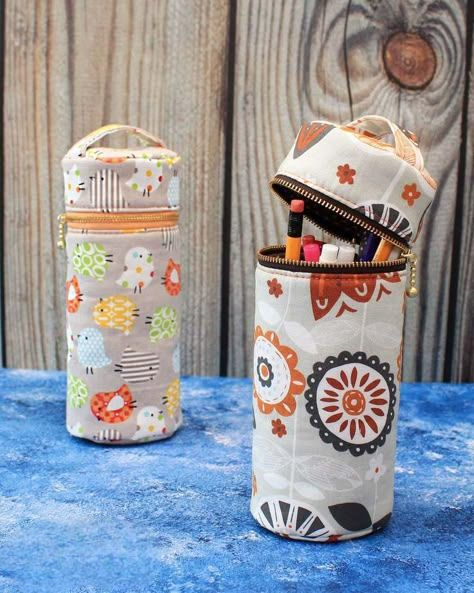
The Round Pencil Case – Tutorial focuses on creating a cylindrical or rounded quilted case with a flat circular base. This structure provides stability and maximizes internal space.
Unlike flat pencil cases, the round design allows items to stand upright, making them easier to see and access.
This type of project is excellent for practicing curved seams, which are an important quilting skill.
The rounded shape also gives the case a polished, professional appearance that stands out among handmade accessories.
Because it is a small project, it can be completed in a relatively short time while still feeling rewarding.
Overall, the Round Pencil Case – Tutorial is a perfect balance of technique, function, and creative expression.
Fabric choice plays an important role in the success of the Round Pencil Case – Tutorial. Quilting cotton is commonly used because it is easy to work with and holds structure well.
Using a sturdy outer fabric helps the case keep its round shape, while a smooth lining fabric allows items to slide in and out easily.
Thin batting or interfacing is usually added to give the case stability without making it bulky.
A zipper is an essential component, allowing the pencil case to open wide for easy access.
Basic quilting tools such as scissors, rotary cutter, ruler, pins, and a sewing machine are required.
Preparing all materials before starting helps ensure a smooth and enjoyable sewing process.
The Round Pencil Case – Tutorial usually begins with cutting the fabric pieces, including the rectangular body and circular base.
The outer fabric is often quilted with batting before assembly, adding texture and durability to the case.
Next, the zipper is attached carefully to ensure smooth opening and closing.
The body piece is then sewn into a tube, forming the round shape of the pencil case.
The circular base is attached last, requiring careful alignment to maintain symmetry.
Once completed, the case is turned right side out and gently shaped by hand for a clean finish.
Customization is one of the most enjoyable parts of the Round Pencil Case – Tutorial. You can experiment with fabric colors, prints, and quilting patterns.
Adding decorative stitching, labels, or zipper pulls can give the case a personalized touch.
Although designed for pencils, this case works beautifully as a makeup bag, tool holder, or travel organizer.
It also makes a thoughtful handmade gift for students, teachers, artists, or craft lovers.
Caring for the case is simple. Gentle spot cleaning helps maintain its appearance.
If needed, the case can be hand washed and air dried to preserve shape and stitching.
Is the Round Pencil Case – Tutorial beginner-friendly?
Yes, it is suitable for confident beginners with basic sewing skills.
How long does it take to make this project?
Most quilters complete it in a few hours.
Can I change the size of the pencil case?
Yes, adjusting the body length and base diameter changes the size easily.
What type of zipper works best?
A standard nylon zipper works well for smooth opening.
Can I use fabric scraps for this project?
Yes, it is a great way to use leftover quilting fabric.
Is this pencil case washable?
Yes, gentle hand washing is recommended.
This Round Pencil Case – Tutorial article explored the design concept, materials, construction steps, and customization ideas for this practical quilt project. From understanding the round structure to assembling and finishing the case, you now have a clear overview of the entire process.
The Round Pencil Case – Tutorial is a wonderful project for quilters who enjoy creating functional accessories with a polished, handmade look.
We invite you to leave your honest opinion and share your suggestions. Your feedback helps improve our tutorials and inspires future quilting projects and creative ideas.