Rose Twirl Quilt - Pattern

The Rose Twirl Quilt – Tutorial is a charming quilting project that celebrates graceful movement, floral inspiration, and traditional patchwork craftsmanship. This pattern is loved by quilters because it combines artistic design with practical sewing techniques, allowing makers to create a quilt that feels both elegant and welcoming. When following the Rose Twirl Quilt – Tutorial, quilters can transform simple fabric pieces into a beautiful swirling design that resembles the gentle motion of blooming roses.
Quilting has always been a creative way to turn fabric into something meaningful. The Rose Twirl Quilt – Tutorial highlights how thoughtful color placement and carefully arranged shapes can produce a quilt that feels lively and visually engaging. Even though the finished quilt may look detailed and sophisticated, the construction process can be approached step by step, making it an enjoyable experience for many crafters.
In this in-depth guide to the Rose Twirl Quilt – Tutorial, you will explore the creative inspiration behind the design, the materials and tools needed for success, the quilting process used to build the blocks, and the finishing techniques that give the quilt a polished appearance. Whether you are new to quilting or already experienced, this project offers a rewarding way to explore color, texture, and movement in fabric.
The Rose Twirl Quilt – Tutorial is inspired by the graceful curves and layered structure of rose petals. Roses have symbolized beauty and creativity for centuries, and this pattern translates that elegance into a quilt design.
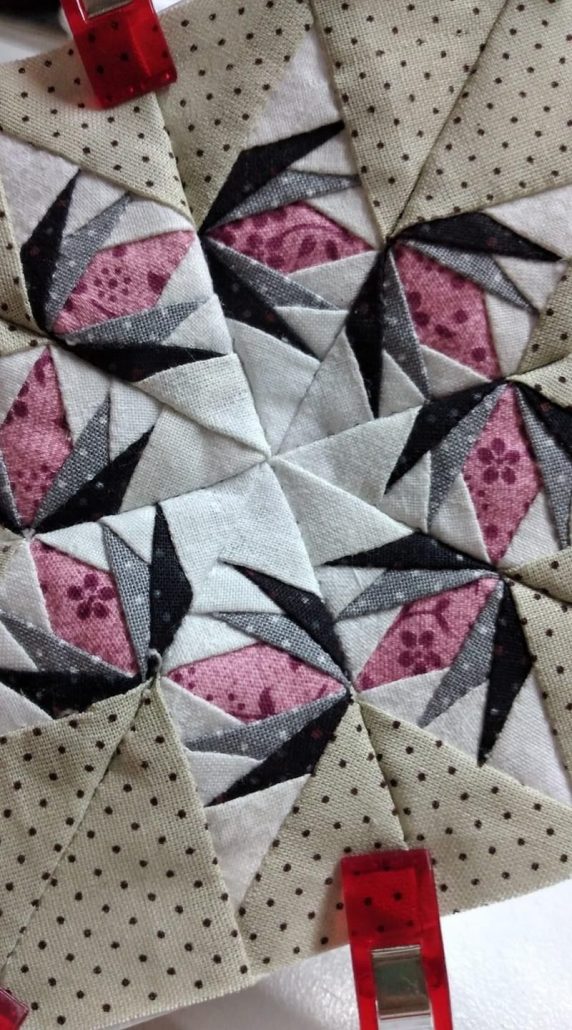
One of the most captivating aspects of the Rose Twirl Quilt is the swirling arrangement of fabric pieces. These shapes give the impression that the quilt is gently rotating, much like the spiraling layers of a blooming flower.
Many quilters are drawn to floral-inspired designs because they add warmth and softness to a room. The Rose Twirl Quilt – Tutorial offers that floral charm while maintaining the geometric balance that traditional quilting patterns often include.
The design also encourages creative color combinations. Soft pinks, warm reds, and subtle neutrals can create a romantic appearance, while brighter tones can produce a bold and modern interpretation.
Movement is another defining feature of this pattern. When the quilt blocks are arranged together, the swirling pieces guide the eye across the quilt top, creating a sense of flow.
Understanding the inspiration behind the Rose Twirl Quilt – Tutorial helps quilters appreciate the design more deeply and encourages thoughtful decisions when selecting fabrics and colors.
Before beginning the Rose Twirl Quilt – Tutorial, it is important to prepare all necessary materials. Having everything ready in advance helps the quilting process remain smooth and enjoyable.
Cotton quilting fabric is the most recommended material for this project. Cotton is durable, easy to sew, and widely used in quilt making due to its reliability.
Choosing a color palette is also an exciting part of the preparation stage. Many quilters prefer coordinated shades that emphasize the swirling floral effect of the Rose Twirl Quilt.
Basic quilting tools are essential. A rotary cutter, self-healing cutting mat, quilting ruler, and sewing machine will make the cutting and piecing process more efficient.
Thread that matches or complements the fabric colors will help maintain a professional look throughout the quilt.
Additional supplies such as batting and backing fabric are needed to complete the quilt layers. These materials provide warmth and stability to the finished quilt.
Gathering these tools and materials ensures that the Rose Twirl Quilt – Tutorial can be completed with accuracy and confidence.
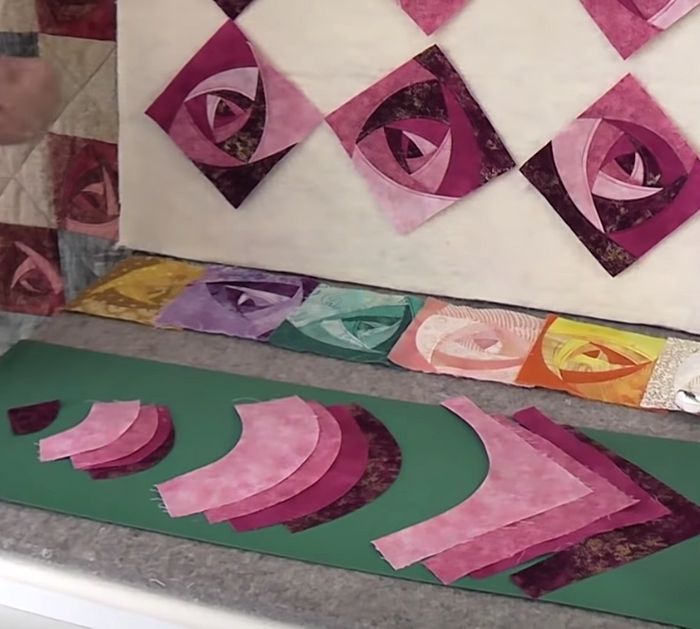
The heart of the Rose Twirl Quilt – Tutorial lies in assembling the quilt blocks that form the swirling pattern. Precision cutting and careful stitching are essential for achieving a balanced design.
The process begins by cutting the fabric pieces according to the measurements provided in the pattern. Accurate cutting helps ensure that each block aligns properly.
Next, the pieces are arranged to visualize the twirling layout. This stage allows quilters to experiment with color placement before sewing begins.
Once the layout is finalized, the pieces are sewn together using consistent seam allowances. Maintaining the same seam width throughout the project helps keep the blocks uniform.
As each block is completed, the swirling effect becomes more visible. Gradually, the quilt top begins to display the elegant motion that defines the Rose Twirl Quilt.
After assembling all blocks, they are joined together in rows to form the complete quilt top. Careful alignment ensures that the twirling pattern flows smoothly across the quilt.
By following these steps in the Rose Twirl Quilt – Tutorial, quilters can construct a quilt top that looks balanced, dynamic, and visually captivating.
Once the quilt top is finished, the next stage of the Rose Twirl Quilt – Tutorial involves completing the quilt with proper finishing techniques.
The first step is preparing the quilt sandwich. This involves layering the quilt top, batting, and backing fabric together.
These layers are temporarily secured with pins or clips so they remain stable during the quilting process.
Quilting stitches are then added to hold the layers together. Straight-line quilting, gentle curves, or floral motifs can all complement the swirling design.
The quilting stage also enhances the texture of the finished quilt, giving it depth and dimension.
After quilting is completed, the edges are trimmed evenly and prepared for binding.
Binding is sewn around the edges of the quilt to create a clean border and protect the layers. This final step completes the Rose Twirl Quilt – Tutorial and gives the quilt a polished look.
Is the Rose Twirl Quilt suitable for beginner quilters?
Yes. While the design may look advanced, many beginners can complete the Rose Twirl Quilt – Tutorial by carefully following the instructions and working step by step.
What fabric works best for this quilt pattern?
High-quality cotton quilting fabric is ideal because it is easy to cut, sew, and press.
How long does it take to finish the Rose Twirl Quilt?
The time required depends on the quilter’s experience and schedule. Many people complete the quilt over several crafting sessions.
Can I adjust the size of the quilt?
Yes. By increasing or reducing the number of blocks, the Rose Twirl Quilt can be adapted for different quilt sizes.
What color combinations work well for this design?
Floral shades such as rose, blush, cream, and green are popular, but bold colors can also create a striking modern version.
Do I need advanced quilting tools?
No specialized equipment is necessary. Standard quilting tools are usually enough to complete the Rose Twirl Quilt – Tutorial.
The Rose Twirl Quilt – Tutorial is a beautiful quilting project that combines floral inspiration with classic patchwork techniques. Through thoughtful fabric selection, careful piecing, and creative quilting stitches, this design becomes a stunning piece of handmade art.
In this guide, we explored the inspiration behind the pattern, the materials needed for the project, the step-by-step construction of the quilt blocks, and the finishing methods that complete the quilt.
Creating the Rose Twirl Quilt is a rewarding experience that allows quilters to explore movement, color, and craftsmanship while producing something both practical and decorative.
Now we would love to hear from you. Did you enjoy learning about the Rose Twirl Quilt – Tutorial? Share your honest opinion and any creative suggestions you might have. Your feedback helps inspire new ideas and supports the growing quilting community.