Lake Cabin Quilt Pattern – Tutorial

The Road Trip Toiletry Bag – PATTERN is a fun and practical sewing project that allows you to create a functional bag perfect for keeping your essentials organized while traveling. Handmade quilted bags are not only stylish but also give you the opportunity to use your creativity with fabrics and colors. This project is suitable for both beginners and experienced sewists, and by following the right steps, you’ll have a durable bag that you can proudly say you made yourself. In this tutorial, we will go through the process of making your own toiletry bag, explain how to choose fabrics, and share tips that will make your project easier.
This bag is perfect for trips because it has the right size to store toiletries, cosmetics, or even small craft supplies. The quilted touch gives it both beauty and sturdiness, ensuring your items are protected. With the Road Trip Toiletry Bag – PATTERN, you can customize every detail, from the lining to the zipper, making it a unique creation. Beyond its functionality, it also makes a wonderful handmade gift for friends or family.
Before starting, remember that quilting projects like this are flexible. You can follow the exact measurements or adjust the size to fit your personal needs. That’s the magic of creating your own bag—you decide the colors, fabrics, and finishings. Let’s explore how to bring this Road Trip Toiletry Bag – PATTERN to life.

To make this bag, you don’t need an overwhelming list of supplies, but having the right materials is key to achieving a good finish. You’ll need fabric for the exterior, lining fabric, batting or fusible fleece for structure, a zipper, and basic sewing tools. Choosing cotton fabrics is ideal because they’re easy to quilt and wash.
A good tip is to use coordinating fabrics. For example, select a patterned fabric for the outside and a solid color for the lining. This gives your bag a professional look and makes the quilting details stand out. Don’t forget to choose a high-quality zipper that will last through many uses.
The batting or fusible fleece will add padding, giving your bag its quilted look while keeping your belongings safe inside. Batting also allows for creative stitching—you can sew simple straight lines or go for decorative patterns.
Besides the fabrics and batting, you’ll need sewing essentials such as thread, scissors, pins, and a sewing machine. If you are a beginner, don’t worry, because this project doesn’t require advanced quilting skills. A simple straight stitch is enough to complete it beautifully.
Some makers also like to add interfacing to give the bag extra structure. This is optional but can make a big difference if you prefer a firmer finish. Make sure to measure your fabric pieces accurately before starting, as precision is important in bag-making.
Finally, keep in mind that the beauty of the Road Trip Toiletry Bag – PATTERN is that you can adjust the fabrics and design to your taste, so don’t be afraid to experiment.
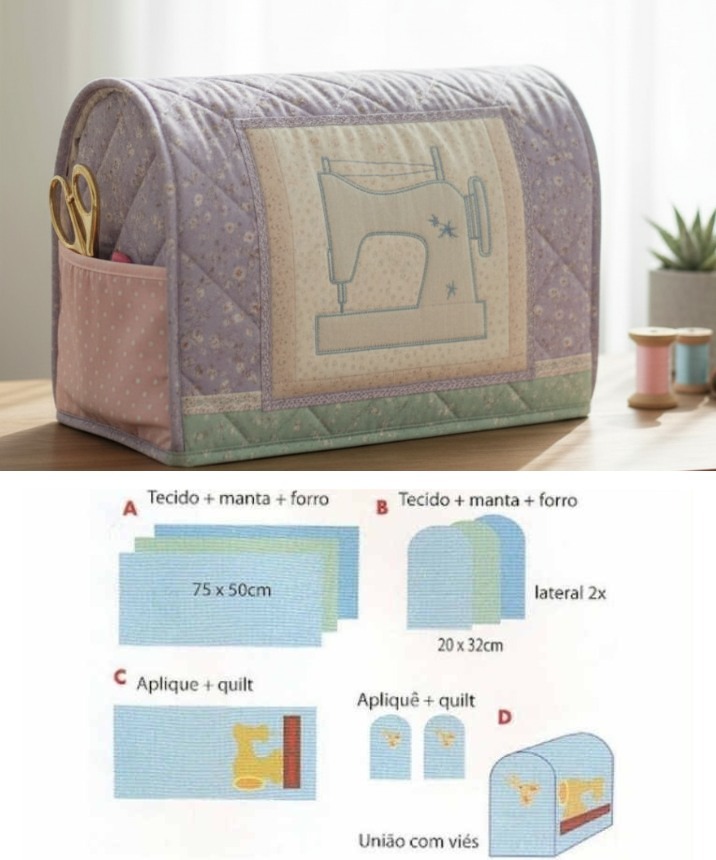
The first step is cutting your fabrics. You’ll need one piece for the exterior, one for the lining, and one batting layer of the same size. Typically, the bag is rectangular, but you can decide the dimensions based on your needs.
Layer your fabrics with the batting in the middle, then quilt them together. This can be as simple as stitching straight lines across the surface. Quilting secures the layers and gives your bag a professional look.
Once your fabric is quilted, it’s time to attach the zipper. Place the zipper facing down along the top edge of the fabric, with the lining fabric on top, and sew them together. Repeat this step for the other side. Zippers might feel tricky at first, but taking it slowly makes the process smooth.
After attaching the zipper, sew the side seams of your bag with the lining and exterior fabrics facing each other. Leave a small opening in the lining so you can turn the bag right side out later.
Turn the bag through the opening, making sure to push out all the corners. Then sew the opening in the lining closed by hand or with a machine stitch. This will give your bag a clean finish.
Finally, press your bag with an iron to smooth out wrinkles and give it a polished appearance. Congratulations, your handmade Road Trip Toiletry Bag – PATTERN is complete.
One of the best parts of making this bag is the chance to customize it. You can choose bright fabrics for a fun look or neutral tones for a classic design. Adding decorative stitching or embroidery is another great way to personalize it.
Consider making the bag in different sizes. A small version can serve as a makeup pouch, while a larger one can hold more toiletries or even craft tools. The versatility of this pattern makes it useful in many ways.
Another fun customization is adding pockets inside the lining. This extra step can help keep smaller items organized and prevent them from getting lost. Even beginners can try adding a simple flat pocket.
You can also experiment with different types of zippers, such as metallic or colorful ones, to give your bag a unique touch. Zippers with decorative pulls are especially trendy and practical.
For added durability, use double stitching on the seams. This makes the bag sturdier and ensures it holds up during frequent use. Strong thread in a matching or contrasting color can also enhance the look.
Lastly, don’t forget that this project is a wonderful gift idea. Handmade quilted items like the Road Trip Toiletry Bag – PATTERN are always appreciated and carry a special personal touch.
There are many toiletry bags available in stores, but making one yourself has unique advantages. First, it allows you to create something truly personal that matches your style. No store-bought bag will have the same character as your handmade one.
Second, it’s cost-effective. With just a small amount of fabric and materials, you can make a bag that might otherwise cost much more in shops. Plus, using fabric scraps from other projects is a great way to save money.
Third, making your own bag is an eco-friendly choice. By reusing fabrics and avoiding mass-produced products, you contribute to a more sustainable lifestyle.
Another reason is the joy of learning. Sewing and quilting projects like this help you develop skills and gain confidence. The more you practice, the easier and faster future projects will become.
Handmade gifts also carry sentimental value. When you make a Road Trip Toiletry Bag – PATTERN for someone, you are giving them something unique and full of love.
Finally, creating your own bag gives you a sense of pride and accomplishment. Every time you use it during a trip, you’ll be reminded of your creativity and effort.
1. Do I need quilting experience to make this bag?
No, this project is beginner-friendly. Basic sewing skills are enough to complete it successfully.
2. Can I make the bag without quilting it?
Yes, but quilting adds structure and durability. If you skip it, consider using interfacing for strength.
3. What size should I cut the fabric for this bag?
The size depends on your needs, but a common dimension is around 12 x 8 inches for the exterior. Adjust as needed.
4. Can I wash the bag in a machine?
Yes, if you use cotton fabrics and sturdy construction, it should be machine washable. Just use a gentle cycle.
5. How long does it take to make the Road Trip Toiletry Bag – PATTERN?
Usually, it can be completed in a few hours, depending on your sewing speed and chosen details.
6. Is this pattern suitable for children to try?
With adult supervision, children who know basic sewing can also enjoy making a simple version of this bag.
The Road Trip Toiletry Bag – PATTERN is a creative and functional sewing project that gives you the chance to make something both beautiful and practical. We went through the materials needed, step-by-step instructions, customization ideas, and the many benefits of making this bag yourself.
PATTERN VIDEO:
It’s a project that combines fun, skill-building, and usefulness, whether for personal use or as a heartfelt gift. I’d love to hear your thoughts about this tutorial. Share your opinion in the comments and feel free to suggest new ideas for future patterns. Would you like me to prepare um artigo igual para um padrão de crochê agora?