How to Cut and Sew a Bucket Hat

Starting a Remote Caddy – TUTORIAL project is one of the most enjoyable ways to blend simplicity, organization, and creativity into a single sewing experience. This beginner-friendly pattern brings convenience into your living space while also letting you express your style through fabric combinations, quilting textures, and functional design. Whether you are new to quilting or already confident with a sewing machine, creating a Remote Caddy – TUTORIAL piece will feel rewarding from start to finish.
One of the best things about this project is how accessible it is, even for those who have never created a structured accessory before. The steps are intuitive, the measurements flexible, and the final result incredibly useful. With a Remote Caddy – TUTORIAL, you can keep remotes, glasses, small notebooks, pens, or chargers neatly organized and close at hand. This makes it a fantastic gift option as well, especially during holidays or for anyone who loves functional handmade décor.
As you explore the process, you will find that the Remote Caddy – TUTORIAL allows endless customization options. You can choose playful prints, elegant fabrics, or scrap-friendly combinations that give new life to leftover materials. The versatility of this project also makes it ideal for building confidence in basic quilting techniques, pressing skills, and simple assembly methods.
Starting the Remote Caddy – TUTORIAL requires only basic cutting, stitching, and layering techniques, making it perfect for sewers of all levels. The structure is simple: a quilted base combined with pockets that secure neatly over an armrest, chair back, or bedside. Because this base is quilted, it provides stability while adding visual appeal.
Choosing the right fabric is the first important step. Cotton prints work beautifully due to their durability and ease of handling. Combine contrasting tones or coordinating sets to give your caddy a cohesive look. You can even incorporate textured fabrics for added charm.
Batting plays a key role in giving your Remote Caddy – TUTORIAL the right level of stiffness. Medium-weight batting is often preferred because it provides appropriate body without making the caddy too bulky. If you want a more defined shape, consider using fusible interfacing along with batting.
Your cutting tools should be sharp and reliable. A rotary cutter and mat will help you achieve straight, clean lines, which improves overall accuracy. Even small variations in measurement can affect how neatly your pockets align, so taking your time with cutting pays off.
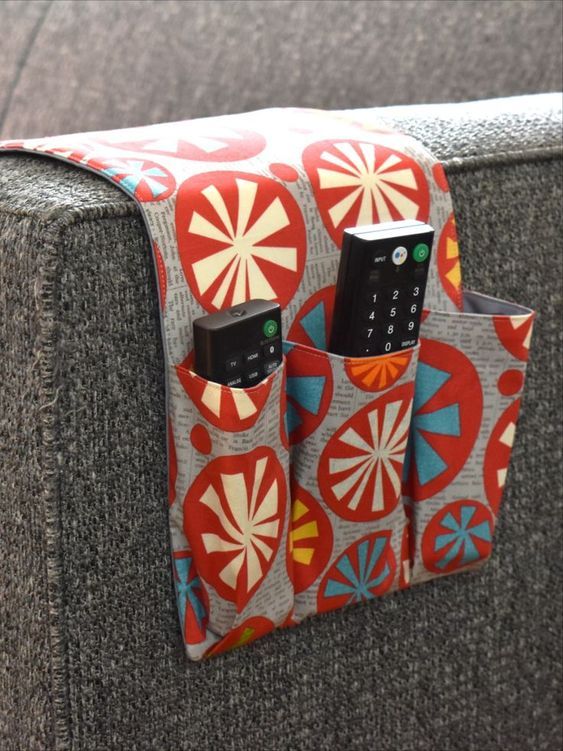
Consider how many pockets you want your caddy to have. Some prefer a simple two-pocket layout, while others like multiple sections to separate remotes, reading glasses, earbuds, or pens. Part of the fun in a Remote Caddy – TUTORIAL is customizing the layout to your lifestyle.
Pressing while assembling is crucial. Press each seam as you go, keeping everything flat and crisp. This not only improves durability but also enhances the polished, professional look of your finished piece.
The base of the Remote Caddy – TUTORIAL determines the overall structure and strength of your finished organizer. Start by cutting the main piece according to your desired dimensions, ensuring it is wide and long enough to rest securely over the furniture you plan to use it on. Most caddies range between 24–30 inches in length.
Layering the quilt sandwich is the next step. Position the backing fabric right-side down, place the batting in the middle, and add the top fabric facing up. Smooth each layer to eliminate wrinkles or shifting before quilting. Pins or clips help keep everything stable.
Choose a quilting design that suits your aesthetic and skill level. Straight-line quilting is the easiest and produces a clean, modern effect. If you prefer something more decorative, try diagonal lines, grids, or gentle curves. Even beginner quilting lines add beautiful texture to the Remote Caddy – TUTORIAL.
Use a walking foot on your sewing machine if you have one. It prevents shifting between layers and results in smoother stitching. Keep your stitch length consistent for a refined finish. A slightly longer stitch often looks better on quilted accessories.
After quilting, square up the piece by trimming excess fabric and batting. This step is important for accuracy during assembly. Clean edges make attaching pockets and binding easier and more visually appealing.
Finally, prepare the binding that will finish the edges of the base. You can choose premade binding or create your own from matching fabric. Binding adds strength to your Remote Caddy – TUTORIAL and helps it withstand daily use.
Pockets are the functional heart of the Remote Caddy – TUTORIAL, giving you a place to store all your everyday essentials. Start by cutting the pocket fabric pieces slightly larger than you think you will need. This gives room for seam allowances and top-stitching.
Fold each pocket piece in half, right sides together, and stitch around the edges, leaving an opening for turning. This method gives pockets a clean, finished look. After turning, press carefully to maintain crisp corners and smooth edges.
Consider adding quilting or interfacing to the pocket panels as well. This keeps them sturdy and prevents stretching over time. You can add a subtle quilting pattern that matches the base, tying the design together.
Position the pocket panels on the quilted base and pin them in place. Take time to align them symmetrically to create a balanced layout. Think about what items you’ll store in each pocket and adjust the spacing accordingly.
Stitch the pockets securely onto the base, backstitching at key stress points. You can create multiple compartments by sewing vertical lines within each pocket panel. This is especially helpful for slender items like pens or small remotes.
Finish the pockets with a topstitch around the upper edge for reinforcement. This not only strengthens the structure but also adds a professional-looking detail that elevates your Remote Caddy – TUTORIAL.
With the base and pockets complete, you’re ready for the final assembly of your Remote Caddy – TUTORIAL. Place the pocket panel on the lower portion of the base, making sure everything aligns neatly. Clips or pins help secure the layers while sewing.
Attach the pocket panel by stitching along the sides and bottom edge. Maintain straight lines and avoid puckering by smoothing the layers as you sew. This step brings the entire piece together, transforming it into a fully functional organizer.
Add binding around the perimeter of the caddy to seal all raw edges. Take your time with corners, folding or mitering them for a clean, professional finish. Even beginners can achieve beautiful results with careful pressing and stitching.
Test the caddy by draping it over the armrest or surface where it will be used. Ensure the pockets sit comfortably without sagging. The quilted thickness helps the caddy grip furniture securely, even when filled with items.
If you want to personalize the project, consider adding labels, embroidery, or decorative stitching. These finishing touches make your Remote Caddy – TUTORIAL uniquely yours and add charm to your home décor.
Once finished, enjoy the convenience of having your essentials neatly organized and always within reach. This project is practical for everyday life, but also makes a wonderful handmade gift.
1. What fabrics work best for the Remote Caddy – TUTORIAL?
Cotton quilting fabric is ideal because it’s durable, easy to sew, and available in many prints. Canvas or home-decor fabric can also add extra strength.
2. Do I need batting for this project?
Yes, batting gives the caddy structure and prevents it from slipping or folding. Medium-weight batting is recommended.
3. How large should I make the pockets?
Pocket sizes depend on what you plan to store—standard sizes fit remotes, phones, and glasses, but you can customize based on your needs.
4. Can beginners make a Remote Caddy?
Absolutely! The steps are simple, and the project is very beginner-friendly, requiring only basic sewing skills.
5. Is quilting the base necessary?
Quilting adds strength and prevents shifting, but you may use fusible interfacing if you prefer a simpler, non-quilted approach.
6. How do I keep the caddy in place on furniture?
The quilted weight naturally helps it stay in position, but you can add non-slip fabric to the underside if needed.
Creating a Remote Caddy – TUTORIAL is a fun, practical, and rewarding sewing project that enhances your home while allowing you to explore fabric choices, simple quilting techniques, and functional design. Throughout this article, you learned how to prepare the base, assemble the pockets, and finish your organizer with clean, polished details.
I hope this tutorial inspires you to try new colors, patterns, and embellishments as you make your own version. If you enjoyed this guide, please leave a sincere opinion and share any suggestions for future tutorials. Your feedback helps enrich our creative community!