
Autumn Lattice Quilt – PATTERN


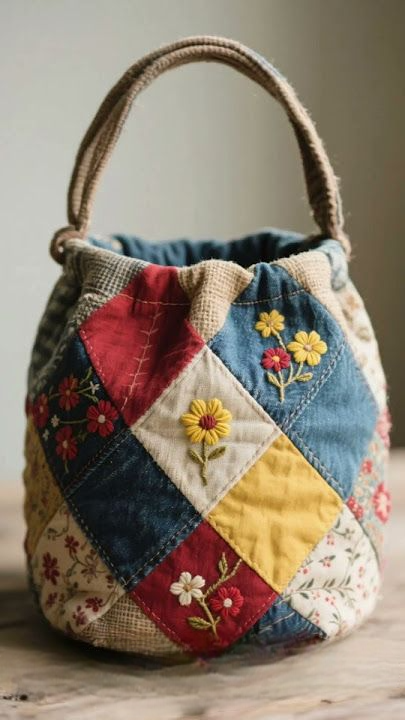
Creating a Quilted Tote Bag – Tutorial is one of the most enjoyable and practical sewing projects for beginners and advanced quilters alike. A quilted tote bag combines style, function, and creativity, making it an accessory that can be customized for any occasion. Whether you need a sturdy bag for shopping, a unique handmade gift, or a personalized everyday carry-all, quilting a tote bag is the perfect project to explore both sewing and quilting techniques.
The beauty of a quilted tote bag lies in its versatility. You can choose fabrics that reflect your personality, play with bold colors, or keep it classic with neutral tones. With quilting, you add not only durability but also a touch of artistry. This makes the project stand out compared to store-bought alternatives. The process of sewing and quilting together may seem detailed, but with the right guidance, even beginners can achieve professional-looking results.
This Quilted Tote Bag – Tutorial will walk you through everything from choosing fabrics and tools to assembling and quilting the bag. By the end, you will have a finished project that is both functional and stylish. Along the way, you will also learn quilting skills that can be applied to many other sewing projects. Let’s explore how to bring this handmade tote to life step by step.
To begin your Quilted Tote Bag – Tutorial, the first step is gathering all the materials you will need. A tote bag usually requires durable fabrics such as cotton or canvas, quilting batting for structure, and sturdy thread. Handles can be made with matching fabric or purchased pre-made straps. Having everything ready before you start sewing makes the process smoother and more enjoyable.
Besides fabrics, batting, and thread, you will also need some basic tools. A rotary cutter or sharp fabric scissors, a cutting mat, and quilting rulers are essential for achieving precise cuts. Sewing pins or clips will help hold layers together as you quilt, and an iron will ensure seams are neat and flat. These small details make a big difference in the final look of your quilted bag.
For quilting, a walking foot for your sewing machine can be very helpful. This foot feeds the layers of fabric evenly, preventing shifting during quilting stitches. A standard sewing machine works fine, but adding the right attachments will make your project easier and more professional-looking. Don’t forget safety pins or basting spray to hold the quilt layers together before stitching.
When selecting fabric, consider mixing prints and solids to create contrast. Many quilters enjoy using scraps, which makes this project eco-friendly and budget-conscious. You can design a patchwork look or keep it simple with one solid fabric quilted with decorative stitching. This flexibility is what makes tote bag quilting so creative.
Batting is another important element. Choose batting that provides structure without being too bulky. Cotton batting is a great option for a soft but sturdy feel, while fusible batting can save time by adhering to the fabric layers. Always pre-read instructions on your batting type before use.
Finally, think about personal touches like adding pockets, zippers, or buttons to your quilted tote bag. These small details transform your project into something that reflects your personal style and increases its usefulness.
The next step in this Quilted Tote Bag – Tutorial is cutting your fabrics to the correct size. The body of a tote bag typically starts with two rectangular panels. The size depends on how large you want the finished bag to be. Standard tote bags often measure around 15 x 18 inches, but you can adjust to suit your needs. Cutting with precision ensures clean seams and a balanced look.
Prepare your handles by cutting two long strips of fabric, usually around 20 to 24 inches each. These will be folded and sewn to create sturdy straps. If you’re using pre-made straps, you can skip this step, but making your own allows you to match them perfectly to your tote bag’s design. Quilted handles also add an extra handmade touch.
Once all pieces are cut, it’s time to layer the fabric with batting. Place your fabric on top of the batting and smooth out any wrinkles. If you’re doing patchwork, sew your smaller pieces together first to create larger panels. This step is where creativity shines, as you can choose patterns like stripes, squares, or random patchwork designs.
Pressing seams is very important. Iron every seam flat to reduce bulk and ensure accuracy when assembling the bag. Taking the time to press fabric during each step results in a cleaner finish and easier stitching later. Quilting relies heavily on precision, so this is one habit worth developing.
Before quilting, baste your layers together with pins or spray. This prevents shifting while sewing. Try quilting simple straight lines, diagonal grids, or free-motion designs, depending on your comfort level. The quilting adds strength to the bag while giving it its distinctive texture.
Finally, trim excess batting and fabric edges after quilting. This gives you neat panels ready for assembly. Proper preparation at this stage makes sewing the bag much easier and ensures professional results in your finished quilted tote bag.
Now that your panels are quilted, the next phase in this Quilted Tote Bag – Tutorial is assembling the bag. Begin by placing the quilted panels right sides together and sewing along the sides and bottom. Use a ½ inch seam allowance for durability. Remember to backstitch at the beginning and end of each seam to secure the stitches.
Once the sides and bottom are sewn, you can create a flat base by boxing the corners. To do this, fold the corner so that the side seam lines up with the bottom seam, forming a triangle. Measure about two inches from the tip and stitch across. Repeat for the other corner. This simple technique adds depth and shape to your tote bag.
After the base is formed, it’s time to attach the straps. Pin the straps evenly to the top of the bag, making sure they are aligned and equal in length. Sew them securely by stitching a square or “X” at the ends of the straps for reinforcement. This prevents the handles from tearing when carrying heavier items.
For the lining, cut two panels of fabric matching the size of your quilted outer panels. Sew them together on the sides and bottom, leaving a small opening at the bottom. Place the lining inside the outer bag with right sides facing, pin the edges, and sew around the top. This creates a clean, finished interior.
Once sewn, turn the bag right side out through the opening in the lining. Stitch the opening closed and push the lining neatly into the tote. Press the top edge with an iron and topstitch around the edge for a polished finish. This step also strengthens the bag and prevents the lining from shifting.
At this stage, you have a fully assembled quilted tote bag ready to use. The process may seem detailed, but each step builds on the last, creating a durable and beautiful handmade project.
The final section of this Quilted Tote Bag – Tutorial is about making the project truly your own. Personalization is one of the greatest joys of crafting, as it transforms a simple tote into a reflection of your creativity. Consider adding embroidery, applique, or even fabric paint to embellish your quilted tote bag. These small touches make your bag unique.
If functionality is your priority, think about adding extra features. A magnetic snap, zipper, or interior pockets can provide more security and organization. Quilted tote bags are perfect for carrying books, groceries, or craft supplies, so customizing the size and compartments makes them even more practical.
Another fun idea is to coordinate your bag with the seasons. Bright floral fabrics make for a cheerful summer tote, while darker plaids or rich solids are great for fall and winter. Because quilting allows endless fabric choices, you can create a collection of tote bags for different occasions.
Quilted tote bags also make thoughtful handmade gifts. A personalized bag shows effort and care, making it perfect for birthdays, holidays, or as a teacher’s appreciation gift. You can even pair it with matching quilted accessories like pouches or keychains for a complete set.
Caring for your quilted tote bag is simple. Most can be machine washed on a gentle cycle, but always check your fabric type first. Air drying is recommended to preserve the structure and avoid shrinkage. With proper care, your handmade tote will last for years.
Ultimately, a quilted tote bag is more than just a sewing project—it’s a creative outlet and a practical accessory. Each time you use it, you’ll be reminded of the time, effort, and creativity you invested in making something truly special.
1. Can beginners make a quilted tote bag?
Yes, beginners can follow a Quilted Tote Bag – Tutorial easily. The project uses basic sewing and quilting skills that are simple to learn with practice.
2. What fabric is best for a quilted tote bag?
Cotton is the most common choice because it is easy to sew and quilt. For added durability, canvas or denim can also be used.
3. How long does it take to make a quilted tote bag?
Depending on your skill level, it can take anywhere from a few hours to a weekend. Simple designs are quicker, while patchwork or added features may take longer.
4. Can I add a zipper to my quilted tote bag?
Yes, zippers can be added to the top for extra security. This step requires some sewing knowledge but adds great functionality.
5. Is quilting necessary for a tote bag?
While not required, quilting adds strength and a decorative look to the bag. It also prevents fabric layers from shifting over time.
6. How can I customize my quilted tote bag?
You can add embroidery, fabric appliques, or interior pockets to personalize your tote bag. Using themed fabrics also makes the design unique.
In this Quilted Tote Bag – Tutorial, we explored everything from gathering materials to assembling and personalizing your handmade bag. Quilting not only adds durability but also brings creativity to a practical project.
The final result is a versatile tote bag that you can use daily or gift to someone special. If you try this tutorial, I’d love to hear your opinion and suggestions. Share your experiences and let me know how your quilted tote bag turned out!


