Lake Cabin Quilt Pattern – Tutorial

If you’re searching for a quick, functional, and creative sewing project, this Pot Handles and Lid Holder – TUTORIAL is just what you need! Whether you’re a beginner or an experienced quilter, this tutorial brings a fun opportunity to create something useful and beautiful for your kitchen. These quilted pot holders and lid grips are not only practical but also add a handmade touch to your daily cooking routine.
Pot Handles and Lid Holder – TUTORIAL is designed with convenience in mind. These small accessories help protect your hands from hot cookware and add charm to your kitchen. The project uses fabric scraps, basic quilting techniques, and can be completed in an afternoon. Perfect for gifting or personal use, these quilted items are excellent stash-busters and a creative outlet for any sewing enthusiast.
In this article, we’ll guide you through the process of making your own pot handle covers and lid holders. We’ll also explore styling options, fabric ideas, and how to personalize your pieces for holidays, themes, or everyday use. Whether you’re new to quilting or looking for your next mini project, the Pot Handles and Lid Holder – TUTORIAL offers just the right balance of creativity and practicality.
To get started with the Pot Handles and Lid Holder – TUTORIAL, gather your basic quilting and sewing tools. This project is ideal for using up leftover fabric scraps, making it budget-friendly and eco-conscious.
You’ll need quilting cotton, batting, and heat-resistant materials like Insul-Bright. These ensure your holders are not only beautiful but also functional and safe.
Scissors, rotary cutters, rulers, and a sewing machine are essential tools for precise cutting and clean stitching. Even hand-sewing enthusiasts can complete parts of this project manually.
Choose thread colors that contrast or complement your fabric for added flair. Don’t be afraid to mix patterns—this project is meant to be fun and expressive.
Make sure to pre-wash your fabrics to avoid shrinkage after sewing. This step helps your final product maintain its shape and size.
Finally, prepare a workspace that gives you enough room to cut and pin your pieces comfortably. A clean, organized area will make the process smoother and more enjoyable.
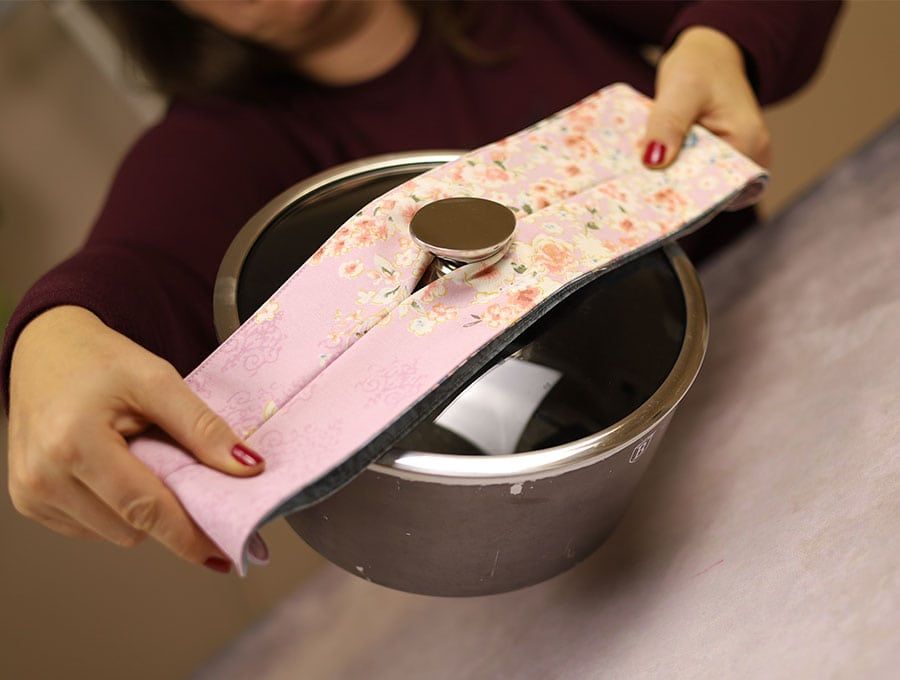
Start by measuring the average size of your cookware handles and lids. This ensures your pieces fit well and serve their purpose effectively.
Cut out two rectangles of fabric and one piece of batting or Insul-Bright for each pot handle or lid holder. You can quilt them using simple lines or decorative stitching.
Place the fabric pieces right sides together with the batting underneath, pin, and sew around the edges, leaving a small gap for turning.
Trim the corners, turn the piece right side out, and press. This step gives your quilted holder a neat, finished look.
Topstitch around the edge to close the gap and reinforce the shape. You can add quilting lines at this stage for a more structured feel.
Add any desired embellishments, such as loops for hanging or buttons for decorative purposes. These small touches make your project unique and functional.
One of the best parts of the Pot Handles and Lid Holder – TUTORIAL is how customizable it is. You can tailor it to match your kitchen decor, holidays, or favorite themes.
For a modern kitchen, choose neutral tones and clean geometric prints. For a rustic feel, opt for florals or farmhouse-style fabrics.
Use holiday-themed fabrics to create seasonal versions. Think red and green for Christmas, orange and black for Halloween, or hearts and pinks for Valentine’s Day.
You can also personalize them with monograms or embroidery. A simple stitched letter or motif adds a charming handmade touch.
Don’t be afraid to experiment with shapes. While rectangles are standard, you can try rounded edges or novelty shapes for extra flair.
Mixing and matching different fabric types—like denim, canvas, or flannel—can add texture and depth to your holders, making them visually appealing and durable.
The Pot Handles and Lid Holder – TUTORIAL isn’t just great for your own kitchen—it also makes a perfect gift. Pair it with a handmade apron or dish towel set for a thoughtful present.
You can create sets of matching pot handle holders and lid grips for housewarmings, weddings, or holiday gifts. Personalizing them with names or favorite colors adds a sweet touch.
Use your holders daily to protect your hands and countertops. They’re washable, reusable, and more eco-friendly than disposable alternatives.
These quilted items also work well for camping gear. Make compact, durable versions for your travel kitchen kit.
Teachers, neighbors, and friends will appreciate these small, practical gifts. Wrap them in craft paper and ribbon for a handmade touch.
Craft fairs and Etsy shops are excellent outlets for selling these. Many buyers love home-sewn kitchen accessories that are unique and stylish.
What size should pot handle covers be?
Measure your cookware’s handles and add half an inch on all sides for seam allowance. Most standard sizes range from 5 to 7 inches long.
Can I use regular batting instead of heat-resistant material?
Regular batting works for light use, but Insul-Bright or another heat-resistant layer is best for handling hot pots safely.
Are these items machine washable?
Yes, use cotton fabrics and pre-wash everything before sewing. Wash on a gentle cycle and let air dry for best results.
How long does it take to complete the tutorial?
The average project time is 1–2 hours, depending on your sewing speed and experience level.
Can beginners make this project?
Absolutely! The Pot Handles and Lid Holder – TUTORIAL is beginner-friendly and a great introduction to quilting small projects.
What type of fabric is best?
Use 100% cotton quilting fabric for the outside and insulated batting for heat protection. Avoid synthetic materials that may melt.
The Pot Handles and Lid Holder – TUTORIAL is the perfect way to mix creativity with functionality. This project is ideal for using up scrap fabric, learning basic quilting techniques, and making your kitchen more beautiful and safe. Whether you’re sewing for yourself or making heartfelt gifts, this tutorial offers endless options for customization and personal expression.
TUTORIAL VIDEO:
We hope this guide has inspired you to try the Pot Handles and Lid Holder – TUTORIAL today! If you found it helpful or have any ideas to improve the pattern, feel free to share your thoughts. Your feedback and suggestions are always welcome!