DIY Denim Patchwork Highland Cow Appliqué

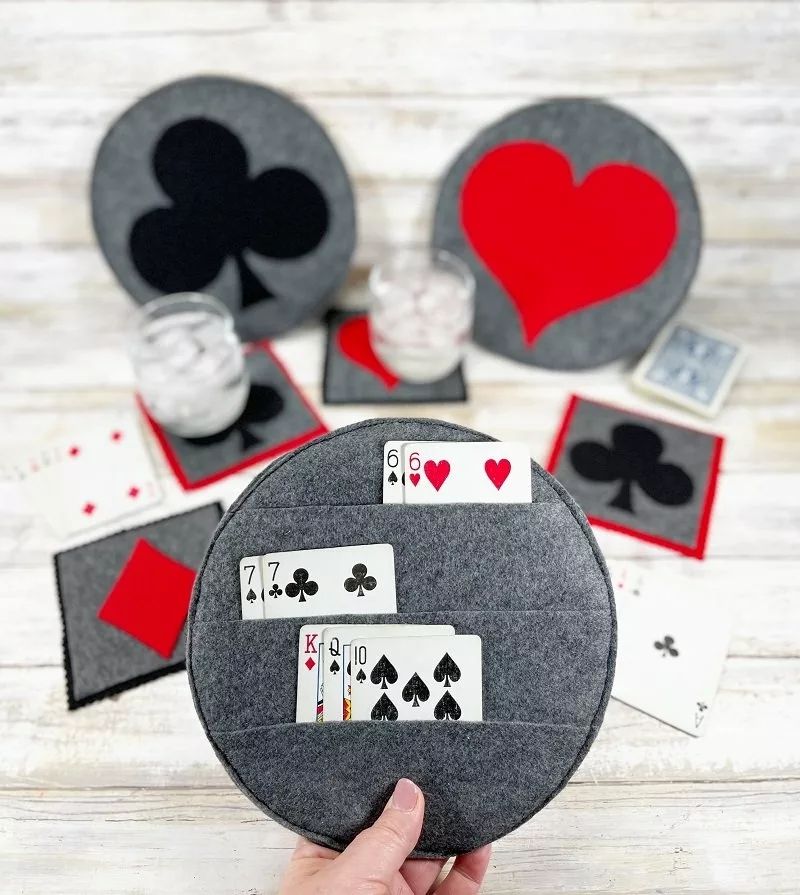
The Playing Card Holder – TUTORIAL is the perfect guide for anyone looking to create a practical and creative solution for organizing playing cards. Whether you love family game nights, board games with friends, or simply want to make handling cards easier for kids and seniors, this tutorial will walk you step-by-step through the process. By the end, you’ll have a functional handmade card holder that adds convenience and charm to every game session.
Making a card holder is not just about convenience—it’s also about style and personal expression. With this project, you can choose your own materials, patterns, and colors, making it uniquely yours. Craft lovers will enjoy this creative project that blends functionality with fun. Even if you’re new to crafting, you’ll find that the Playing Card Holder – TUTORIAL is easy to follow, with simple steps designed for beginners and experts alike.
This tutorial also shows how handmade projects can bring people together. Imagine the smiles at the table when you present your custom card holder, or how helpful it will be for children struggling to hold too many cards at once. With this easy guide, you can create something useful while also enjoying the satisfaction of making it yourself.
One of the main reasons to follow this Playing Card Holder – TUTORIAL is the practicality it offers. Holding multiple cards at once can be challenging, especially for children or people with limited dexterity. A card holder solves this problem instantly.
Another reason is organization. A card holder keeps your playing cards neatly arranged, so you can focus on your strategy rather than struggling to keep your hand hidden.
A card holder also extends the life of your cards. By reducing constant bending and handling, the cards stay in better condition for longer.
This project is also budget-friendly. Instead of buying an expensive accessory, you can create your own with basic supplies you likely already have at home.
It’s also customizable. You get to decide on the size, color, and even add decorative touches that reflect your personality.
Finally, making one is fun. Crafting is a relaxing activity, and the result is something that you’ll use and enjoy for years to come.
To start with the Playing Card Holder – TUTORIAL, you’ll need just a few simple materials. Most of these items are easy to find at craft stores or even at home.
You will need sturdy cardboard or thin wood, which forms the base of your card holder. Both are strong enough to hold multiple cards without bending.
You’ll also need glue or adhesive strong enough to keep the pieces together. Hot glue guns work very well for this project.
Scissors or a small cutting tool are required to shape your holder properly. Always ensure safety when using sharp tools.
Decorative paper or fabric can add personality to your holder. This is where your creativity shines—you can choose bright colors, elegant patterns, or even game-themed designs.
Lastly, optional accessories like small stickers, washi tape, or varnish can help add final touches and make your card holder look professional.
The Playing Card Holder – TUTORIAL begins with preparing the base. Cut your cardboard or wood into two identical oval or rectangular shapes. These will act as the front and back of your holder.
Next, create a small gap by attaching a spacer between the two cutouts. This is where your cards will slide in and stand upright.
Secure the pieces together using glue. Make sure the alignment is correct so that the holder stands evenly on a table.
Once the base structure is complete, it’s time to decorate. Cover the holder with your chosen paper or fabric, smoothing out any bubbles or wrinkles.
Allow the glue to dry fully before testing the holder with a set of playing cards. Adjust if needed to ensure the cards fit securely without tipping over.
Finally, add finishing touches such as protective varnish, decorative trims, or even personal initials to make it uniquely yours.
The Playing Card Holder – TUTORIAL doesn’t just stop at board games—it can be used in many fun and creative ways.
For kids, the card holder can double as a learning tool, helping them handle flashcards more easily during study sessions.
Seniors will find it especially useful for bingo cards, reducing strain on their hands.
You can even use the holder as a display for small photos or notes on your desk, giving it multifunctional value.
It also makes a thoughtful handmade gift. Whether for a birthday, holiday, or special occasion, it’s a personal and practical present.
If you enjoy selling crafts, card holders can be part of your handmade shop lineup. They are inexpensive to make and appealing to many buyers.
Finally, having one at home simply adds joy to game nights, ensuring everyone enjoys themselves without distractions.
Q1: Is the Playing Card Holder difficult to make?
Not at all! The steps are beginner-friendly and require only basic tools.
Q2: What materials work best for durability?
Thin wood or strong cardboard is ideal. Adding varnish or a protective layer increases longevity.
Q3: Can kids make this project?
Yes, but younger children should have adult supervision when using scissors or glue guns.
Q4: How many cards does the holder fit?
This depends on the size you make. Most holders can comfortably fit 20–40 cards.
Q5: Can I wash or clean the card holder?
It’s better to dust or wipe it with a dry cloth. If covered with fabric, avoid water to prevent damage.
Q6: Can I personalize it for different games?
Absolutely! You can design multiple holders in different colors and themes for each card game.
The Playing Card Holder – TUTORIAL is a fun and practical project that combines creativity, utility, and personal style. With just a few materials and some imagination, you can craft a card holder that makes game nights easier and more enjoyable for everyone. From improving organization to extending the life of your playing cards, this project is worth trying.
We hope this tutorial inspired you to create your own unique card holder. If you try it, don’t forget to share your honest opinion and leave suggestions—we’d love to hear your ideas!0