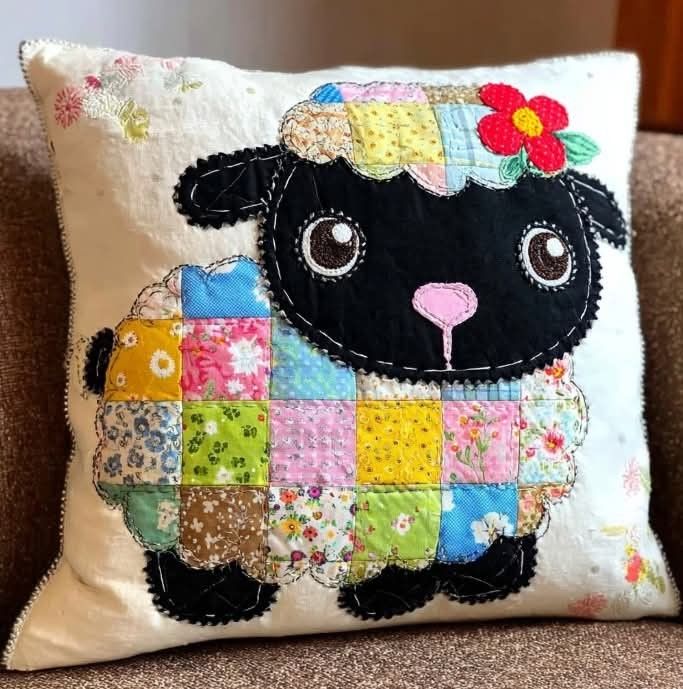
Patchwork Sheep Appliqué Pillow – Tutorial

The Patchwork Sheep Appliqué Pillow – Tutorial is a delightful and creative sewing project that blends traditional quilting techniques with charming appliqué design. Perfect for beginners and experienced crafters alike, this project allows you to create a soft, decorative pillow featuring an adorable sheep motif that adds warmth and personality to any space.
Working through this Patchwork Sheep Appliqué Pillow – Tutorial is not only relaxing but also highly rewarding. Patchwork and appliqué are timeless techniques that give you endless opportunities to experiment with fabrics, textures, and colors. Whether you are making this pillow for your home, a nursery, or as a handmade gift, it’s a project full of character and charm.
In this complete Patchwork Sheep Appliqué Pillow – Tutorial, you will learn how to select fabrics, prepare your appliqué, assemble the patchwork front, and finish your pillow professionally. By following each step carefully, you’ll create a beautiful handmade piece that showcases both skill and creativity.
To begin your Patchwork Sheep Appliqué Pillow – Tutorial, selecting the right fabrics is essential. Cotton fabric is the most recommended choice because it is easy to work with, durable, and widely available in various patterns.
Choose a combination of fabrics for the patchwork background. Soft pastel tones or neutral shades work beautifully for a cozy and calming look, while brighter colors can create a more playful design.
For the sheep appliqué, select contrasting fabrics to make the design stand out. Typically, white or cream fabric is used for the sheep’s body, with darker shades for the face and legs.
You will also need basic sewing supplies such as thread, scissors, pins, a sewing machine, and fusible interfacing for the appliqué process.
Before cutting, wash and iron all fabrics. This prevents shrinkage and ensures a smooth and precise sewing experience.
Organizing your materials ahead of time will make your Patchwork Sheep Appliqué Pillow – Tutorial more efficient and enjoyable.
The next step in your Patchwork Sheep Appliqué Pillow – Tutorial is assembling the patchwork background. Start by cutting your chosen fabrics into equal-sized squares or rectangles.
Arrange the pieces in a layout that you find visually pleasing. You can alternate colors or create a pattern depending on your style preference.
Once satisfied with the layout, sew the pieces together row by row using a consistent seam allowance, typically 0.6 cm (¼ inch).
Press the seams flat after each row. This step helps keep your patchwork neat and reduces bulk.
After joining all rows, you will have a complete patchwork panel that will serve as the base for your appliqué.
A well-constructed background enhances the final look of your Patchwork Sheep Appliqué Pillow – Tutorial and provides a sturdy foundation.
Now comes the highlight of the Patchwork Sheep Appliqué Pillow – Tutorial—creating the sheep design. Start by preparing your appliqué pattern, which includes the sheep’s body, head, ears, and legs.
Trace each piece onto fusible interfacing and attach it to the corresponding fabric. Then carefully cut out each shape.
Position the appliqué pieces on your patchwork background. Take your time arranging them until you achieve a balanced and appealing look.
Fuse the pieces in place using an iron. This temporarily secures them and makes sewing easier.
Sew around the edges of each appliqué piece using a zigzag stitch or blanket stitch. This step adds durability and decorative detail.
Adding the appliqué brings your Patchwork Sheep Appliqué Pillow – Tutorial to life, giving it a soft and charming personality.
To complete your Patchwork Sheep Appliqué Pillow – Tutorial, it’s time to assemble the pillow. Cut a backing fabric to match the size of your patchwork front.
Place the front and back pieces together with the right sides facing inward. Pin them securely to prevent shifting during sewing.
Sew around the edges, leaving a small opening for turning the pillow right side out.
Turn the pillow through the opening and gently push out the corners for a clean shape.
Insert the pillow stuffing or a pre-made pillow insert, then close the opening with a hidden stitch.
For a polished finish, you can add decorative elements such as piping, buttons, or embroidery details to enhance your Patchwork Sheep Appliqué Pillow – Tutorial.
1. Is this project beginner-friendly?
Yes, the Patchwork Sheep Appliqué Pillow – Tutorial is suitable for beginners, especially those familiar with basic sewing techniques.
2. What fabric works best for patchwork?
Cotton fabric is the best choice due to its durability and ease of handling.
3. Do I need a sewing machine?
A sewing machine is recommended, but you can complete the project by hand with patience and careful stitching.
4. How do I clean the finished pillow?
Spot cleaning or gentle hand washing is recommended to preserve the appliqué and fabric quality.
5. Can I customize the sheep design?
Yes, you can adjust the size, colors, and details to create your own unique version.
6. What size should the pillow be?
Common sizes range from 30 cm to 45 cm, but you can customize the dimensions based on your preference.
The Patchwork Sheep Appliqué Pillow – Tutorial is a wonderful project that combines creativity, comfort, and craftsmanship. Throughout this guide, you learned how to select fabrics, create a patchwork base, design and attach an appliqué, and assemble a finished pillow with professional techniques.
This project is perfect for adding a handmade touch to your home or creating a thoughtful gift. The combination of textures and the charming sheep design make it both unique and heartwarming.
If you enjoyed this Patchwork Sheep Appliqué Pillow – Tutorial, don’t forget to share your honest opinion and leave your suggestions. Your feedback helps inspire new ideas and improve future tutorials!