How to Cut and Sew a Bucket Hat

Patchwork Chatelaine – TUTORIAL is a delightful sewing project that combines traditional quilting techniques with a modern twist. This tutorial will guide you through the process of creating a functional and decorative chatelaine that can hold your sewing essentials while adding a personal touch to your crafting space. Whether you are an experienced quilter or a beginner looking for a creative project, this guide will help you master every step with ease.
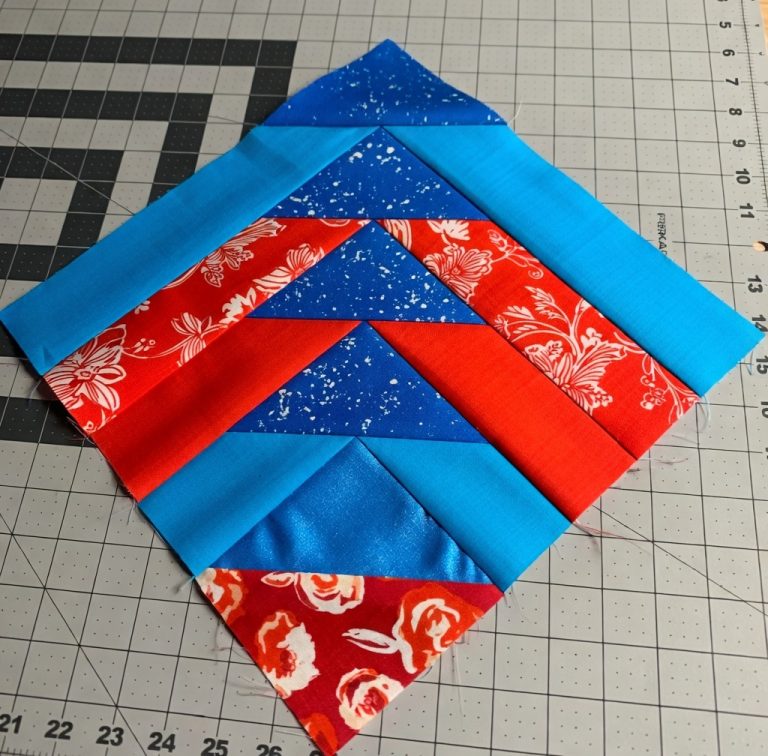
The charm of a Patchwork Chatelaine lies in its ability to use fabric scraps creatively. By mixing different prints, textures, and colors, you can produce a unique accessory that reflects your style. This makes it not only an excellent way to repurpose leftover materials but also an opportunity to experiment with patterns you may not usually choose for larger projects.
In this tutorial, we’ll cover the materials you’ll need, tips for selecting fabrics, step-by-step sewing instructions, and finishing touches to make your chatelaine both durable and beautiful. With clear explanations and practical advice, you’ll be able to create a professional-looking piece that you’ll be proud to wear or gift.
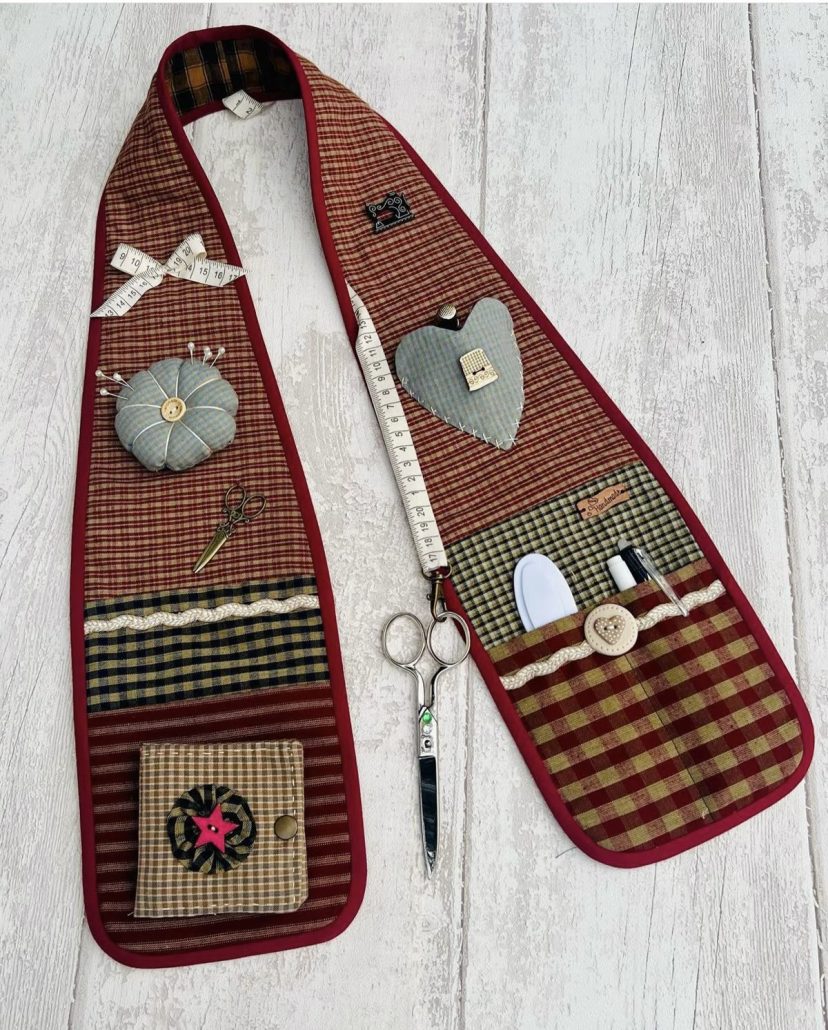
A Patchwork Chatelaine is essentially a wearable sewing organizer. Traditionally worn around the neck or waist, it has pockets or pouches to keep tools like scissors, thread, needles, and thimbles handy while you work. In this modern Patchwork Chatelaine – TUTORIAL, we focus on combining form and function to make an item that is as stylish as it is useful.
The first step in creating your chatelaine is to decide on the size and shape. Some prefer a narrow, belt-like design, while others like a wider band with multiple compartments. Your choice will depend on how many tools you want to carry and the overall look you’re aiming for.
Fabric selection is essential for a successful patchwork project. Opt for 100% cotton fabrics, which are easy to work with and hold their shape well. Mixing bold prints with solid colors can create visual interest while maintaining balance in your design.
In addition to fabrics, you’ll need sturdy interfacing to give structure to your chatelaine. This helps it retain its shape even when loaded with sewing supplies. If you prefer a softer look, you can skip the interfacing and use a quilted batting layer instead.
Once you have your materials ready, it’s time to plan your patchwork layout. You can go for a random arrangement or a more organized block pattern. Using a design wall or laying pieces out on a flat surface will help you visualize the final look before sewing.
Before starting the actual stitching, it’s wise to prepare all fabric pieces, cutting them to size and pressing them to remove wrinkles. This step ensures accuracy and makes sewing easier.
Begin by sewing your patchwork pieces together in the arrangement you planned. Use a quarter-inch seam allowance for accuracy and press seams open or to one side as you go. Keeping seams consistent is important for a neat finish in your Patchwork Chatelaine – TUTORIAL.
After assembling your patchwork front, cut a matching piece for the back panel. If you’re using interfacing or batting, sandwich it between the front and back layers at this stage. Pin or clip the layers together to keep them aligned.
Sew around the edges, leaving a small opening for turning the piece right side out. Trim excess fabric from the corners to reduce bulk, then turn the chatelaine right side out and press it flat. This step gives it a crisp, professional appearance.
Next, topstitch around the edges to close the opening and add durability. Topstitching also enhances the overall look of your chatelaine and helps the layers stay in place.
Now it’s time to add pockets. Depending on your design, you can sew simple flat pockets or more complex gathered ones. Reinforce the top edges of the pockets for strength, especially if they’ll hold heavy tools like scissors.
Finally, add straps or ties so your chatelaine can be worn comfortably. You can make these from matching fabric or use sturdy ribbon. Adjust the length so it fits your preferred wearing style.
One of the best aspects of the Patchwork Chatelaine – TUTORIAL is the freedom to customize it. You can choose colors and prints that match your sewing room, or create seasonal designs to change throughout the year.
For a more decorative approach, consider adding embroidery or applique to your patchwork. This gives your chatelaine a personal, artistic touch that reflects your personality.
If you often work with small tools, adding elastic loops inside the pockets can keep them securely in place. This prevents them from shifting or falling out as you move around.
You can also experiment with closures. While some prefer open pockets for easy access, others may choose snap buttons, Velcro, or zippers for added security. The right choice will depend on how and where you plan to use your chatelaine.
Incorporating recycled materials can make your project more eco-friendly. Old shirts, fabric remnants, or even vintage linens can be transformed into beautiful patchwork pieces.
Adding a quilted layer not only strengthens your chatelaine but also gives it a luxurious texture. You can choose simple straight-line quilting or intricate free-motion designs depending on your skill level.
A Patchwork Chatelaine made from quality fabrics will last for years, but proper care is important to maintain its beauty. Always follow the washing instructions for the fabrics you used.
Spot cleaning is often enough for small stains, especially if you use your chatelaine regularly while sewing. A damp cloth and mild soap can work wonders without subjecting the piece to full washing.
If machine washing is necessary, use a gentle cycle and cold water to preserve the fabric colors and prevent shrinkage. Placing it in a mesh laundry bag can protect it during the wash.
Air drying is the best method to avoid wear and tear from heat. Lay your chatelaine flat on a clean towel to dry, reshaping it if necessary.
Occasional pressing with a warm iron will keep it looking crisp. Be sure to avoid ironing over any plastic or metal parts, such as snaps or zippers.
With regular care, your chatelaine will remain a functional and attractive accessory in your sewing toolkit for many years.
FAQ
What is a Patchwork Chatelaine used for?
It is a wearable sewing organizer designed to keep tools like scissors, thread, and needles within easy reach.
Do I need advanced sewing skills to make one?
Not at all. This Patchwork Chatelaine – TUTORIAL is suitable for beginners, as it involves basic sewing and patchwork techniques.
What fabrics are best for this project?
100% cotton fabrics are ideal for their durability and ease of sewing. You can mix prints and solids for a unique look.
Can I customize the size?
Yes, you can make it as narrow or wide as you prefer, depending on how many pockets and compartments you want.
Is quilting necessary?
Quilting is optional but recommended for added strength and decorative appeal.
Can I wash my patchwork chatelaine?
Yes, but always follow fabric care instructions. Gentle washing and air drying are best.
Conclusion
Creating a Patchwork Chatelaine is a rewarding project that blends practicality with creativity. In this tutorial, we explored material selection, step-by-step sewing, customization options, and care tips to help you produce a beautiful and functional piece.
Now it’s your turn to give it a try and make a chatelaine that’s truly your own. I’d love to hear your honest feedback and suggestions for future tutorials—share your thoughts and let’s keep the creativity flowing!