
Autumn Lattice Quilt – PATTERN


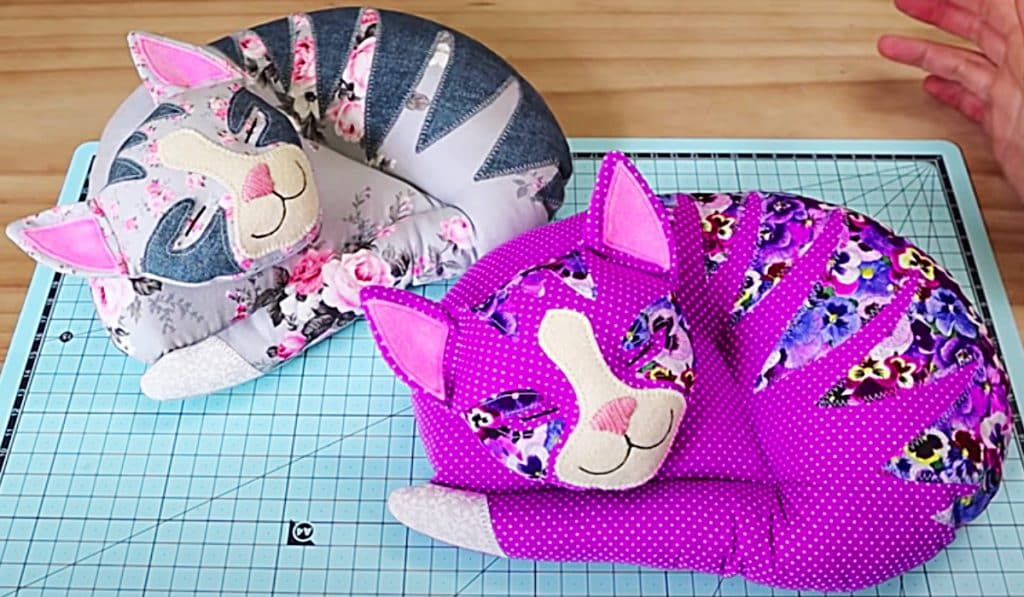
The Patchwork Cat – PATTERN is a delightful project for anyone who loves sewing, quilting, and creative crafting. This charming design allows crafters to use fabric scraps in imaginative ways while creating an adorable cat figure that can serve as a decoration, toy, or keepsake. The pattern combines the traditional beauty of patchwork with the universal appeal of cats, making it a favorite among sewing enthusiasts. Whether you are an experienced quilter or just starting your sewing journey, this pattern provides both a fun challenge and a heartwarming finished result.
One of the greatest appeals of the Patchwork Cat – PATTERN is how versatile it can be. You can adapt the size, colors, and details to match your style or the recipient’s preferences. Some crafters make small patchwork cats as gifts or ornaments, while others create larger versions that become cuddly companions or decorative pillows. The endless options allow you to experiment and express your creativity in unique ways.
In addition to its charm, the Patchwork Cat – PATTERN is also a sustainable project. It’s an excellent way to reuse leftover fabric pieces that might otherwise go to waste. By combining different textures, patterns, and colors, you can create a cat that is both eco-friendly and visually striking. This makes the pattern especially appealing for quilters who value resourcefulness and wish to add a personal, handmade touch to their home décor.
When beginning the Patchwork Cat – PATTERN, the first step is selecting your fabrics. Since this is a patchwork project, you can mix and match a wide variety of materials. Cotton is a popular choice because it is easy to sew and comes in endless prints.
Think about the color scheme you want to achieve. A traditional approach might include earthy tones or coordinated pastels, while a modern twist could involve bold, contrasting colors. Mixing solids with patterned fabrics creates depth and interest.
Once fabrics are chosen, gather your basic sewing tools. You’ll need a sewing machine, scissors, pins, thread, and an iron for pressing seams. Having everything organized before starting makes the process smoother.
Many patterns include templates for cutting the pieces. These templates guide you in creating the cat’s body, head, tail, and patchwork sections. Carefully tracing and cutting ensures accuracy later when assembling.
Before sewing, arrange your fabric pieces into a layout. This gives you a preview of how the final patchwork cat will look and helps you decide if you want to make changes to colors or placement.
Finally, prepare a comfortable workspace with good lighting. Sewing is an enjoyable, creative process, and the right environment enhances the experience.
Begin by piecing together the smaller fabric sections. Sew them with consistent seam allowances, pressing each seam flat to maintain neatness. These small sections will gradually form the cat’s body.
Once you’ve assembled the body sections, move on to the head and tail. These pieces are often curved, so take your time and use pins or clips to secure the fabric before sewing. This ensures smooth, rounded shapes.
After creating the main components, start joining them together. Align edges carefully to avoid uneven seams. The patchwork design relies on precision, so double-checking alignment is important.
At this stage, you may choose to add decorative stitching. Some quilters like to sew over the seams with contrasting thread, creating a visible patchwork effect. Others prefer invisible stitching for a seamless look.
If you want your cat to be three-dimensional, sew two identical pieces together, leaving an opening for stuffing. Fill it with fiberfill until plump, then close the seam securely.
Adding eyes, whiskers, or even a small bow can personalize your patchwork cat. These details bring the character to life and make it unique to you or the person receiving it.
The Patchwork Cat – PATTERN allows for endless variations. You can change its size depending on whether you want a small ornament, a decorative pillow, or a cuddly toy.
Some makers enjoy adding embroidery to the fabric patches. Simple stitches like stars, flowers, or initials can give your patchwork cat extra charm.
Another variation is to use themed fabrics. Holiday prints can turn your cat into a seasonal decoration, while bright and colorful fabrics make it perfect for children.
You can also experiment with textures. Mixing velvet, denim, and cotton fabrics creates an interesting tactile effect. This makes the project even more engaging.
For those who love quilting, you can quilt the fabric pieces before assembling them. This adds texture and dimension while keeping the cat sturdy.
Finally, consider creating a family of patchwork cats in different sizes and styles. Displayed together, they make a whimsical and heartwarming collection.
Accuracy is key in patchwork. Always measure and cut carefully to ensure your pieces fit together seamlessly.
Pressing seams after each step not only improves accuracy but also gives your finished project a professional appearance.
If you are new to sewing curves, practice on scrap fabric before attempting the cat’s head or tail. This builds confidence and improves your results.
Using coordinating thread colors helps create a polished look. However, contrasting thread can be used for decorative effect if desired.
Don’t rush the process. Enjoy each step, from selecting fabrics to adding finishing touches. Handmade projects are about creativity and relaxation as much as they are about the result.
Lastly, remember that no two patchwork cats will look the same. Embrace imperfections as part of the handmade charm, and let your personality shine through your work.
Q: Is the Patchwork Cat – PATTERN suitable for beginners?
Yes, beginners can follow this pattern as long as they take their time and practice basic sewing techniques.
Q: What fabrics are best for this pattern?
Cotton is recommended for ease of sewing, but you can mix different fabrics like denim, linen, or velvet for variety.
Q: Can I use scraps for this project?
Absolutely. This pattern is perfect for using leftover fabric pieces in creative ways.
Q: Do I need a sewing machine?
While a sewing machine makes the process faster, you can sew by hand if you prefer a slower, meditative approach.
Q: Can I make the patchwork cat stuffed or flat?
Yes, you can create a stuffed toy or a flat decorative piece depending on your preference.
Q: How long does it take to complete one cat?
It depends on the size and details, but most projects can be finished in a few hours to a couple of days.
The Patchwork Cat – PATTERN is a fun and versatile sewing project that combines tradition, creativity, and sustainability. By using fabric scraps and simple sewing techniques, you can create an adorable cat that reflects your personal style.
Whether you keep it for yourself, gift it, or make a collection, this project offers joy and satisfaction at every step. Now it’s your turn—try this pattern, enjoy the process, and don’t forget to share your thoughts, opinions, and suggestions. Your feedback helps keep the creative community alive and inspired.
