Baby Sleeping Bag - TUTORIAL

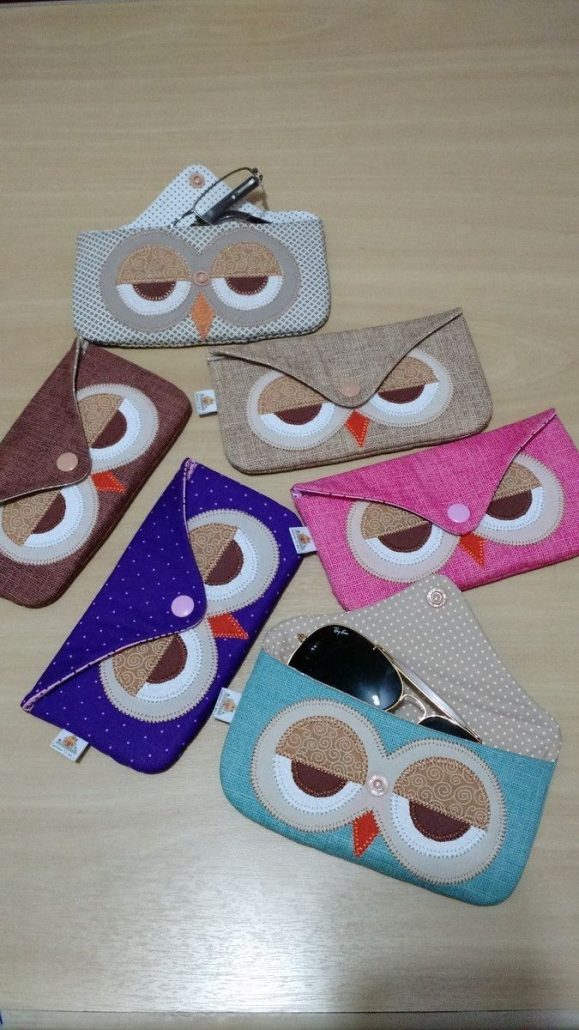
The Owl Glasses Holder – TUTORIAL is a delightful and practical sewing project that combines functionality with charm. Many people misplace their glasses around the house, and this creative design solves that problem while adding a touch of personality to your home decor. By sewing an owl-shaped glasses holder, you create not only a useful accessory but also a handmade piece that reflects warmth and creativity.
This tutorial guides you step by step in making your own owl glasses holder, whether for personal use or as a thoughtful handmade gift. Owls are often associated with wisdom and protection, making this project both symbolic and practical. The Owl Glasses Holder – TUTORIAL is an excellent project for beginners and advanced sewists alike, as it requires only basic sewing skills and a bit of fabric creativity.
Handmade crafts like this bring joy into everyday life. Instead of relying on ordinary stands or leaving glasses lying around, you can rest them on a cute owl that brightens your space. With fabric scraps, simple stitches, and a touch of imagination, you can create a charming project that blends practicality with style.
Before starting the Owl Glasses Holder – TUTORIAL, you’ll need to gather the right supplies. This includes fabric of your choice, scissors, thread, a needle or sewing machine, stuffing, and small decorative details such as buttons for the owl’s eyes. Using fabric scraps is a great option, especially if you love sustainable sewing projects.
Choosing the fabric design is an important step. Owls look adorable in patterned fabrics, from floral prints to polka dots, or even patchwork-style combinations. Selecting different textures, such as cotton or felt, can also make your owl holder unique.
Prepare a simple owl pattern template. You can draw your own or print a basic owl shape as a cutting guide. This ensures that your fabric pieces are symmetrical and easy to assemble later. Templates help even beginners feel confident in the process.
The stuffing will give your owl glasses holder its shape and stability. Polyester fiberfill works well, but you can also recycle fabric scraps to keep your project eco-friendly. A sturdy base inside, such as cardboard, can help the owl stand upright.
Don’t forget about the glasses perch. A small padded nose bridge section is included in the design so that your glasses rest securely without slipping. This simple detail makes your owl both functional and decorative.
Finally, set up your sewing space with good lighting and all tools at hand. Having everything organized helps you enjoy the process without interruptions.
The core of the Owl Glasses Holder – TUTORIAL lies in shaping the owl body. Start by cutting two identical pieces of fabric using your template. These will form the front and back of the owl. Adding an extra half inch around the template gives you seam allowance.
Once the pieces are ready, pin them together with the right sides facing inward. Sew around the edges, leaving a small opening at the bottom for turning and stuffing. This is a standard sewing technique that makes the piece neat and durable.
After stitching, carefully turn the owl right side out. At this stage, you’ll already see the body form taking shape. Press gently with an iron if necessary to smooth out any wrinkles and prepare for stuffing.
Stuff the owl body evenly with fiberfill until it is firm but soft. Avoid overstuffing, as this can distort the shape. The goal is to create a stable base while keeping the body plush enough to hold glasses comfortably.
For the base, insert a piece of sturdy cardboard or thick interfacing at the bottom before closing the seam. This strengthens the structure, ensuring the owl stands upright and supports glasses without tipping over.
Finally, hand-stitch the opening closed with small, invisible stitches. Take your time on this step, as neat finishing enhances the overall look of the project.
What makes the Owl Glasses Holder – TUTORIAL truly special are the details. Start with the owl’s eyes, which can be made from fabric circles, felt cutouts, or buttons. Large, expressive eyes give the owl its personality and charm.
The beak can be a small triangle of contrasting fabric stitched just below the eyes. Using bright or glittery fabric for the beak adds a playful touch to the design.
Wings and feathers are optional but highly recommended. You can stitch small fabric appliqués on the sides to represent wings, or quilt patterns into the body fabric for a feather-like texture. These small additions enhance the handmade look.
For the glasses perch, sew or attach a padded fabric strip across the nose area. This ensures the glasses rest securely without slipping down. Using felt or fleece for this part adds softness and prevents scratches on the lenses.
Consider adding embellishments like ribbons, embroidery, or even small fabric flowers to personalize your owl. Each added detail makes it unique and perfectly suited to your style or the person you’re gifting it to.
Take care to balance decoration with functionality. While creative touches make the owl more attractive, the main purpose is to hold glasses safely and steadily.
The last stage of the Owl Glasses Holder – TUTORIAL is about final touches and enjoying the finished piece. Once your owl is assembled, take a moment to adjust any uneven stitches or trim loose threads for a polished finish.
Try placing your glasses on the owl to check the stability and adjust the perch if necessary. The glasses should sit comfortably without slipping, showing that your design is both cute and practical.
This project is also a fantastic handmade gift idea. An owl glasses holder is perfect for birthdays, holidays, or as a thoughtful surprise for anyone who wears glasses. Adding a small note with care instructions makes it even more special.
Beyond glasses, the owl can be used decoratively on shelves, nightstands, or office desks. It brings personality and charm to any space, making it a versatile project.
Experiment with seasonal fabrics, such as Christmas prints or autumn tones, to create themed owl holders throughout the year. This adds a festive touch to your home while keeping the design fresh and fun.
Lastly, celebrate your handmade success by sharing photos of your owl online. Posting your project inspires others and builds connections with fellow crafters who love practical yet creative sewing projects.
Is the owl glasses holder beginner-friendly?
Yes, this tutorial is simple enough for beginners, as it involves basic sewing techniques like cutting, stitching, and stuffing.
What materials do I need for this project?
Basic fabric scraps, stuffing, a needle or sewing machine, thread, scissors, and optional decorations like buttons or felt pieces are enough to get started.
Can I make the owl glasses holder without a sewing machine?
Absolutely. Hand sewing works just as well, though it may take a little longer. Using strong stitches ensures durability.
How big should the owl be?
A height of around 6–8 inches is ideal for holding standard glasses comfortably while keeping the owl stable.
Can I personalize the design?
Yes, you can choose different fabrics, add accessories, or even make themed owls for special occasions like Christmas or Halloween.
Does the owl glasses holder require special care?
No, just occasional spot cleaning with a damp cloth to keep the fabric fresh and dust-free.
The Owl Glasses Holder – TUTORIAL is a wonderful project that blends creativity with everyday practicality. From cutting and sewing the owl shape to adding charming details and ensuring a sturdy design, this handmade craft makes life easier while bringing joy to your space.
It’s simple enough for beginners yet customizable for advanced sewists who want to add more flair. We hope this guide has inspired you to make your own owl glasses holder. Share your thoughts, suggestions, and creative variations—we’d love to hear about your experience with this project.