
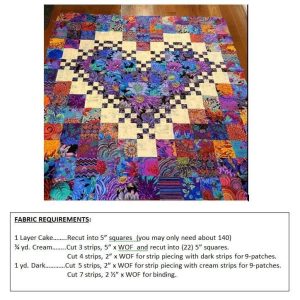
Autumn Lattice Quilt – PATTERN


Nap Support for Car Seat – Tutorial is a creative and practical sewing project that helps keep children comfortable and properly supported during car rides. This type of project is especially useful for parents and caregivers who want to make traveling safer and more relaxing for little ones. By making your own nap support for car seat, you gain the ability to customize fabrics, adjust sizes, and design a piece that fits your child perfectly. Throughout this article, the term Nap Support for Car Seat – Tutorial will be used to reinforce search optimization and improve the reach of your crafting content.
Creating a nap support accessory involves simple sewing methods, fabric layering, and thoughtful consideration of ergonomics. Many people choose this project because it provides gentle head and neck stability that store-bought items often lack. When done correctly, this handmade accessory helps prevent the child’s head from falling forward while sleeping, offering more comfort during long or short trips. As you progress through the Nap Support for Car Seat – Tutorial, you will see just how beginner-friendly and accessible this craft can be.
This guide is structured to support both beginners and experienced sewists. Even if you’re new to sewing, you’ll find that this project is straightforward and easy to follow. The key to successful results is choosing the right materials and following each step with care. With thoughtful stitching and proper padding, your nap support will become a cherished travel companion. The goal of the Nap Support for Car Seat – Tutorial is to empower makers to create safe, soft, and durable accessories for everyday use.

The first part of this Nap Support for Car Seat – Tutorial focuses on understanding the fundamental structure of the project. A proper nap support typically includes shaped side cushions, a soft headrest band, and a secure fastening method. Each section plays a role in preventing the child’s head from leaning uncomfortably during naps. By knowing how these pieces work together, you can craft with intention and precision.
Selecting the right shape is important. Car seats vary in design, so your nap support should complement the seat’s natural structure. Crescent shapes, curved bands, or pillow-style supports are common options. Test your pattern against the car seat before cutting fabric to ensure proper proportions. Small adjustments can make a big difference in comfort.
Padding is another essential component. Soft polyester fiberfill is a popular choice because it retains its shape while remaining lightweight. You may also use foam pieces for more firmness. Layering the padding correctly prevents uncomfortable pressure points and allows the support to mold gently around the child’s head and neck.
Fabric selection contributes both to comfort and longevity. Cotton is breathable and gentle on sensitive skin, while fleece offers warmth and softness. For the back side of the support, you may choose a durable woven fabric that withstands frequent movement. Coordinating colors or themed prints add charm and personalization to your Nap Support for Car Seat – Tutorial project.
Stitching style also matters. Reinforced seams ensure durability, especially since this accessory will be used frequently. Top-stitching adds a polished look while keeping the padding from shifting. Even beginners can achieve professional results by sewing slowly and maintaining consistent seam allowance.
Finally, consider safety throughout your design. Avoid loose embellishments or buttons that could detach and pose hazards. The safest nap supports are simple, generously padded, and securely sewn. This foundational knowledge sets you up for success as you continue through the Nap Support for Car Seat – Tutorial.
Gathering the correct supplies is essential for completing your Nap Support for Car Seat – Tutorial efficiently. Before sewing, take time to compare fabrics, weights, and textures to ensure your project is both safe and comfortable. Having the right tools will also make the process smoother and more enjoyable.
Start by choosing two main fabrics: one soft material for the interior and a durable outer layer. Many crafters prefer cotton flannel, fleece, or minky fabric for the soft side. The outer layer may be cotton or a sturdy woven blend. These fabrics contribute softness against the skin while providing structure and durability.
Polyester fiberfill is the most recommended filling for this project. It is lightweight, washable, and easy to insert into curved shapes. If you prefer a firmer feel, you can combine fiberfill with foam scraps. Make sure your padding material is hypoallergenic, especially for young children.
A sewing machine is not required but makes the process faster. If you choose to sew by hand, use strong thread and tight stitching to prevent gaps. Fabric scissors, pins or clips, an iron, and sewing needles should also be kept nearby during the Nap Support for Car Seat – Tutorial. These basic tools help maintain accuracy and consistency.
Patterns are important even for simple shapes. You can draw your own crescent or U-shaped pattern using paper, or modify an existing pillow template. If you’re crafting multiple supports, keep your pattern stored for future use. Tracing your pattern onto fabric ensures symmetrical and neat pieces.
Fastening options include Velcro, snaps, or sewn-in straps. Velcro is the easiest choice because it allows quick removal and adjustment. Snaps offer durability but may require a snap-setting tool. Choose the fastening method that works best with your car seat style and your sewing experience level.
Before sewing, prepare your workspace. Iron your fabrics, organize your tools, and pre-cut all pattern pieces. This reduces errors and speeds up the crafting process. Being well-prepared makes the experience smoother and ensures the Nap Support for Car Seat – Tutorial results in a high-quality finished product.
The sewing process is the heart of the Nap Support for Car Seat – Tutorial, and even beginners will find these steps easy to follow. Begin by pinning your fabric pieces right sides together. This ensures that the seams will be hidden once the fabric is turned right-side out. Carefully pin along curves to maintain smooth edges.
Next, sew around the perimeter of your pinned pieces, leaving a small gap for turning. A quarter-inch seam allowance works well for this project. Sew slowly around corners and curves to maintain control. If needed, lift your presser foot occasionally to reposition the fabric. Removing pins only as they reach the needle helps keep everything aligned.
Once the main shape is sewn, trim the excess seam allowance. This includes snipping small notches around curved edges. These cuts allow the fabric to turn smoothly and lie flat without bunching. Turn the piece right-side out through the opening, carefully pushing out the corners using a blunt tool.
Now begin stuffing your nap support. Insert small handfuls of fiberfill at a time to ensure even distribution. Press and shape the filling as you go to prevent lumps. Adjust the firmness according to your preference. The goal is to create a soft yet supportive cushion that maintains its structure during use.
After filling, sew the opening closed with a ladder stitch or top-stitch around the entire edge for reinforcement. This completes the pillow portion of your Nap Support for Car Seat – Tutorial. If your design includes straps, attach them securely to each side before closing the opening. Double-stitching straps increases safety and strength.
Finally, attach the fastening method you selected earlier. Velcro strips should be sewn firmly to prevent peeling. Snaps should be aligned correctly to ensure easy use. Once completed, test the nap support on the car seat to confirm it fits comfortably and securely. Your handmade accessory is now ready for use.
To make your Nap Support for Car Seat – Tutorial project even more functional, consider adding thoughtful customizations. Personal touches not only make the accessory unique but also ensure it suits the child’s needs perfectly. Adding embroidered initials or choosing themed fabrics such as animals, stars, or cars can make the support more appealing.
If you’re making the nap support as a gift, use neutral colors and soft textures to ensure it matches most car seats. You can also experiment with shape variations, such as elongated cushions or compact supports designed for infants. Test each design before final stitching to ensure comfort.
Some makers enhance the support by adding breathable mesh panels. These sections increase ventilation and prevent overheating. This is especially useful in warmer climates or during long road trips. Make sure the mesh is soft and durable to maintain comfort and quality.
Caring for the finished support is easy. Most nap supports are machine washable when made with cotton or fleece. Use a gentle cycle and mild detergent to maintain softness. Air-drying helps preserve the shape, especially for fiberfill-stuffed cushions. Regular cleaning ensures the accessory remains hygienic for repeated use.
If damage occurs, simple repairs can extend the life of your nap support. Hand-stitch any open seams or reinforce areas with wear. Since the accessory is small, repairs are quick and uncomplicated. Maintaining your handcrafted item saves money and reduces waste.
By incorporating these tips into your Nap Support for Car Seat – Tutorial, you’ll create a long-lasting and highly personalized item that enhances comfort and safety during travel. Customizations, care routines, and thoughtful adjustments make this project both enjoyable and rewarding.
1. Is a handmade nap support safe for children?
Yes, as long as it is sewn securely, free of choking hazards, and fits properly. Avoid buttons or loose decorations and always ensure it does not interfere with car seat straps.
2. What is the best fabric to use?
Soft cotton, fleece, or flannel are ideal choices. They provide comfort while remaining breathable. Durable fabric on the back helps maintain structure.
3. How firm should the padding be?
Medium firmness is recommended. Overfilling can create pressure, while under-filling reduces support. Adjust the fiberfill until it feels comfortable and stable.
4. Can this nap support be washed?
Yes, most can be machine washed on gentle cycle. Let it air-dry to maintain the shape and softness of the padding.
5. Does the nap support fit all car seats?
Because designs vary, it’s best to test your pattern on the car seat before sewing. You can easily resize the template for a perfect fit.
6. Can beginners make this project?
Absolutely. The Nap Support for Car Seat – Tutorial is simple enough for beginners and requires only basic sewing techniques.
The Nap Support for Car Seat – Tutorial is a wonderful sewing project that blends practicality with creativity. You learned how to choose the right materials, design a supportive structure, follow sewing steps, and customize your final piece.
PATTERN VIDEO:
This project helps ensure comfort and stability during car rides while offering the joy of crafting something handmade and meaningful. I hope this guide inspires you to create your own version and adapt it to your needs. Please share your honest thoughts, suggestions, or ideas for future tutorials—I’d love to hear your feedback!


