Lake Cabin Quilt Pattern – Tutorial

If you’re a fan of handmade sewing projects, you’re going to love this Mouse Zipper Purse – Pattern. Right from the very first stitch, this tutorial introduces a whimsical and practical sewing idea that combines charm with functionality. Whether you’re looking to create a unique coin pouch, a fun gift, or just want to level up your quilting and sewing skills, this project is the perfect choice.
The Mouse Zipper Purse – Pattern stands out among beginner-friendly patterns for its adorable design and usefulness. It’s ideal for organizing small items like coins, earbuds, keys, or sewing supplies. With a few fabric scraps and a zipper, you can transform your creativity into something both cute and functional.
In this tutorial, we will walk you through each step with clarity, giving you all the tools to confidently sew your very own Mouse Zipper Purse – Pattern. From choosing the right fabric to the final seam, you’ll discover tips that will make this project both enjoyable and rewarding.

Before diving into your sewing machine, it’s essential to gather all your materials. Preparation makes the process smooth and stress-free. You’ll find that most of these supplies are likely already in your sewing kit.
You’ll need fabric scraps in cotton or canvas, preferably in different prints to add character. The body of the mouse is a great place to use up your quilting leftovers or charm squares. Pick prints that match or contrast for extra fun.
A 4” to 6” zipper is ideal for this project. A longer zipper can be trimmed if needed. Choose a zipper color that complements your fabric or go bold with something contrasting.
You will also need batting or felt for a bit of structure, along with standard sewing tools: scissors, pins, sewing machine, thread, and a marking tool. If you want to add a tail or ears, consider some yarn or felt pieces for embellishment.
Don’t forget a pattern template for the mouse shape. You can draw your own or find printable templates online. It helps ensure uniformity, especially if you’re making multiples.
Optional accessories can include buttons for eyes, a ribbon loop for hanging, or embroidery thread for decorative stitches. These small touches make the purse even more charming.
Having all your supplies ready at the start will help you enjoy the Mouse Zipper Purse – Pattern from the moment you begin stitching.
Now let’s dive into the sewing process. This Mouse Zipper Purse – Pattern is fun, quick, and beginner-friendly, but you’ll want to follow the steps carefully to get a neat finish.
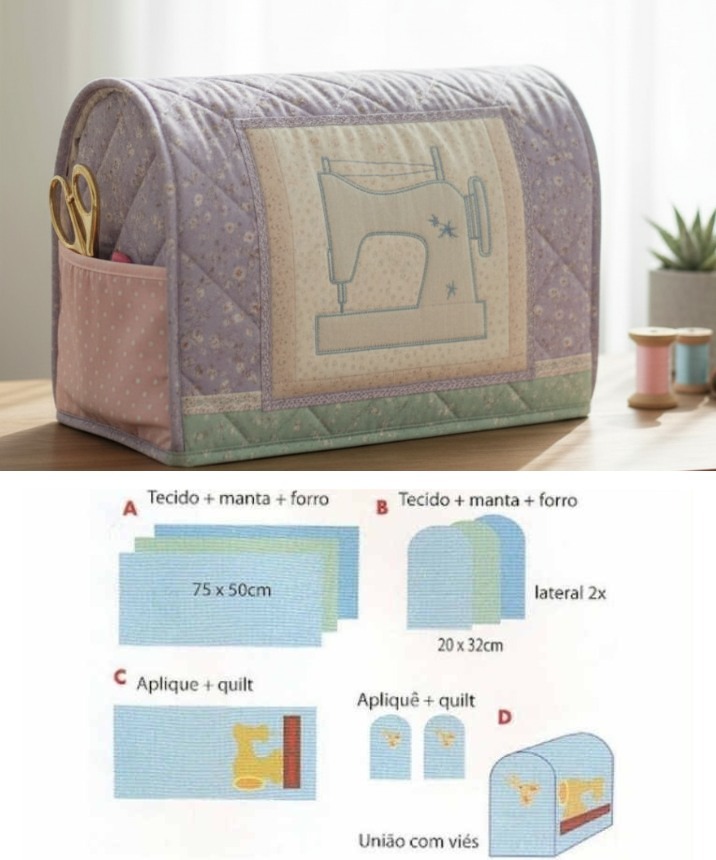
Begin by cutting your fabric using the mouse-shaped pattern template. You’ll need two pieces for the front and back of the purse, two pieces of batting or felt for structure, and any extras like ears or tails.
Pin your zipper in place between the outer fabric and lining, face-to-face, aligning it with the top edge. Sew it slowly to make sure the zipper stays straight and the corners are secure.
Repeat the zipper process on the other side with the remaining fabric and lining pieces. Once attached, turn the fabric right side out and topstitch along the zipper to keep it flat and professional-looking.
Now, place your front and back pieces right sides together, pin around the edges, and sew all the way around the mouse shape—leaving a small opening at the bottom if you plan to turn it inside out.
Before turning, clip the curves and corners carefully. This will help the mouse shape look clean and rounded once flipped. Then, turn the purse right side out through the opening or zipper.
Finish by adding any decorative touches like buttons for eyes, a felt nose, or yarn tail. These personal details really bring your Mouse Zipper Purse – Pattern to life and make it one-of-a-kind.
One of the joys of the Mouse Zipper Purse – Pattern is how easily it can be customized. You can make a dozen versions and each one will have its own personality.
Try using different fabrics for each section of the mouse. Maybe a floral print for the back and a polka-dot for the belly. Mixing and matching creates endless possibilities.
You can also play with the zipper placement. Horizontal, vertical, or diagonal – each layout changes the overall style of the purse while keeping it practical.
Change up the size of your mouse purse. A smaller one makes a great coin purse, while a larger one could store cosmetics, sewing tools, or even travel items.
Make it extra fun by using fabric with mouse or cheese motifs. Kids especially love themed accessories, and this can make it more appealing as a handmade gift.
If you love quilting, consider quilting the outer fabric pieces before assembly. This adds texture, structure, and a touch of classic quilting charm to the project.
For a festive twist, use seasonal fabrics—like red and green for Christmas or pastels for Easter. This makes the Mouse Zipper Purse – Pattern perfect for holiday gifts or craft fair inventory.
This project has gained popularity among sewists, quilters, and crafters alike—and for good reason. The Mouse Zipper Purse – Pattern is more than a novelty item; it’s a great teaching tool, gift idea, and stash buster.
It’s beginner-friendly, yet satisfying for advanced sewists. It allows you to practice zipper installation, curved sewing, and small project construction—all in one.
The project takes a short amount of time to complete. In under an hour, you can have a finished piece in your hand. That’s especially rewarding for busy crafters who love fast finishes.
The design is charming and versatile. Whether you’re sewing for a child, a friend, or yourself, this purse brings smiles. It has an endearing handmade look that people appreciate.
It makes an excellent gift or craft fair item. Small, useful, and adorable items like this sell well and show off your skills beautifully.
It’s a great way to use fabric scraps. You don’t need much fabric, and it’s perfect for using leftovers from larger quilt projects.
The process encourages creativity. There are no strict rules—just guidelines—so each Mouse Zipper Purse – Pattern becomes a personal expression of style and fun.
Q1: Can beginners make the Mouse Zipper Purse?
Yes! This pattern is perfect for beginners. The steps are simple, and the project is small enough to be manageable even if you’re new to sewing or quilting.
Q2: What kind of fabric works best?
Cotton is ideal, especially quilting cotton. Canvas or linen can also work for added durability, but make sure your machine can handle thicker layers.
Q3: How long does the project take to complete?
Most people can complete a Mouse Zipper Purse in 30–60 minutes, depending on their experience and embellishments.
Q4: Can I sell items made from this pattern?
Yes, as long as the pattern doesn’t specify otherwise. Many makers sell these at craft fairs or online shops. Just give credit to the original pattern designer when required.
Q5: Can the pattern be resized?
Absolutely! You can enlarge or shrink the template before cutting your fabric. Just remember to adjust your zipper size accordingly.
Q6: What are some popular uses for the finished purse?
Use it for coins, earphones, sewing tools, or as a kid’s gift. It’s also a cute accessory for travel bags or backpacks.
The Mouse Zipper Purse – Pattern is a delightful and practical sewing project that suits all skill levels. From gathering your materials to stitching the last detail, this pattern offers creativity, functionality, and fun in every step. With endless ways to personalize it, the finished product will always be uniquely yours.
We hope you enjoyed this tutorial and feel inspired to try it yourself. Don’t forget to leave a sincere opinion below and share any suggestions or creative variations you’ve tried. We’d love to hear from you!