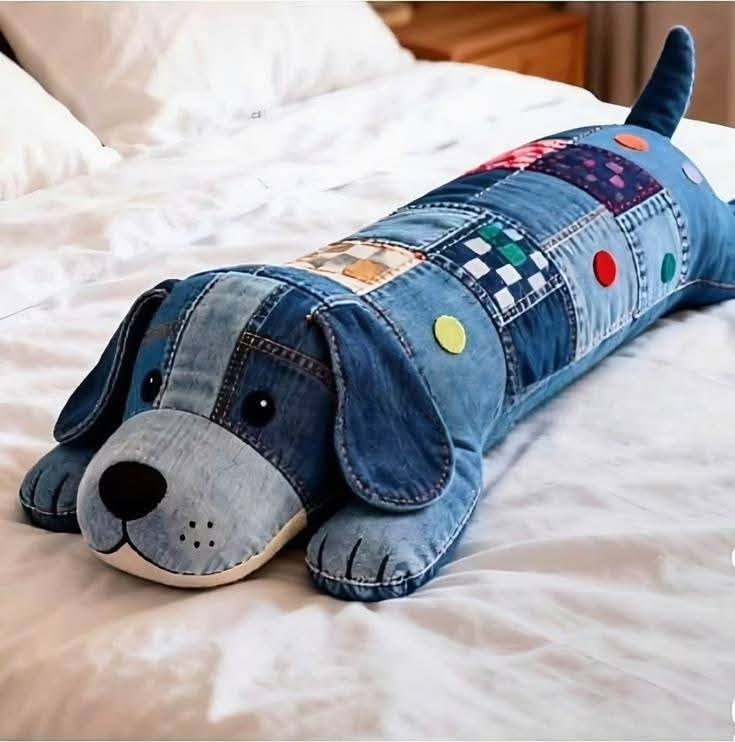
DIY - Quilted Denim Dog Pillow

The Kitty Pencil Case – TUTORIAL is the perfect project for those who love practical crafts with a touch of cuteness. A pencil case is always useful, but when it has a kitty design, it becomes something extra special, especially for kids, students, and cat lovers. Handmade items like this not only serve a purpose but also reflect personality and creativity.
Creating your own kitty pencil case allows you to customize it in terms of colors, size, and details. Whether you want something bright and fun for children or a more minimalist style for adults, this project is versatile and adaptable. It also makes for a thoughtful gift idea, as personalized handmade items are always appreciated.
This Kitty Pencil Case – TUTORIAL will guide you through the process step by step, from materials to assembly. Even if you are new to crafting or sewing, the instructions are simple and clear, making this a beginner-friendly project. With patience and creativity, you will end up with a functional and adorable accessory that you can proudly use or gift.

To start your kitty pencil case project, you will need a few essential materials. The fabric you choose will determine both durability and style, so cotton or canvas are excellent choices for everyday use. Felt is another great option, especially if you want a soft and easy-to-sew finish.
A zipper is one of the most important parts of the pencil case. Choose one that matches the length of the case you plan to make. A good quality zipper ensures the pencil case opens and closes smoothly, keeping your pens and pencils secure.
Thread and a sewing needle or sewing machine will also be required. If you are sewing by hand, be patient and take your time to make neat, strong stitches. A sewing machine makes the process faster, but either method works well for this project.
For the kitty details, you can use felt pieces, fabric scraps, or even embroidery thread. These will be used to create the ears, whiskers, eyes, and nose. Adding these details is what transforms a simple pencil case into a charming kitty design.
Scissors, pins, and fabric glue may also come in handy during the process. Pins help hold the fabric in place while sewing, and fabric glue can secure smaller decorative pieces if you prefer not to stitch them.
Finally, don’t forget a measuring tape to cut your fabric accurately. This ensures your pencil case has the right size to hold pens, pencils, and other small supplies.
The first step is to cut two rectangular pieces of fabric for the front and back of the case. The size depends on how many items you want to store, but a good standard size is around 9 inches by 5 inches.
Next, prepare the kitty ears. Cut two small triangles of fabric or felt and sew them onto the top edge of one of the fabric rectangles. This step instantly gives the case a playful look.
Attach the zipper to the top of the fabric rectangles. Place the zipper face down on the right side of the fabric and stitch carefully. Repeat this for the other rectangle. Once sewn, the zipper should open and close smoothly.
Now it’s time to stitch the two fabric rectangles together. Place them right sides facing each other and sew around the edges, leaving the zipper slightly open so you can turn the pencil case right side out later.
After sewing, turn the pencil case inside out through the zipper opening. At this stage, you will see the basic shape of your kitty pencil case. Adjust the corners neatly with scissors or a pencil tip to make them sharp.
Finally, add the kitty face. You can stitch or glue small felt pieces to make eyes, whiskers, and a nose. If you enjoy embroidery, you can stitch the details directly onto the fabric. Personalize it as much as you like to give your kitty a unique expression.
One of the best things about this project is that you can be as creative as you want. The kitty pencil case can be made in a variety of fabrics and colors to match different personalities.
For kids, you can use bright and cheerful fabrics like pink, blue, or patterned materials. Add sparkly embellishments or fun buttons to make the pencil case even more exciting.
For adults, a minimalist approach works well. Neutral colors like gray, beige, or black combined with subtle kitty details can create a professional yet playful accessory for the office or school.
Another fun idea is to make themed pencil cases. For example, you could design a Halloween kitty with orange and black fabric, or a Christmas kitty with red and green colors. Seasonal versions make great gifts and festive accessories.
If you enjoy upcycling, consider reusing old jeans, t-shirts, or fabric scraps. This not only makes your project eco-friendly but also gives the pencil case a unique look that can’t be found in stores.
Lastly, you can turn this project into a small business opportunity. Handmade kitty pencil cases are attractive items to sell at craft fairs or online. With the right fabrics and details, each one becomes a unique creation that customers will love.
Precision is key when making pencil cases. Always measure your fabric carefully before cutting to avoid uneven edges. A ruler or cutting mat can be very helpful.
When sewing the zipper, go slowly. Many beginners struggle with zippers, but with patience, you can achieve a neat finish. Pinning or basting the zipper in place before stitching can help.
If you are adding felt details for the kitty’s face, make sure they are secured properly. Stitching is more durable than glue, but if you prefer glue, choose a strong fabric adhesive.
Experiment with different ear shapes and sizes. Small rounded ears give a cute cartoon look, while sharper triangular ears look more realistic. Play around until you find the style you like best.
Ironing the fabric before sewing will make the process easier and the final product neater. Wrinkled fabric can cause uneven seams, so a smooth surface helps with accuracy.
Finally, don’t be afraid to make mistakes. Crafting is all about learning and improving. Each pencil case you make will look better as you practice, so enjoy the journey and have fun.
1. What fabric works best for a kitty pencil case?
Cotton, canvas, or felt are the best options because they are durable and easy to sew.
2. Can I make this project without a sewing machine?
Yes, the Kitty Pencil Case – TUTORIAL can be completed with hand stitching. It may take more time, but it works well.
3. How long does it take to make a kitty pencil case?
On average, it takes about 1 to 2 hours, depending on your sewing experience.
4. Can children use this tutorial?
Yes, but younger children should have adult supervision, especially when using scissors and needles.
5. Is it possible to wash the pencil case?
Yes, if you use washable fabric and securely stitched details. Hand washing is recommended to maintain the shape.
6. Can I sell pencil cases made from this tutorial?
Absolutely! Handmade kitty pencil cases are popular and make great items for craft fairs or online shops.
The Kitty Pencil Case – TUTORIAL is a fun, creative, and practical project that combines sewing with personal expression. From choosing your fabric and sewing the zipper to adding the adorable kitty details, this guide takes you step by step through the process.
Whether you are making it for yourself, as a gift, or to sell, the kitty pencil case is sure to bring smiles and usefulness to everyday life. Each one can be customized, making it truly unique.
PATTERN VIDEO:
I’d love to hear your thoughts! Share your opinion about this tutorial and leave suggestions for future craft projects. Your feedback helps inspire even more creative ideas for the community.