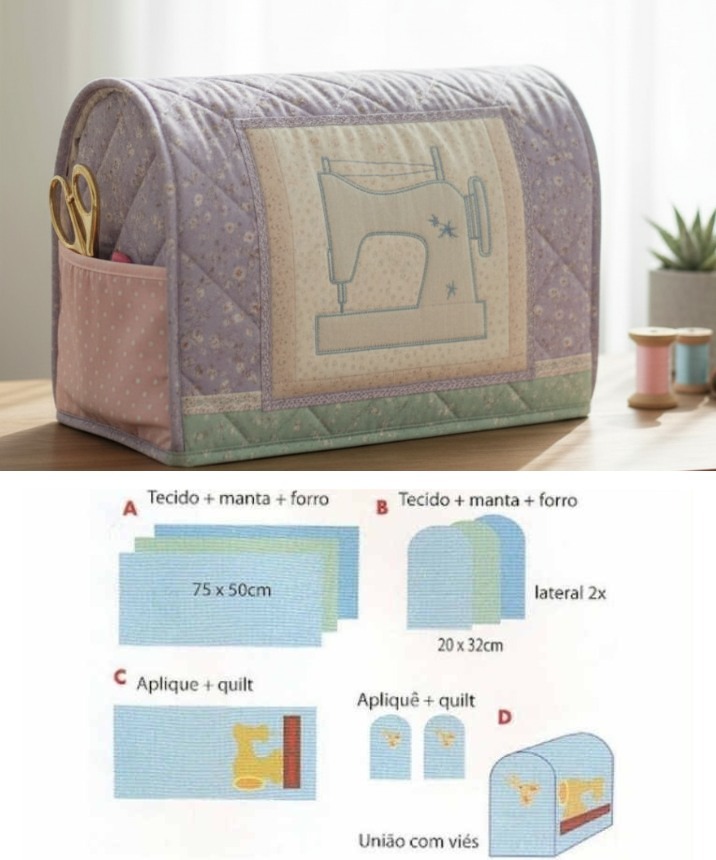
Lake Cabin Quilt Pattern – Tutorial

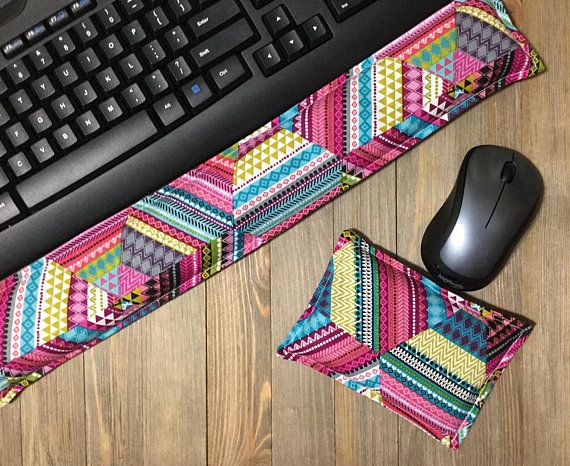
If you spend long hours working at your computer, crafting your own Keyboard and Mouse Wrist Rests – PATTERN is not only a creative project but also a practical one. These wrist rests are designed to provide comfort and reduce strain during typing or gaming sessions. With this simple yet stylish pattern, you can crochet or sew your own ergonomic accessories that look amazing on any desk setup. Plus, making them yourself means you can customize the colors, fabrics, and shapes to perfectly fit your space and personality.
The beauty of creating your own Keyboard and Mouse Wrist Rests – PATTERN is that you can design something both functional and visually appealing. Whether you prefer a minimalist aesthetic, a cute theme, or a modern vibe, this project allows you to combine creativity with comfort. Unlike store-bought wrist rests, handmade ones offer a personal touch and can be adapted to your exact wrist and hand size. It’s an excellent project for anyone who enjoys crafting, sewing, or crocheting with purpose.
In this tutorial, we’ll walk through everything you need to know about creating the Keyboard and Mouse Wrist Rests – PATTERN from start to finish. You’ll learn how to choose the best materials, shape and fill the wrist rests properly, and finish them with neat details that ensure durability and long-lasting comfort. Whether you’re a beginner or an experienced crafter, this project is simple enough to complete in an afternoon and rewarding enough to use every day.
When making the Keyboard and Mouse Wrist Rests – PATTERN, the first step is gathering the right materials. Choosing comfortable and durable fabrics is essential since your wrists will rest on them for long periods. Soft cotton, fleece, or microfiber fabrics are great options that feel pleasant against the skin. If you want something more stylish, consider using patterned cotton or even upcycled fabric from old clothes or linens.
Next, you’ll need to decide on the filling. The goal is to create enough support without making the wrist rests too hard. Common filling materials include polyester fiberfill, rice, flaxseed, or microbeads. For a lightweight and easily washable version, polyester fiberfill is ideal. For a more eco-friendly and natural option, flaxseed or rice gives a nice, moldable feel that conforms to your wrists.
Measuring your keyboard and mouse area is also crucial. The wrist rest for the keyboard should typically be the same width as your keyboard and about 2 to 3 inches wide. The mouse wrist rest can be smaller, designed to fit comfortably under your hand during use. Customizing the sizes ensures perfect ergonomics for your setup.
If you’re sewing, you’ll need basic tools like scissors, a needle, thread, pins, and a sewing machine. If crocheting, choose a yarn that’s soft yet durable—cotton yarn works best for comfort and easy cleaning. Use a hook size appropriate for your yarn weight, usually between 3.5 mm and 4.5 mm.
Before you begin sewing or crocheting, consider pre-washing your fabric or yarn. This step prevents shrinking or color bleeding after your wrist rests are complete. It also helps soften the texture for a more pleasant feel during use.
Lastly, plan your color palette. Desk accessories are part of your workspace decor, so choose hues that inspire creativity and calmness. Neutrals, pastels, and earthy tones are great for a soothing effect, while bright colors can add fun and energy to your setup.
Now that your materials are ready, it’s time to start crafting the Keyboard and Mouse Wrist Rests – PATTERN. Begin by cutting or crocheting the base shapes. For a keyboard rest, you’ll need a long rectangular piece. The mouse wrist rest should be smaller and rounded for comfort. Make sure to leave room for seams if you’re sewing—about ½ inch around each side.
If you’re sewing, place two fabric pieces right sides together, sew around the edges, and leave a small opening for filling. Once the stitching is complete, turn the piece inside out so the seams are hidden. This gives your wrist rest a clean, professional appearance.
If you’re crocheting, work in rows for the keyboard rest and rounds for the mouse rest. Use tight stitches to ensure the filling won’t leak through. A simple single crochet stitch pattern works well for strength and density. When finished, crochet or stitch the sides together, leaving a small gap for inserting the filling.
Before adding the filling, double-check that the shape and size are correct. Try placing your hands where they will rest to see if the pieces feel comfortable. Adjustments at this stage are much easier than after the filling is added.
When filling, add the chosen material slowly and evenly. The goal is to achieve a balance—firm enough to provide support, but soft enough to cushion your wrists. Avoid overstuffing, as this can make the wrist rest too high and uncomfortable.
After filling, close the opening securely with a hidden stitch or final crochet row. Make sure all seams are strong and tight to prevent leakage or unraveling. Your wrist rests should now hold their shape and feel smooth to the touch.
To make your Keyboard and Mouse Wrist Rests – PATTERN even more enjoyable, you can add decorative and functional touches. One option is to create removable covers. This makes it easier to wash or switch styles whenever you want. Simply sew or crochet a slightly larger sleeve that fits snugly over your wrist rest and add a small zipper or button closure.
You can also embellish your wrist rests with embroidery, appliqué, or crochet borders. Small flowers, geometric patterns, or your initials can personalize your design beautifully. Just be sure that any added decorations don’t interfere with the wrist’s resting area or make the surface uneven.
If you prefer a cooling effect, consider using breathable fabrics like bamboo cotton or linen. These materials help keep your wrists comfortable even during long work sessions. For a warming effect, rice or flaxseed fillings can be gently microwaved for a few seconds to create cozy warmth on cold days.
Another great idea is to match your wrist rests with other desk accessories. You could make a matching mouse pad cover, keyboard sleeve, or even a small cup holder coaster. These cohesive details help create a calm and coordinated workspace.
When it comes to sewing or crochet patterns, experiment with texture. Raised crochet stitches, such as the popcorn or puff stitch, can add dimension and grip to the bottom surface while keeping the top smooth for comfort.
Finally, if you plan to gift your handmade wrist rests, wrap them beautifully and include a tag with care instructions. It’s a thoughtful and practical handmade gift that anyone who works or studies at a computer will appreciate.
Proper care ensures that your Keyboard and Mouse Wrist Rests – PATTERN lasts for years. If you used washable materials like cotton or polyester fiberfill, you can clean them gently by hand washing in cold water with mild soap. Always air dry completely before use to avoid moisture buildup inside the filling.
For non-washable fillings like rice or flaxseed, it’s best to spot clean the surface with a damp cloth. Avoid soaking, as moisture can cause mold or odors over time. Having removable covers is helpful for these versions since they can be easily washed separately.
Over time, fillings may compress slightly with daily use. If this happens, you can open a small section, add more filling, and reseal the edge. Regular maintenance keeps your wrist rests supportive and comfortable.
If your workspace gets dusty, remember to shake or gently vacuum your wrist rests once in a while. This keeps them fresh and extends their lifespan.
For crochet wrist rests, inspect the stitches periodically to ensure no gaps are forming. If you find loose threads, reinforce them with a few extra stitches using matching yarn.
Lastly, rotate your wrist rests occasionally to ensure even wear. This small habit can prevent uneven flattening and keep the surface smooth and supportive for longer periods.
Q: Can beginners make the Keyboard and Mouse Wrist Rests – PATTERN?
A: Yes! This project is beginner-friendly and requires only basic sewing or crochet skills. It’s a great way to practice making functional items.
Q: What is the best filling for wrist rests?
A: For washable versions, polyester fiberfill is best. For natural alternatives, try flaxseed or rice for a moldable and comfortable texture.
Q: How can I make the wrist rests ergonomic?
A: Ensure the height matches your wrist position when typing. Avoid overfilling and shape them to allow your wrists to stay straight and relaxed.
Q: Can I microwave my wrist rests for warmth?
A: Only if they are filled with rice or flaxseed and contain no metal or synthetic materials. Heat for short intervals and test before use.
Q: How do I keep the wrist rests clean?
A: Use removable covers for easy washing, or spot clean with a damp cloth for non-washable fillings.
Q: Can I gift this project?
A: Absolutely! The Keyboard and Mouse Wrist Rests – PATTERN makes an excellent handmade gift for friends, coworkers, or students.
Creating your own Keyboard and Mouse Wrist Rests – PATTERN is a simple yet satisfying way to combine creativity and practicality. You’ve learned how to choose materials, build the base, add stylish details, and maintain your handmade wrist rests for long-term use.
Whether sewing or crocheting, this project helps you craft something that adds both comfort and charm to your workspace. We’d love to hear your honest opinion and suggestions—what design or filling worked best for you? Share your experience below and inspire others to create their own wrist rest masterpiece!