Lake Cabin Quilt Pattern – Tutorial

If you love quilting and journaling, then this Journal Cover – Quilt Pattern is the perfect project for you. It combines creativity, practicality, and beauty into one delightful handmade item. Whether you’re making it for yourself or as a thoughtful gift, this quilted journal cover adds a personal touch to any notebook or diary. With simple steps and room for customization, this tutorial will guide you through crafting a unique and meaningful piece that reflects your artistic spirit.
The Journal Cover – Quilt Pattern allows quilters of all levels to express themselves through fabric selection, stitching, and design. You can play with colors, textures, and patterns to make each journal cover distinct. Not only does it protect your notebooks, but it also turns an ordinary object into a work of art that you’ll be proud to use every day.
This project is great for using up fabric scraps or trying out new quilting techniques. Plus, it’s quick, satisfying, and makes an excellent handmade gift for writers, students, or anyone who loves stationery. So, get ready to follow along and create something both functional and beautiful with this Journal Cover – Quilt Pattern tutorial.
Before beginning your project, gather all the materials you need to make your Journal Cover – Quilt Pattern. Having everything ready will make the process smooth and enjoyable. You’ll need cotton fabric (two or more coordinating prints), batting or fusible fleece, thread, a sewing machine, scissors or a rotary cutter, and a notebook to measure your cover size.
Choose fabrics that reflect your personal style. Floral patterns give a soft, feminine touch, while geometric or abstract prints create a modern vibe. The key is to pick fabrics that complement each other and showcase your creativity.
Batting or fleece gives the journal cover a cushioned feel and helps it maintain structure. Lightweight batting is usually best, as it keeps the cover flexible without being bulky.
You’ll also need a ruler or measuring tape to ensure precision. Accurate measurements are crucial for a snug fit around your notebook. Write down the height and width of your journal and add extra seam allowances before cutting your fabric pieces.
Make sure your sewing tools are in good condition. Sharp scissors, matching thread, and a clean sewing machine can make all the difference in achieving professional results.
Finally, set up a comfortable workspace. Quilting is an enjoyable and calming craft, so take your time and enjoy the creative process from start to finish.
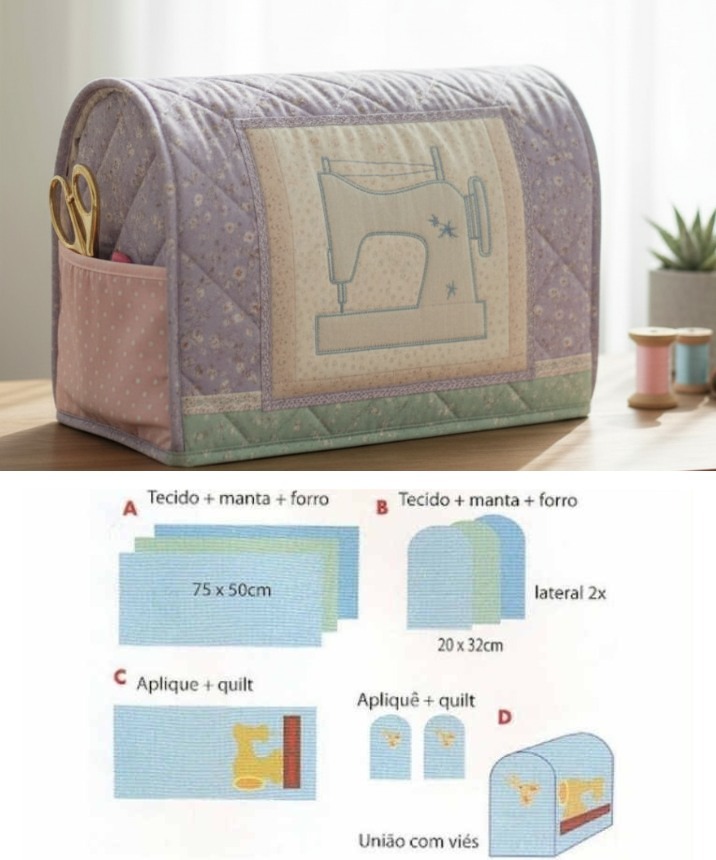
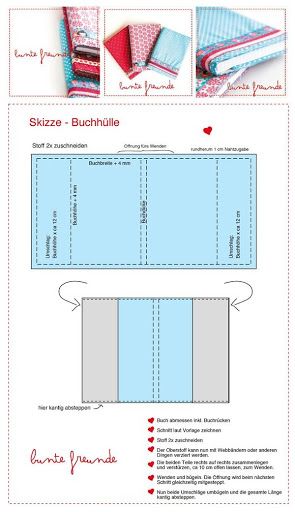
Start by measuring your journal. Measure the width, height, and thickness of your notebook, then calculate the fabric dimensions accordingly. The Journal Cover – Quilt Pattern should fit snugly, allowing the book to slide in easily but not too loosely.
Cut the fabric for the outer cover, lining, and pockets. If you want a patchwork design, piece together small fabric squares before cutting to the final size. This is where your quilting skills can really shine—experiment with color combinations and stitching patterns.
Next, layer your fabrics: place the outer cover and lining right sides together, with the batting underneath. Pin or clip the layers to hold them in place. Sew around the edges, leaving a small opening to turn the cover right-side out later.
Once sewn, trim excess fabric and clip corners for a neat finish. Turn the cover right-side out and press it flat with an iron. Topstitch around the edges to close the opening and give your project a polished look.
Add your pockets by folding and stitching fabric pieces on each inside flap of the cover. These pockets will hold your notebook’s covers in place. Be sure to test the fit before final stitching to make sure the notebook slides in smoothly.
Finally, give your Journal Cover – Quilt Pattern one last press and admire your work. You now have a beautiful, custom-made journal cover ready to use or gift to someone special.
One of the best parts of the Journal Cover – Quilt Pattern is how customizable it is. You can easily adapt the design to match your personality, interests, or the season. Use different fabric themes for holidays, nature, or even your favorite hobbies.
For a minimalist look, try solid colors with subtle quilting lines. This creates a clean, elegant design that’s timeless. You can also add a small embroidered monogram or initial for a sophisticated touch.
If you prefer something more vibrant, go bold with contrasting fabrics or bright patchwork patterns. Mixing prints can give your journal cover a fun and artistic feel.
Adding embellishments like buttons, lace, or fabric appliqués makes the project even more special. Consider adding a fabric strap with a snap or button closure to keep your journal securely closed.
Another fun idea is to create themed journal covers—one for daily journaling, another for recipes, or even a cover for your quilting notebook. The Journal Cover – Quilt Pattern can easily be adapted to different book sizes and purposes.
Lastly, you can line the inside with a soft fabric such as flannel or felt for extra texture. These little details elevate your handmade project and make it uniquely yours.
When quilting small projects like this, precision is key. Take time to measure and cut accurately—uneven edges can affect how well the cover fits. The Journal Cover – Quilt Pattern is simple, but neatness makes it stand out.
Press your seams open as you sew. Ironing after each step ensures your project lies flat and helps prevent puckering when assembling the layers.
Don’t skip the topstitching. It not only reinforces the edges but also gives your journal cover a finished, professional look. Choose a thread color that complements or contrasts with your fabric, depending on your design preference.
If you’re new to quilting, start with simple straight-line quilting before trying more complex designs. Even a few diagonal stitches can add texture and interest to the fabric surface.
When turning the cover right-side out, use a blunt tool like a knitting needle or chopstick to push out corners neatly without tearing the fabric. Small touches like this make a big difference in the final result.
Finally, enjoy the process and be creative. The beauty of quilting lies in the personal expression it allows, so let your Journal Cover – Quilt Pattern reflect your heart and style.
1. Can I make this project without a sewing machine?
Yes! You can hand-stitch your quilted journal cover if you prefer. It will take longer but can be just as beautiful and rewarding.
2. What type of fabric works best for this pattern?
Cotton is the most popular choice because it’s easy to handle and holds its shape well. You can also use linen or canvas for a sturdier cover.
3. How do I clean my quilted journal cover?
Gently hand wash in cool water and let it air dry. Avoid machine washing if your cover has embellishments or delicate fabrics.
4. Can I make covers for different notebook sizes?
Absolutely! Simply measure each notebook and adjust your fabric dimensions accordingly. The pattern is very adaptable.
5. Is this a beginner-friendly project?
Yes, the Journal Cover – Quilt Pattern is perfect for beginners. It’s a quick, simple project that helps build confidence and basic sewing skills.
6. What kind of batting should I use?
Lightweight cotton or polyester batting works best. It provides structure without making the cover too thick or stiff.
Making your own Journal Cover – Quilt Pattern is a rewarding way to combine creativity and functionality. You’ve learned how to measure, cut, assemble, and personalize your project with confidence.
Whether for yourself or as a handmade gift, your quilted journal cover is a beautiful expression of your craftsmanship and love for quilting. We’d love to hear your thoughts—share your honest opinions and suggestions below, and tell us how your journal cover turned out!