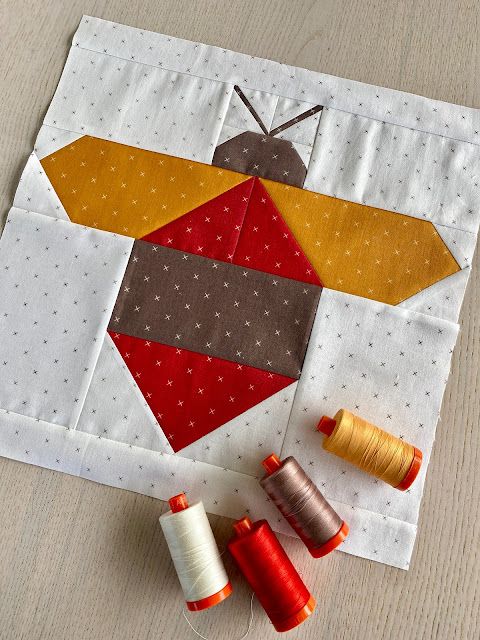
Buzzy Bee Block – TUTORIAL

The Jeans Apron – TUTORIAL is a creative and sustainable sewing project that allows you to transform old jeans into a stylish and functional apron. This upcycling idea is not only environmentally friendly but also incredibly practical for daily use. Whether you need an apron for cooking, gardening, crafting, or painting, this project helps you create a durable and fashionable piece that reflects your personal style. Perfect for both beginners and experienced sewists, this tutorial will walk you through every step to make your own unique denim apron.
Repurposing denim is one of the most satisfying sewing projects you can take on. Jeans are made of sturdy fabric that can withstand wear and tear, making them ideal for an apron that will last for years. The Jeans Apron – TUTORIAL encourages creativity by letting you mix and match denim shades, add pockets, and even include decorative stitching. You’ll end up with an apron that is both beautiful and functional while reducing fabric waste.
By following this Jeans Apron – TUTORIAL, you’ll learn how to cut, shape, and sew denim pieces with precision. You’ll also gain useful sewing tips for working with thicker fabrics and customizing your design to fit your needs. Whether you want a rustic kitchen apron or a chic crafting accessory, this guide gives you the knowledge to make it happen.
Before starting your Jeans Apron – TUTORIAL, gather all the materials you’ll need. The main fabric will be a pair of old jeans—choose one that’s in good condition, with thick, strong denim. If the jeans have interesting pockets or seams, even better! These features can become part of your apron’s design, adding character and originality.
You’ll also need basic sewing supplies: sharp fabric scissors, sewing pins, a measuring tape, chalk or a fabric marker, and a sewing machine. A denim needle for your machine is highly recommended since it handles thick fabrics more efficiently and prevents broken needles. Choose a sturdy polyester thread in a color that matches or contrasts with your denim, depending on the look you want.
Optional items include bias tape or cotton straps for the ties, metal grommets for added strength, and decorative fabric scraps if you want to embellish your apron. Some people like to add a lining, especially if the apron will be used for heavy-duty work, but that’s completely optional.
Before you begin cutting, wash and dry your jeans. Pre-washing softens the fabric and removes any dirt or dye residue. It’s also helpful to iron the denim so it’s smooth and easier to cut. Preparing your materials properly ensures a clean and professional result.
Having all your materials organized before you start will make your sewing experience smoother. A little preparation goes a long way in ensuring that your Jeans Apron – TUTORIAL project runs efficiently and is enjoyable from start to finish.
The first step in the Jeans Apron – TUTORIAL is cutting your denim into usable pieces. Lay your jeans flat on a large surface, like a table or cutting mat. Identify the areas with the least wear—usually the thighs and back panels—and use those sections for your main apron body. Mark the outline of your apron shape with chalk before cutting.
For a classic apron design, start with a rectangular base and curve the upper corners slightly to form the neckline. You can also trace around an existing apron if you have one, adjusting the size to your preference. Make sure to leave extra fabric for seams and hemming.
Once the main piece is cut, turn your attention to the pockets. Reuse the pockets from the jeans for functional storage on the apron. Cut them neatly from the jeans, leaving a small fabric margin around the edges for sewing. Arrange them on your apron front and pin them in place before stitching.
If your jeans have interesting seams or decorative stitching, you can feature those elements in your design. Many people like to use the waistband as the apron’s top edge or the leg hems as natural finishing lines. This not only saves time but also adds visual interest to the finished piece.
For the ties, you can cut long strips from the remaining denim or use cotton tape or bias binding. Straps made from denim will give your apron a unified look, while cotton ties provide flexibility and comfort. Make sure the straps are long enough to tie comfortably around your waist.
By the end of this step, you should have all your denim pieces cut, arranged, and ready to sew. This preparation is key to a smooth assembly process and ensures that your Jeans Apron – TUTORIAL results in a well-proportioned and stylish apron.
Now comes the exciting part of the Jeans Apron – TUTORIAL — sewing everything together. Start by finishing the edges of your main apron piece. Fold the edges inward about half an inch, pin them in place, and stitch all around. This creates a neat and durable hem that prevents fraying.
Next, attach the pockets you prepared earlier. Sew them securely onto the front of the apron, reinforcing the corners for extra strength. You can add as many pockets as you like—small ones for tools or pens, larger ones for recipe cards or utensils. Personalize it according to your needs.
If you’re adding a lining, place the lining fabric and denim with right sides facing each other. Sew around the edges, leaving a small opening to turn it right side out. Once turned, press the apron flat and topstitch around the border to close the opening and give a clean finish.
Attach the neck strap and waist ties next. You can sew them directly to the apron or use metal grommets to thread them through. Make sure the straps are even and comfortable. If you prefer an adjustable neck strap, use a D-ring or buckle for easy resizing.
For extra durability, double-stitch areas that will experience more tension, such as the ties and pocket edges. Denim is a strong fabric, but reinforcing these points ensures your apron will last for a long time.
After sewing, give your apron a final press with an iron. This helps set the stitches and gives your finished Jeans Apron – TUTORIAL project a polished look that’s ready to wear or gift.
The best part of the Jeans Apron – TUTORIAL is making it your own. Customizing your apron gives it personality and makes it truly unique. You can add embroidery, fabric patches, or decorative stitching to enhance its design. Use contrasting thread colors to create a bold, modern look, or keep it simple and classic with subtle tones.
Adding decorative trims, lace, or appliqués can also transform your denim apron into something special. If you enjoy mixed media crafts, try painting designs or adding iron-on transfers for a creative twist. The possibilities are endless when it comes to personalizing denim.
When caring for your finished apron, it’s important to follow a few steps to maintain its durability. Wash your jeans apron in cold water to prevent fading and shrinking. Turn it inside out before washing to protect decorative elements and stitching. Avoid bleach, as it can weaken the fabric and discolor the denim.
Hang your apron to air dry instead of using a dryer. Denim can shrink in high heat, and air drying helps preserve the fabric’s shape and texture. If your apron becomes wrinkled, use a medium iron setting to smooth it out.
Store your apron in a cool, dry place when not in use. If you made several aprons from different jeans, label them or keep them folded neatly. Each apron tells a story and carries the charm of sustainable crafting.
By following these care tips, your handmade Jeans Apron – TUTORIAL creation will remain beautiful, functional, and ready to use for many years to come.
Q1: Can I make a jeans apron without a sewing machine?
Yes, you can hand-sew a jeans apron, although it will take more time. Use a heavy-duty needle and strong thread to handle the denim fabric effectively.
Q2: What type of jeans are best for this project?
Medium to heavy-weight denim jeans work best. Avoid stretchy or very thin jeans, as they may not hold the shape as well.
Q3: Can I make this apron in children’s sizes?
Absolutely! Simply reduce the pattern dimensions to fit smaller sizes. Kids love wearing aprons made from old jeans, especially with fun patches or colorful trims.
Q4: What should I do if my denim is too thick to sew?
Use a denim needle and adjust your sewing machine’s tension. You can also use a hammer to flatten thick seams before stitching.
Q5: How can I add more decoration to my apron?
Try embroidery, fabric paint, or even patchwork using leftover fabric scraps. These small touches make your apron truly one-of-a-kind.
Q6: Is it possible to sell aprons made from this tutorial?
Yes! Handmade denim aprons are popular craft fair and online shop items. Just be sure to use your own photos and descriptions when listing them for sale.
The Jeans Apron – TUTORIAL shows how a simple pair of old jeans can be transformed into something practical, stylish, and environmentally friendly. This project combines creativity, sustainability, and functionality — a perfect balance for sewing enthusiasts. By learning to cut, sew, and customize denim, you not only save materials from waste but also create a piece that tells a story of craftsmanship and care.
We hope this tutorial has inspired you to give new life to your old jeans. Share your results and experiences in the comments — we’d love to hear your thoughts and suggestions for future tutorials!