How to Cut and Sew a Bucket Hat

If you’ve ever dreamed of having a practical yet stylish bag that fits all your makeup essentials, then learning How to Sew a Beauty Bag That Holds It All is the perfect project for you. This creative sewing tutorial will guide you step-by-step through making a beautiful, durable, and fully functional bag that not only looks amazing but also helps keep your beauty products perfectly organized. Whether you’re a beginner or an experienced sewer, this project will be both fun and rewarding.
When it comes to sewing projects, few things are as satisfying as creating something both beautiful and useful. A beauty bag is one of those items that every person loves—compact enough to travel with but roomy enough to hold everything from brushes to skincare essentials. By following the How to Sew a Beauty Bag That Holds It All tutorial, you’ll be able to personalize your bag with fabrics, zippers, and designs that reflect your own style.
This tutorial not only teaches you how to construct a makeup bag but also helps you develop your sewing skills through practice with zippers, lining, and structured seams. Once you complete your first bag, you’ll probably want to make more—for gifts, travel, or even to sell! Let’s get started with the essential steps that will show you exactly how to sew a beauty bag that holds it all.
Before you begin sewing, it’s important to have all your materials ready. For this How to Sew a Beauty Bag That Holds It All project, you’ll need fabric for both the exterior and lining, interfacing for structure, a zipper, thread, scissors, and your sewing machine. Choose fabrics that complement each other and suit your personality—cotton or canvas works beautifully for this kind of bag.
Having the right materials ensures that your project turns out neat and durable. The interfacing will give your bag stability, while a high-quality zipper will make it easy to open and close. Be sure to pre-wash your fabrics if they’re cotton, as this prevents shrinkage later.
It’s also helpful to have small clips or pins to hold your fabric in place as you sew. These tools will help you maintain clean seams and professional results. Remember, in sewing, preparation is half the success!
Another important step before you begin stitching is to iron your fabrics. Pressing makes them easier to work with and helps the final bag have a crisp, clean look. It might seem like a small detail, but it makes a big difference.
When everything is ready, take a moment to review your pattern or the dimensions you plan to use. Some prefer a rectangular shape, while others enjoy a boxy or curved design—your creativity is what makes this How to Sew a Beauty Bag That Holds It All project truly unique.
Finally, set up your sewing space comfortably. A clean workspace and good lighting will make your sewing experience much more enjoyable and efficient.
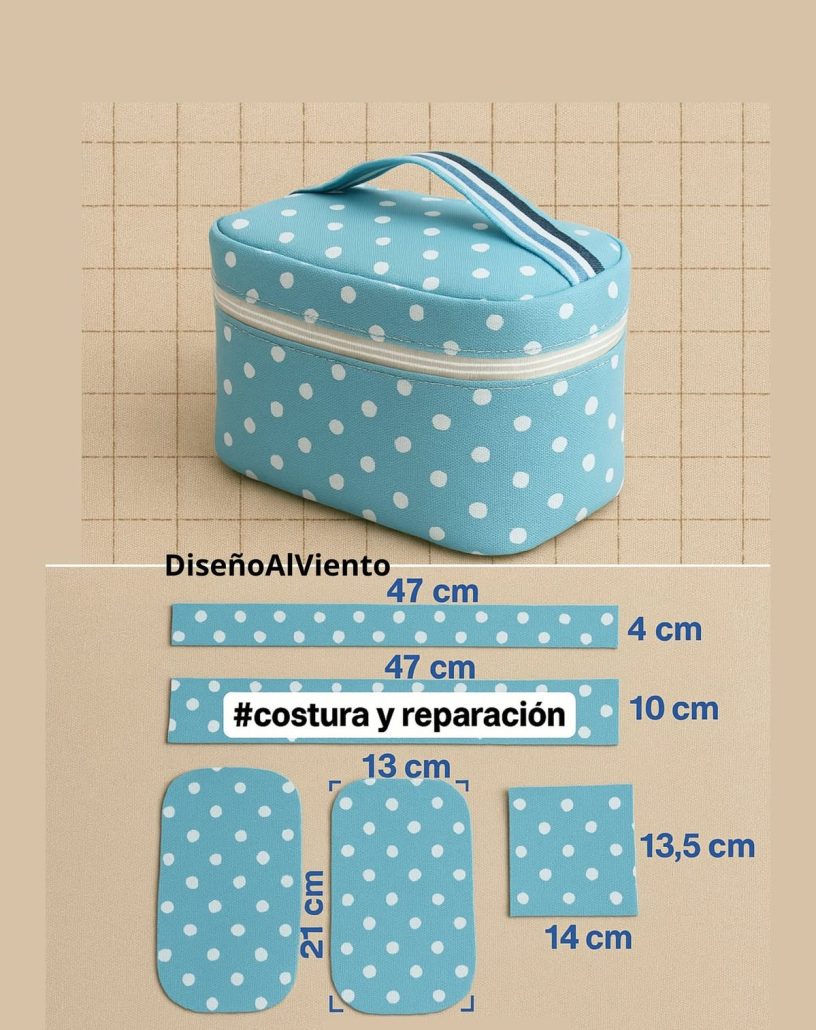
The next step in the How to Sew a Beauty Bag That Holds It All tutorial is cutting your fabric. Precision here is key—accurate measurements will make your bag symmetrical and professional-looking. Use a ruler and rotary cutter to ensure clean, straight cuts.
Cut two pieces each for the outer fabric and the lining, making sure they’re the same size. If you’re adding interfacing, cut it slightly smaller than your fabric pieces to avoid bulk in the seams. Fuse the interfacing to the wrong side of the outer fabric using an iron.
Once your pieces are cut, it’s time to prepare the zipper section. Place the zipper face-down along the top edge of your outer fabric and line it up with the edge. Then place the lining fabric right side down on top of the zipper, forming a “sandwich.” Pin or clip them together.
Sew along the zipper edge using a zipper foot, which helps you get close to the zipper teeth. After stitching, turn the fabrics right side out and press them neatly. This step is crucial for giving your bag that polished look.
Repeat the process for the other side of the zipper with the remaining fabric and lining pieces. Once both sides are attached, topstitch along the edges of the zipper to reinforce it and prevent the lining from catching in the zipper teeth.
By now, your project is starting to look like a real beauty bag! Take a moment to admire your work and make sure all edges align perfectly before moving on to assembly.
This is where the magic happens! In this section of How to Sew a Beauty Bag That Holds It All, you’ll assemble all your pieces to create the final structure. Begin by opening the zipper halfway—this will be important when you turn the bag right side out later.
Next, align the outer fabrics together with right sides facing and do the same for the lining pieces. Pin around all edges, making sure the zipper teeth are facing toward the lining. Leave a small opening in the bottom of the lining so you can turn the bag later.
Sew all the way around, except for that small opening. Backstitch at the beginning and end to secure your seams. Once stitched, trim the corners to reduce bulk and make the bag corners crisp.
Now, gently turn the bag right side out through the opening in the lining. Push out the corners carefully using a blunt tool, such as a chopstick or the end of a pencil. You’ll start to see your beauty bag that holds it all taking shape beautifully.
After checking that everything looks neat, sew the opening in the lining closed by hand or with your machine. Then push the lining back into the bag and give everything one final press with an iron.
At this point, your bag is ready for use! Whether you plan to use it for makeup, art supplies, or travel accessories, this handmade project combines beauty with practicality.
The final step in the How to Sew a Beauty Bag That Holds It All tutorial is adding your personal touches. This is where you can truly make your creation stand out and reflect your style. Consider adding decorative stitching, appliqués, or even a custom fabric label.
You can also play with different color combinations or experiment with printed fabrics that express your personality. Floral, geometric, or minimalist patterns can all give your bag a distinctive charm.
If you want extra functionality, consider adding inside pockets or small elastic loops to hold brushes or pencils. These additions make your beauty bag even more useful for everyday life.
Don’t forget to use sturdy thread for reinforcement, especially around the zipper area. A well-constructed beauty bag will last for years and hold up under frequent use.
Once your bag is complete, fill it with your favorite products and admire your handiwork! You’ve successfully learned how to sew a beauty bag that holds it all, and now you have a beautiful, practical creation to show for it.
Lastly, consider sharing your finished bag with friends or on social media. Handmade projects inspire others, and your work could motivate someone else to start sewing too!
1. What kind of fabric is best for a beauty bag?
Cotton, canvas, or linen blends work wonderfully because they’re durable and easy to sew. For a waterproof version, consider adding vinyl lining.
2. How do I clean a handmade beauty bag?
You can hand wash it in cold water and let it air dry. Avoid putting it in the dryer to maintain its shape.
3. Can I make this bag without a sewing machine?
Yes, it’s possible, though it will take more time. Use small, tight stitches for durability if sewing by hand.
4. What size zipper should I use?
A 9- or 10-inch zipper works well for most beauty bags, but you can adjust depending on your preferred bag size.
5. How can I make my bag more structured?
Adding interfacing or fusible foam will give your beauty bag a sturdier and more professional finish.
Learning How to Sew a Beauty Bag That Holds It All is a fantastic way to combine creativity, functionality, and personal style. This project allows you to make something truly practical while improving your sewing skills.
PATTERN VIDEO:
With a bit of patience and creativity, you can create a beautiful and durable bag that reflects your unique touch. Try making a few different versions and see which designs you love most! If you enjoyed this tutorial, leave your honest opinion and suggestions below—we’d love to hear from you and see your creations!