Trapper Hat - TUTORIAL

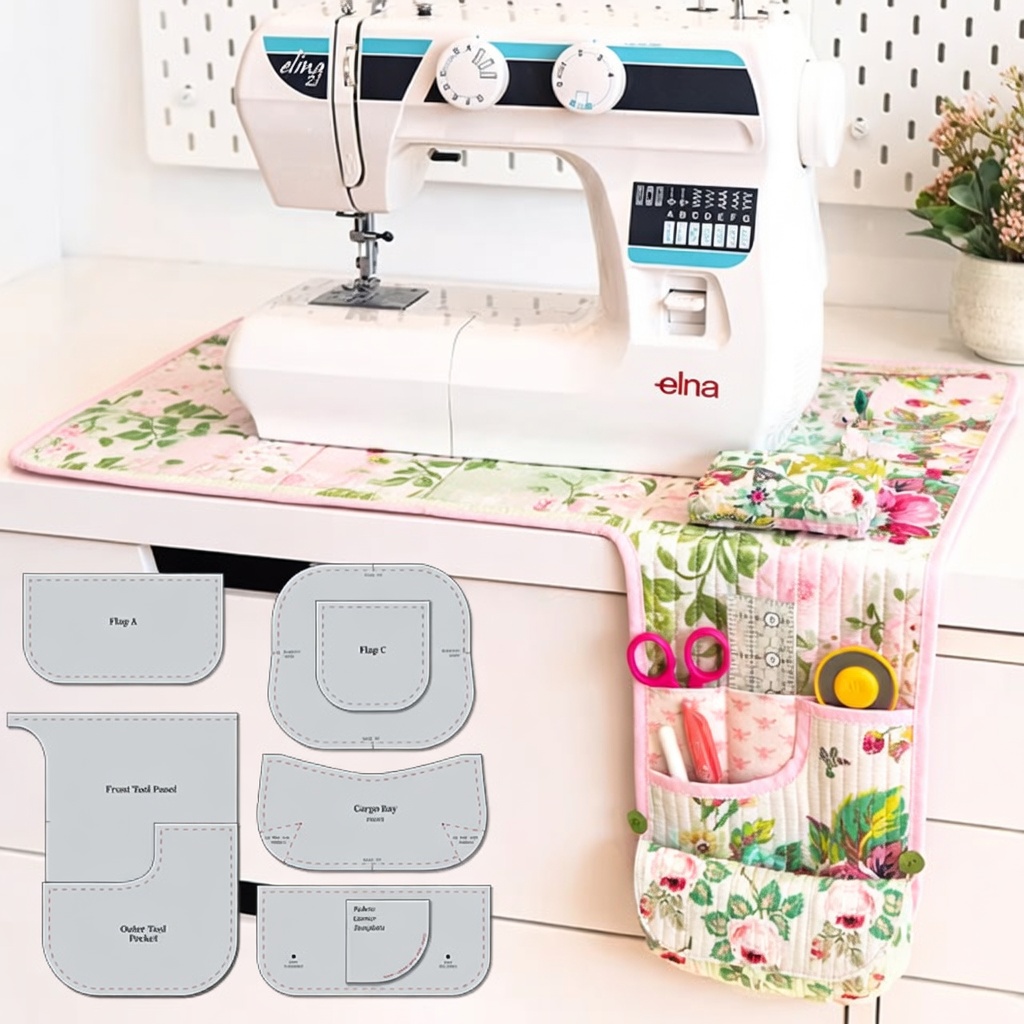
The How To Make an Under-the-Table Sewing Tool Caddy – PATTERN is a smart and highly practical quilting project designed to keep your sewing space organized and efficient. This functional caddy fits neatly under your table, providing easy access to tools while maximizing your workspace.
With the How To Make an Under-the-Table Sewing Tool Caddy – PATTERN, you can combine quilting techniques with clever design to create a storage solution tailored to your needs. It’s perfect for holding scissors, threads, pins, and other essential sewing tools within reach.
In this complete guide, you will learn how to create your own How To Make an Under-the-Table Sewing Tool Caddy – PATTERN step by step. Whether you are a beginner or an experienced quilter, this tutorial will help you achieve a durable, organized, and professional-looking result.
To begin your How To Make an Under-the-Table Sewing Tool Caddy – PATTERN, selecting sturdy fabrics is essential. Cotton canvas or quilting cotton with interfacing works well for durability.
You can choose colors and patterns that match your sewing space, making the caddy both functional and decorative.
Essential tools include scissors, pins, a sewing machine, rotary cutter, quilting ruler, and measuring tape.
You will need interfacing or stabilizer to give structure and help the caddy maintain its shape.
Additional materials such as elastic, Velcro, or straps may be required for attachment under the table.
Before starting, wash and press all fabrics. This ensures your How To Make an Under-the-Table Sewing Tool Caddy – PATTERN looks neat and lasts longer.
The How To Make an Under-the-Table Sewing Tool Caddy – PATTERN begins with cutting your fabric pieces according to the pattern template.
Typically, the design includes a base panel and several smaller panels for pockets and compartments.
Sew the pocket sections first, attaching them securely to the main base panel.
Reinforce the seams to ensure the caddy can hold heavier tools without tearing.
Add quilting lines or stitching to provide extra strength and structure.
Once all components are assembled, your How To Make an Under-the-Table Sewing Tool Caddy – PATTERN will start to take shape.
One of the most useful aspects of the How To Make an Under-the-Table Sewing Tool Caddy – PATTERN is its flexibility. You can customize pocket sizes to fit your specific tools.
Adding elastic bands can help hold items like scissors or rulers securely.
You can also include zippered compartments for smaller items such as needles or buttons.
Adjusting the overall size allows you to fit different table dimensions.
Using contrasting fabrics for pockets can make organization easier and more visually appealing.
You might also create matching organizers to complement your How To Make an Under-the-Table Sewing Tool Caddy – PATTERN.
Finishing your How To Make an Under-the-Table Sewing Tool Caddy – PATTERN properly ensures durability and ease of use. Reinforce all stress points, especially where the caddy attaches to the table.
Attach straps, Velcro, or ties securely so the caddy stays in place during use.
Trim any loose threads and press the finished piece for a polished look.
This project is highly practical, helping you keep your sewing area tidy and efficient.
The How To Make an Under-the-Table Sewing Tool Caddy – PATTERN saves space and keeps essential tools within easy reach.
It’s also a great project for improving your quilting and organizational skills.
Is this project suitable for beginners?
Yes, the How To Make an Under-the-Table Sewing Tool Caddy – PATTERN is beginner-friendly with basic sewing knowledge.
What type of fabric should I use?
Sturdy cotton or canvas with interfacing is recommended.
How do I attach the caddy to the table?
Use straps, Velcro, or ties depending on your preference.
Can I customize the pockets?
Absolutely. Adjust sizes and add features as needed.
How long does it take to complete?
It typically takes a few hours.
Can I wash the caddy?
Yes, most fabrics allow gentle washing.
The How To Make an Under-the-Table Sewing Tool Caddy – PATTERN is a practical and rewarding quilting project that enhances both organization and creativity. In this guide, you’ve learned how to choose materials, assemble the structure, customize the design, and finish your caddy professionally.
With its versatility and usefulness, this handmade organizer is a valuable addition to any sewing space. It helps you stay organized while showcasing your crafting skills.
Now it’s your turn to try the How To Make an Under-the-Table Sewing Tool Caddy – PATTERN. Share your honest feedback and leave your suggestions—your ideas can inspire even more creative quilting projects!