How to Cut and Sew a Bucket Hat

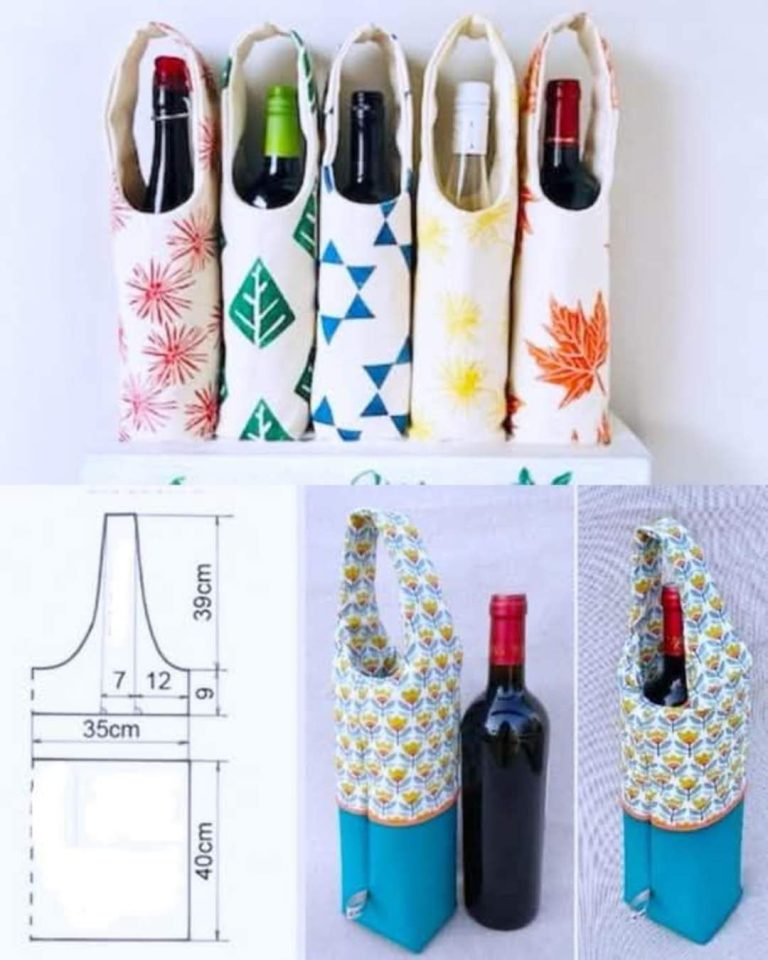
How to Make a Wine Transporter – TUTORIAL is a practical and stylish quilting project that allows you to create a secure and elegant carrier for transporting wine bottles. By following the How to Make a Wine Transporter – TUTORIAL, you can design a reusable and eco-friendly alternative to disposable packaging while showcasing your sewing skills.
One of the most appealing features of the How to Make a Wine Transporter – TUTORIAL is its combination of functionality and creativity. You can personalize your wine carrier with different fabrics, colors, and patterns, making it perfect for gifting or personal use. It’s a great project for using fabric scraps while creating something useful.
In this complete How to Make a Wine Transporter – TUTORIAL, you will learn how to choose materials, prepare and cut fabric, assemble the transporter, and finish it with professional details. This guide is suitable for beginners and experienced quilters alike.

The first step in the How to Make a Wine Transporter – TUTORIAL is gathering all the necessary materials to ensure a smooth sewing process.
Cotton fabric is highly recommended because it is durable and easy to work with.
You can also use canvas or denim for extra strength and structure.
Batting or padding is essential in the How to Make a Wine Transporter – TUTORIAL to protect the bottle.
Basic sewing tools such as scissors, pins, thread, and a sewing machine are required.
A ruler or measuring tape ensures accurate cutting and assembly.
An iron is important for pressing seams and achieving a clean finish.
Preparation is a crucial part of the How to Make a Wine Transporter – TUTORIAL, ensuring all pieces are ready for assembly.
Start by measuring the size of the wine bottle to determine dimensions.
Cut fabric pieces for the outer layer, lining, and padding.
In the How to Make a Wine Transporter – TUTORIAL, precise cutting ensures a snug and secure fit.
Mark fold lines and seam allowances on the fabric.
Press all pieces before sewing to remove wrinkles.
Organize your materials for easier assembly.
The next stage in the How to Make a Wine Transporter – TUTORIAL is assembling the structure of the carrier.
Layer the outer fabric, batting, and lining together.
Sew the layers to create a quilted effect that adds both style and protection.
In the How to Make a Wine Transporter – TUTORIAL, strong seams are essential for durability.
Fold and sew the sides to form a pocket that holds the bottle.
Add a base seam to support the weight of the wine.
Attach handles or straps for easy carrying.
The final stage of the How to Make a Wine Transporter – TUTORIAL focuses on finishing touches and personalization.
Trim excess threads and press the entire piece for a polished look.
Topstitch edges to reinforce seams and improve durability.
You can decorate the transporter with embroidery, labels, or appliqué designs.
In the How to Make a Wine Transporter – TUTORIAL, customization allows you to create a unique gift item.
Adjust handle length if needed for comfort.
Once completed, your wine transporter is ready to use.
Is this project suitable for beginners?
Yes, the How to Make a Wine Transporter – TUTORIAL is beginner-friendly with basic sewing skills.
What fabric works best?
Cotton, canvas, or denim are great options for durability.
Do I need padding?
Yes, padding helps protect the bottle during transport.
How long does it take to complete?
Most projects can be finished in a few hours.
Can I customize the size?
Yes, you can adjust the dimensions to fit different bottles.
Is it a good gift idea?
Absolutely, it makes a practical and thoughtful handmade gift.
The How to Make a Wine Transporter – TUTORIAL is a practical and creative quilting project that combines functionality with style. It allows you to create a reusable and protective carrier that is both useful and visually appealing.
In this tutorial, you learned how to select materials, prepare fabric pieces, assemble the transporter, and finish it with professional details. Each step contributes to a durable and attractive final product.
Projects like the How to Make a Wine Transporter – TUTORIAL demonstrate how quilting can be applied to everyday items, turning simple materials into functional handmade solutions.
If you enjoyed this tutorial, feel free to leave your honest opinion and share your suggestions. Your feedback helps inspire more creative quilting and sewing ideas.