Lake Cabin Quilt Pattern – Tutorial

The How to Make a Twisting Rail Fence Quilt Block pattern is an exciting twist on one of the most classic and beloved quilt designs. The Rail Fence block has long been a favorite among quilters because of its simplicity, versatility, and ability to showcase a wide range of fabric colors and patterns. In this tutorial, you’ll learn how to create a version with a modern spin — the Twisting Rail Fence Quilt Block, which adds motion and depth to your quilt through creative fabric placement and color choices.
This block is perfect for quilters of all skill levels. Beginners will appreciate its straightforward piecing technique, while advanced quilters will love the opportunity to play with color gradients and rotation effects. The finished result is a stunning block that gives the illusion of movement, making your quilt look dynamic and full of life.
Whether you’re working with fabric scraps or a coordinated fabric collection, this Twisting Rail Fence Quilt Block is a fantastic way to experiment with design. It’s also an excellent project to improve your precision piecing skills and explore the beauty of geometry in quilting. Get ready to dive into the creative process and learn how to bring this captivating quilt block to life!
Before you begin your How to Make a Twisting Rail Fence Quilt Block project, gather all the necessary materials. You’ll need a selection of fabrics in contrasting or coordinating colors. Choose at least four different shades or patterns to emphasize the twisting effect once the block is assembled. High-contrast fabrics work best to create visual movement within the design.
You will also need basic quilting tools such as a rotary cutter, quilting ruler, cutting mat, iron, and sewing machine. For thread, select a color that blends well with your chosen fabrics to achieve clean, seamless seams.
Cut your fabric into strips of equal width—typically 2 ½ inches wide works perfectly for this design. Make sure your strips are straight and accurately measured, as precision cutting is key to making your block align properly.
Once your strips are cut, press them with a hot iron to remove any creases or wrinkles. This helps ensure that your pieces fit together smoothly during assembly.
Label your fabric strips if you’re using multiple colors. Keeping them organized by color order will make it easier to piece the Twisting Rail Fence Quilt Block accurately.
Lastly, double-check your measurements before sewing to maintain consistency across all your blocks. Precision is the secret to a beautifully twisted final layout.
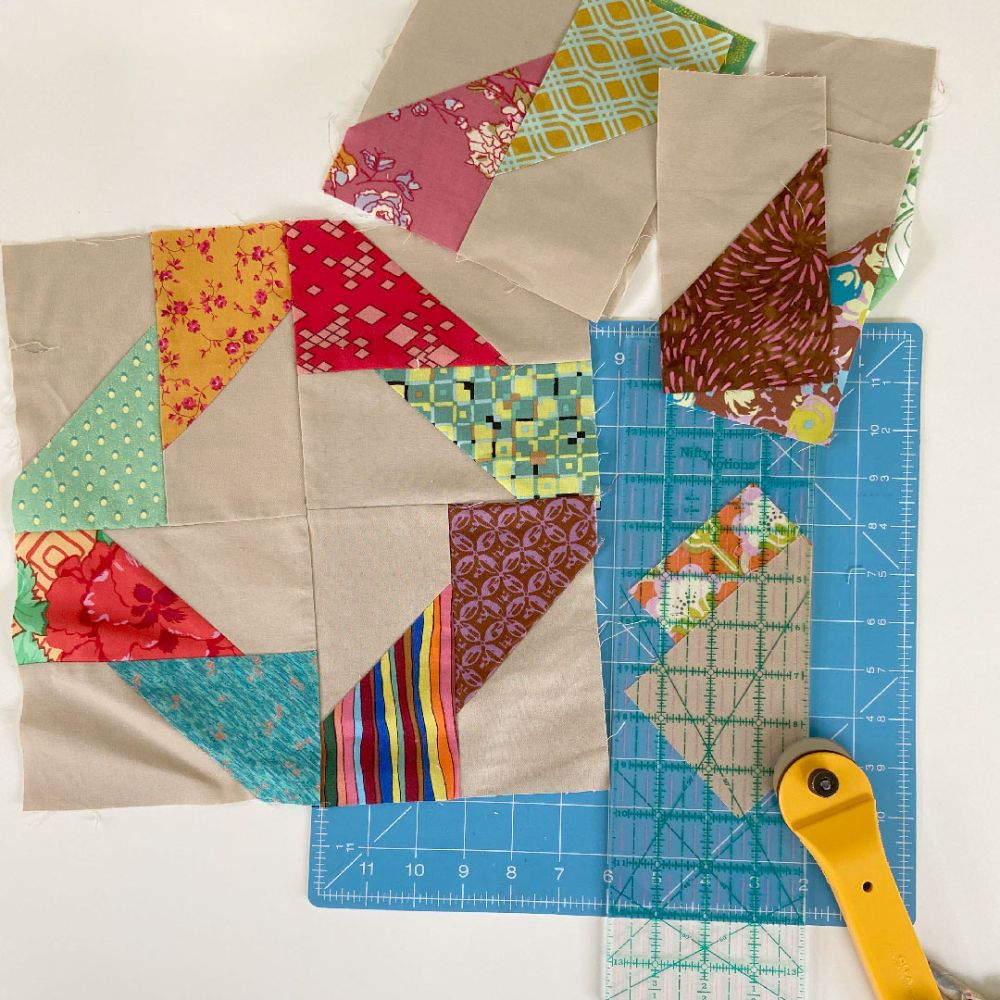
To start assembling your Twisting Rail Fence Quilt Block, sew together three or four fabric strips in your chosen color order. Use a ¼-inch seam allowance for all seams to maintain accuracy. After sewing, press the seams in one direction to reduce bulk and help the block lay flat.
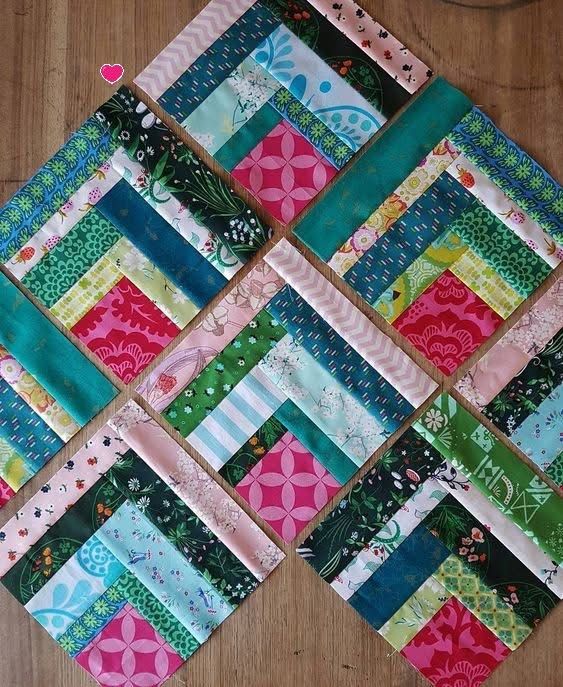
Once you’ve created several strip sets, cut them crosswise into smaller sections. These smaller units will become the core of your Rail Fence design. The direction you arrange these units determines how the “twist” effect will appear.
Rotate each section in alternating directions as you lay them out. This creates the distinctive twisting motion that gives the block its name. By simply rotating the strip units, you can achieve a wide variety of visual patterns—from subtle waves to bold spirals.
Experiment with placement before sewing the blocks together. This step allows you to see how the twisting effect changes with different arrangements.
When satisfied with your layout, start sewing the units together row by row, ensuring that seams line up neatly. Pin the seams if needed to keep everything aligned.
After assembling the full block, press it carefully from the back, making sure all seams lay flat. Your Twisting Rail Fence Quilt Block is now taking shape beautifully!
The How to Make a Twisting Rail Fence Quilt Block tutorial offers endless possibilities for creativity. You can adjust the number of strips, change their widths, or experiment with different fabric combinations to achieve unique looks.
Try using ombre fabrics that transition from light to dark to enhance the twisting illusion. Gradient fabrics naturally create a sense of flow and movement, which looks stunning in this block.
You can also mix solids and prints for visual interest. Using bold prints alongside neutral solids makes the twist stand out even more.
For a festive variation, use holiday-themed fabrics such as reds and greens for Christmas, or blues and whites for a winter quilt. The twisting effect brings energy and joy to seasonal designs.
Another idea is to use scrap fabrics from previous projects. This not only makes your Twisting Rail Fence Quilt Block eco-friendly but also gives it a personal touch filled with memories from past quilts.
Lastly, don’t be afraid to experiment! Each arrangement you try can lead to a completely new and unexpected design that showcases your individual quilting style.
Once you’ve completed your Twisting Rail Fence Quilt Block, the next step is assembling it into a full quilt. You can use identical blocks for a cohesive look or alternate with solid squares or contrasting blocks for more variety.
When joining the blocks, pay close attention to the alignment of seams. This ensures that the twisting effect flows naturally across the quilt top. Press each seam flat as you go to maintain a polished finish.
After assembling the quilt top, layer it with batting and backing fabric. Baste the layers together securely before quilting. You can choose straight-line quilting to emphasize the geometric design or free-motion quilting to add texture and depth.
Trim any excess batting and backing fabric, then bind the quilt with a coordinating fabric to complete the look. The binding frames your design and gives it a clean, professional edge.
For an added touch, label your quilt with the name Twisting Rail Fence Quilt and the date of completion. Handmade quilts tell stories, and labeling them preserves those memories for years to come.
Finally, step back and admire your finished work. The motion, symmetry, and color play of your Twisting Rail Fence Quilt Block will surely impress anyone who sees it!
1. What size strips should I cut for the Twisting Rail Fence Quilt Block?
Most quilters use strips that are 2 ½ inches wide, but you can adjust the size based on your desired block dimensions.
2. Can I make this block with fabric scraps?
Yes! The Twisting Rail Fence Quilt Block is perfect for using up scraps. Just make sure your strips are the same width for accurate piecing.
3. What fabric works best for this pattern?
Cotton quilting fabric is ideal. It’s easy to cut, sew, and press, making it perfect for precision work.
4. How can I make my block look more dynamic?
Use high-contrast colors or gradient fabrics to enhance the twisting illusion. Alternating light and dark tones adds dimension.
5. Is this pattern beginner-friendly?
Absolutely! The Twisting Rail Fence Quilt Block uses straight seams and simple rotations, making it great for beginners who want to practice precision piecing.
6. Can I combine this block with other quilt patterns?
Yes! It pairs beautifully with solid blocks, star blocks, or log cabin designs for a more complex quilt layout.
In this How to Make a Twisting Rail Fence Quilt Block tutorial, you learned how to take a traditional design and give it a modern, dynamic twist. From choosing your fabrics to assembling and finishing the block, each step helps you develop your quilting skills while creating something visually captivating.
The Twisting Rail Fence pattern is not just about sewing—it’s about exploring color, movement, and creativity through fabric. Whether you’re making a small wall hanging or a full-sized quilt, this block will add energy and elegance to your collection.
We hope this tutorial has inspired you to try your own version of the Twisting Rail Fence Quilt Block. Share your creations, leave your honest feedback, and let us know what other quilt patterns you’d love to learn next!