
Bear Paws Block – Tutorial


If you’ve ever wanted to add a touch of handmade magic to your Halloween season, learning How to Make a Quilted Witch Hat is the perfect project. This creative and fun tutorial combines the traditional art of quilting with the whimsy of a classic witch hat, resulting in a charming decorative piece—or even a wearable accessory—that showcases your sewing skills. Whether you’re making it for a costume, a centerpiece, or seasonal décor, this project allows you to experiment with color, texture, and design in a truly unique way. The beauty of quilting is that you can reuse fabric scraps and transform them into something completely new and enchanting.
The Quilted Witch Hat project is suitable for all levels, from beginners who want to try something festive to experienced quilters looking for a creative challenge. You’ll enjoy the process of selecting fabrics, cutting precise shapes, piecing them together, and seeing your design come to life as the hat takes shape. With its mix of creativity and craftsmanship, this is one of those projects that not only looks stunning but also feels satisfying to complete.
Before diving into the step-by-step tutorial, let’s go over what makes this pattern so special and why quilting enthusiasts love creating it year after year. Once you finish, your handmade Quilted Witch Hat will be a showstopper for Halloween and a treasured part of your holiday décor.
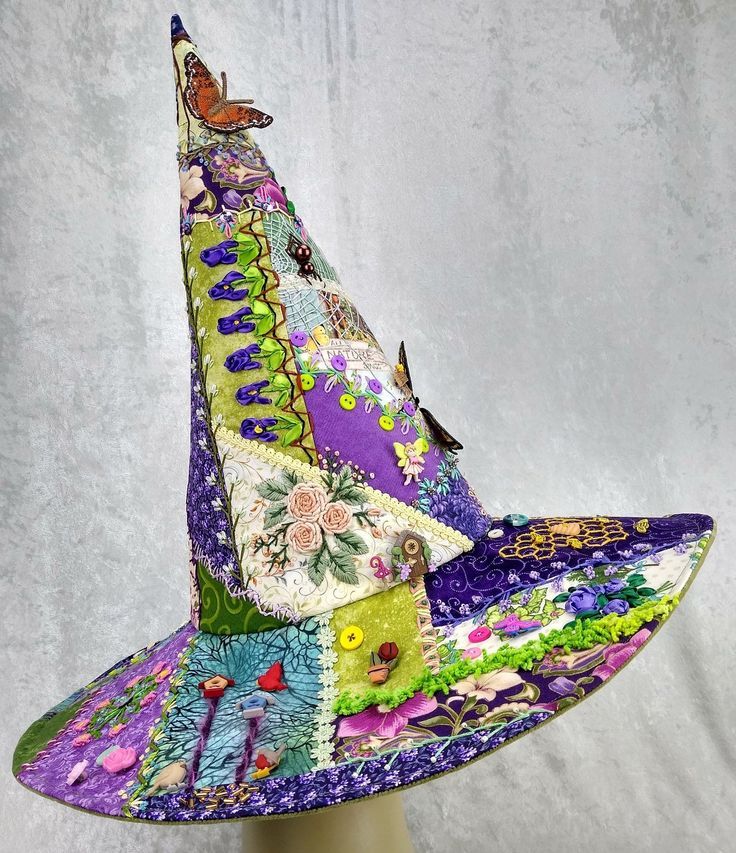
The first step in learning How to Make a Quilted Witch Hat is gathering all the materials you’ll need. You’ll want to select fabrics in Halloween-inspired colors such as deep purples, blacks, oranges, and greens. Batik or cotton fabrics work best since they are easy to quilt and hold their shape well. Mixing solid and patterned fabrics adds a playful, patchwork charm to your design.
You’ll also need quilt batting to give your hat structure and softness. Choose lightweight batting to make sure the hat remains flexible yet sturdy enough to hold its shape. For the lining, select a coordinating fabric that complements your chosen colors—it will make the inside of your hat look neat and professional.
Other essential tools include scissors or a rotary cutter, quilting pins, a sewing machine, thread, and a hot glue gun for final assembly. A measuring tape or ruler helps ensure your pieces are cut accurately. If you want your hat to stand tall, consider using interfacing or craft foam between the fabric layers for extra stability.
Finally, think about embellishments. You can add lace trim, ribbons, or even decorative buttons to make your Quilted Witch Hat stand out. A few sparkling sequins or a fabric flower can transform your hat from spooky to spectacular.
With all your supplies ready, it’s time to start cutting your fabric pieces and bringing your quilted masterpiece to life.
The heart of any quilting project lies in piecing the fabric together, and How to Make a Quilted Witch Hat is no exception. Start by cutting triangle-shaped pieces of fabric that will form the cone of your hat. You’ll need enough triangles to wrap around and create a circular cone shape once they’re sewn together. The brim can be cut as two large circles—one for the top and one for the underside.
Before sewing, lay out your pieces to decide on the color arrangement. This is your chance to play with contrast and pattern. You might alternate dark and light fabrics or create a gradient effect from base to tip. Taking time to plan your layout ensures a cohesive and eye-catching design.
Once your layout is finalized, begin sewing the triangle pieces together using a quarter-inch seam allowance. Press each seam flat with an iron to keep your fabric smooth and professional-looking. When the cone section is complete, join the edges to form a 3D shape. Secure it with pins before sewing to ensure alignment.
Next, attach the batting to the brim circles and quilt them using your preferred design—straight lines, swirls, or free-motion quilting all work beautifully. Quilting adds dimension and durability to your project while enhancing its visual appeal.
After quilting the brim, sew the cone and brim together carefully. You now have the main structure of your Quilted Witch Hat, and it’s ready for the finishing touches.
With the main body of your Quilted Witch Hat complete, it’s time to assemble the final components and personalize your design. Begin by attaching the cone to the brim. If you used lightweight fabrics, a small line of hot glue along the seam can help secure the pieces firmly. For a more durable finish, sew the edges together using a topstitch around the base.
To make your hat stand upright, insert a bit of interfacing or craft foam between the inner and outer layers. This keeps the cone’s shape sharp and crisp. Alternatively, lightly stuff the tip with fabric scraps or cotton for added structure.
Now for the fun part—decorating your hat. Add a ribbon around the base of the cone for a polished look, or tie a bow for a touch of elegance. You can also sew on appliqué designs like stars, moons, or pumpkins. If you’re making your Quilted Witch Hat as part of a Halloween costume, consider attaching elastic or a headband inside for a secure fit.
For a decorative piece, you can embellish with artificial flowers, small bells, or even LED fairy lights for a magical glow. Every addition turns your project into a one-of-a-kind creation that reflects your personality and style.
Before displaying or wearing your hat, press it lightly with a warm iron to smooth out any wrinkles and give it that crisp, finished appearance.
Once you’ve mastered How to Make a Quilted Witch Hat, you’ll discover endless possibilities for how to use it. It’s not just a costume accessory—it can also serve as unique seasonal décor or even a thoughtful handmade gift. Display your hat as a centerpiece on your Halloween table surrounded by candles, pumpkins, or candy bowls for a cozy, festive atmosphere.
You can also create miniature versions of the hat to hang as ornaments or use them as party favors for guests. Quilted witch hats make wonderful wall decorations, especially when paired with coordinating quilted banners or table runners.
If you’re part of a crafting community or quilting group, consider teaching this project to others during the Halloween season. It’s a great way to share your creativity and inspire others to experiment with quilting beyond traditional quilts.
For those who love costume-making, this pattern can easily be scaled up or down to fit different head sizes. You can even make matching hats for children and adults for a family costume theme.
And don’t stop at witches—once you understand the structure, you can adapt the pattern to create other hat designs like wizard hats or festive cone hats for different holidays. With every variation, your quilting skills will continue to grow, and your handmade creations will shine.
FAQ about How to Make a Quilted Witch Hat
Q1: What type of fabric should I use for the quilted witch hat?
Cotton is ideal for this project because it’s easy to sew, holds its shape, and works well with batting and quilting stitches.
Q2: Can I make the witch hat without a sewing machine?
Yes, you can hand-sew the pieces, though it will take longer. Using a sewing machine makes the process faster and ensures sturdier seams.
Q3: How do I keep the hat’s cone upright?
Add interfacing, foam, or light stuffing to maintain structure. These materials help the hat keep its shape even after extended use.
Q4: Is this project suitable for beginners?
Absolutely! How to Make a Quilted Witch Hat is beginner-friendly. It requires only basic sewing and quilting skills, making it perfect for anyone new to crafting.
Q5: Can I wash my quilted witch hat?
If it’s made primarily from cotton fabric, gentle hand washing is fine. Avoid soaking hats with glued decorations, and air dry them flat.
Conclusion
Learning How to Make a Quilted Witch Hat is a delightful project that blends quilting tradition with seasonal fun. You’ve discovered how to select fabrics, piece your design, assemble the structure, and add unique details that bring your creation to life. Whether you make it as a costume piece or a festive decoration, this handmade hat will be a charming addition to your Halloween collection.
PATTERN VIDEO:
Try experimenting with different colors and themes to make each one special. Don’t forget to share your experience and leave your honest opinion and suggestions—we’d love to hear how your quilted witch hat turned out!
