Circling Swallows Quilt Block - PATTERN

The Gnome-Shaped Coasters – TUTORIAL is a fun and festive quilting project perfect for adding a touch of holiday magic to your home decor. These adorable quilted coasters are shaped like cheerful gnomes, bringing charm and personality to your coffee table or holiday gatherings. Whether you’re new to quilting or an experienced maker, this tutorial will guide you through each step with easy-to-follow instructions and creative ideas to personalize your gnome coasters.
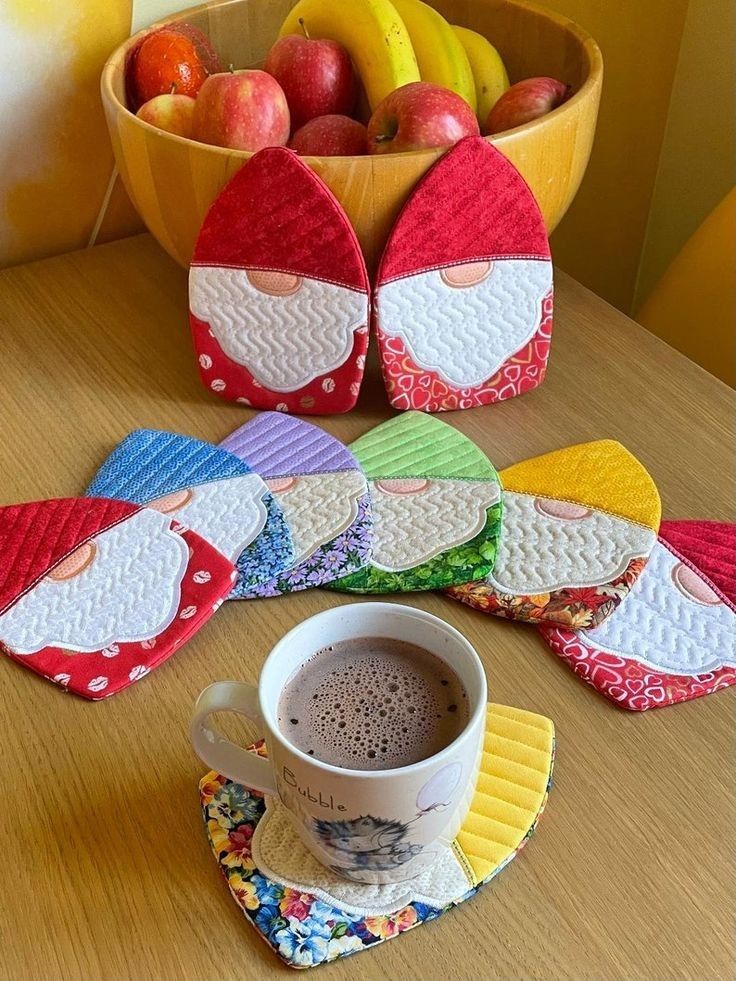
Creating Gnome-Shaped Coasters is not only enjoyable but also a great way to use fabric scraps from previous projects. With just a few materials, you can design colorful, whimsical coasters that capture the spirit of the season. Each gnome can be customized with different hat patterns, fabrics, and colors, allowing you to craft a unique set that reflects your own style.
In this Gnome-Shaped Coasters – TUTORIAL, you’ll learn how to prepare your fabric, assemble each gnome piece, quilt them together neatly, and finish with beautiful edges. These coasters make a wonderful handmade gift or an eye-catching decoration for your kitchen, dining room, or even office. Let’s dive into this creative project and make something special for your next holiday season.
Before beginning your Gnome-Shaped Coasters – TUTORIAL, it’s important to gather all the materials you’ll need. Having your tools and fabrics ready will make the quilting process much smoother and more enjoyable.
Start with cotton fabric in various colors and prints. You’ll need at least three types: one for the gnome’s hat, one for the beard or face area, and one for the background or base. Christmas-themed fabrics such as red, green, or plaid are perfect choices for a festive touch.
You will also need batting or quilt wadding to give your coasters a soft, cushioned texture. This layer goes between the front and back fabric pieces, adding durability and thickness to your coasters.
A good rotary cutter, cutting mat, and ruler will help ensure precise cuts for all your fabric pieces. Sharp fabric scissors are also handy for trimming smaller details around the gnome’s beard or hat.
For the backing, choose a fabric that complements your front design. A solid color or subtle pattern works best so the focus stays on your gnome design.
Don’t forget thread that matches or contrasts with your fabrics, depending on the effect you want. Finally, a sewing machine (or needle if you prefer hand quilting), pins, and a fabric marker will complete your list of essentials.
Once everything is prepared, you’re ready to start cutting and assembling your adorable gnome coasters.
Now that your materials are ready, it’s time to dive into the creative process of making your Gnome-Shaped Coasters. Follow these steps carefully for a neat and professional finish.
Begin by cutting the base fabric into coaster-sized squares, usually around 5×5 inches or slightly larger if you prefer. Cut one square for the front, one for the back, and a matching piece of batting.
Next, cut the gnome shapes—the hat, beard, and nose—from coordinating fabric scraps. You can draw a simple pattern on paper first, then trace it onto your fabric using a washable fabric marker. Play with colors and textures to give each gnome a unique personality.
Once all the pieces are ready, layer the fabrics. Start with the base, then place the batting, and finally the top piece featuring your gnome design. Pin everything in place carefully to keep the layers aligned.
Now comes the fun part—quilting and stitching. Use a straight or zigzag stitch around the edges of each gnome element. This will secure the layers while giving your coaster a detailed, finished look. Don’t rush this step; even small stitches make a big difference in the final appearance.
After quilting, trim the excess batting and fabric neatly around the coaster’s edge. You can round the corners slightly for a softer look or leave them square for a modern touch.
Finally, bind the edges with a strip of bias tape or fabric. This step not only covers the raw edges but also adds a beautiful border to your coaster. Once bound, your Gnome-Shaped Coaster is ready to brighten your holiday decor!
One of the best parts about this Gnome-Shaped Coasters – TUTORIAL is that it allows endless room for creativity. You can make each gnome unique and experiment with different fabrics, styles, and embellishments.
Start by personalizing each gnome’s hat design. Use patterned fabrics like stripes, polka dots, or Christmas motifs to give your coasters a playful vibe. You can even add small details like embroidery or tiny buttons to decorate the hat.
For the beard, consider using white felt, faux fur, or textured fabric to create a soft and fluffy appearance. This adds dimension to your gnome and makes your coasters stand out from traditional quilted ones.
Experiment with color combinations. Traditional holiday tones like red, green, and gold work beautifully, but pastel colors can create a charming Scandinavian-style winter look. You can even make a set of rainbow gnomes for a cheerful year-round display.
Add small accessories to make your coasters extra festive. Try attaching a tiny pom-pom to the tip of the gnome’s hat, or sew on miniature bells that jingle softly. These little touches make your coasters truly special.
If you’re feeling ambitious, make matching sets for different occasions—like spring gnomes with floral hats or Valentine gnomes with heart details. This way, your Gnome-Shaped Coasters can bring joy to your table throughout the year.
Finally, don’t forget to label your handmade creations with a small fabric tag or embroidered initials. It’s a lovely finishing touch that adds a personal signature to your quilting work.
Once your Gnome-Shaped Coasters are complete, there are countless ways to use and share them. These quilted coasters are both functional and decorative, making them ideal gifts or home accessories.
Use them as table decor during the holidays. Place them under mugs, teacups, or candles to add warmth and color to your Christmas setup. Guests will love the handmade charm of your gnome designs.
If you’re looking for a thoughtful handmade present, gift a set of coasters wrapped in twine or placed in a small gift box. Pair them with a mug or packet of hot cocoa mix for a cozy, festive gift idea.
You can also use them as stocking stuffers or part of a larger handmade gift basket. They’re lightweight, easy to make in bulk, and always bring a smile to the recipient’s face.
For craft sellers, this project offers excellent opportunities. Handmade Gnome-Shaped Coasters can be listed in your online shop as part of your seasonal collection. Use high-quality photos and SEO-friendly tags like holiday quilt coasters or Christmas gnome decor to attract more customers.
You can even host a quilting workshop using this tutorial as a teaching pattern. People love learning creative crafts during the holidays, and this fun, beginner-friendly project makes a great group activity.
Finally, display your coasters proudly around your home. These little gnomes will add joy, color, and a handmade touch to your festive celebrations year after year.
1. Are these coasters beginner-friendly?
Yes, the Gnome-Shaped Coasters – TUTORIAL is perfect for beginners, as it involves basic quilting and simple stitching techniques.
2. What fabrics work best for this project?
Cotton is ideal, but you can also use felt or linen for a rustic look. Just make sure your fabrics are washable and durable.
3. Do I need a sewing machine to make these?
While a sewing machine makes the process faster, you can hand-stitch the coasters if you prefer a traditional approach.
4. Can I wash these coasters?
Yes, they’re washable. Use a gentle cycle and mild detergent, then air-dry to maintain their shape.
5. How can I make my coasters more festive?
Add embellishments like pom-poms, embroidery, or small bells to the gnome hats for a holiday flair.
6. Can I sell coasters made from this pattern?
Yes, you can sell finished products made using this tutorial. Just credit the Gnome-Shaped Coasters – TUTORIAL as your design inspiration.
The Gnome-Shaped Coasters – TUTORIAL is a delightful way to celebrate creativity and holiday cheer through quilting. You’ve learned how to gather materials, design your gnome shapes, assemble and quilt each coaster, and personalize them with fun, festive touches. Whether you gift them, sell them, or keep them for your own table, these adorable coasters are sure to bring smiles and warmth to everyone who sees them.
We hope this tutorial inspires you to explore your love for quilting even more! Please leave your honest opinion and suggestions below—your feedback helps us create even better tutorials and creative ideas for future projects.