
Autumn Lattice Quilt – PATTERN


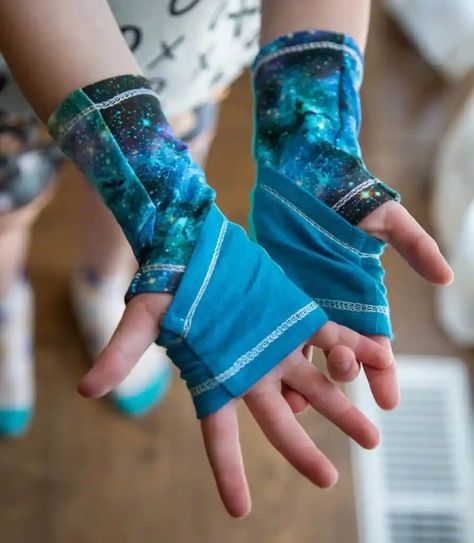
If you’re passionate about sewing and love creating cozy handmade accessories, this Fingerless Glove Patterns – TUTORIAL is the perfect project for you. These gloves are stylish, practical, and customizable, making them ideal for cold days when you still need to use your phone, type, or sew. With this guide, you’ll learn how to design, cut, and stitch your own fingerless gloves using quilting-inspired methods that add both comfort and charm.
The Fingerless Glove Patterns – TUTORIAL brings together the art of quilting and the functionality of wearable fashion. This pattern is suitable for all skill levels—whether you’re a beginner looking to practice basic stitches or an experienced quilter who enjoys small, detailed projects. You can use leftover fabric scraps from your quilting projects, making it an eco-friendly and creative way to repurpose materials.
Each pair of gloves can be uniquely designed with your favorite fabrics, colors, and stitching details. Handmade fingerless gloves not only keep your hands warm but also showcase your talent for craftsmanship. Let’s dive into how you can create your own pair with this step-by-step Fingerless Glove Patterns – TUTORIAL.
Before you begin your Fingerless Glove Patterns – TUTORIAL, gather all the materials and tools you’ll need. Having everything prepared ensures a smooth sewing experience and professional results.
You’ll need:
Choose a comfortable, stretchable fabric that allows movement without being too tight. Quilted fabric gives your gloves a cozy, layered feel that’s both stylish and functional. You can also mix fabrics for a patchwork design that reflects your personal touch.
Wash and press your fabric before cutting to remove any shrinkage or creases. This step ensures your gloves retain their shape and look clean and polished when finished.
Once your materials are ready, it’s time to begin your Fingerless Glove Patterns – TUTORIAL. These steps will guide you through the process of making your own cozy gloves.
Step 1: Create Your Pattern
Place your hand flat on a piece of paper and trace around it, leaving about ½ inch for seam allowance. Mark where your thumb opening will be. Cut out this pattern and use it as a template for your fabric.
Step 2: Cut Your Fabric
Fold your fabric in half with the right sides together. Pin the pattern to the fabric and cut two pieces for each glove (a total of four pieces).
Step 3: Sew the Side Seams
Pin the fabric pieces together and sew along the edges, leaving a small opening for the thumb. Use a straight stitch or zigzag stitch if your fabric is stretchy. Repeat for the second glove.
Step 4: Create the Thumb Opening
Fold the raw edges around the thumb opening inward and stitch around it for a neat, reinforced finish. You can also use bias tape for a decorative border.
Step 5: Add Quilted or Decorative Details
To enhance your gloves, stitch simple quilted patterns like diamonds or lines across the fabric before assembling. You can also add small appliqués, embroidery, or buttons for a personalized touch.
Step 6: Finish the Edges
Hem the top and bottom edges of each glove by folding them inward and sewing a clean seam. Press with an iron to give your gloves a crisp, professional appearance.
Once complete, try them on and admire your new handmade creation. Your Fingerless Glove Patterns – TUTORIAL gloves are ready to wear or gift!
The Fingerless Glove Patterns – TUTORIAL offers endless creative possibilities. You can make them elegant, playful, or practical depending on your fabric choice and design preferences.
With these design options, your Fingerless Glove Patterns – TUTORIAL can match any season, occasion, or outfit. Whether you’re making them for yourself or as handmade gifts, each pair will carry your creative signature.
To make your Fingerless Glove Patterns – TUTORIAL look professional and long-lasting, pay attention to these essential sewing tips:
Taking the time to apply these details will give your gloves a refined, handcrafted look that you’ll be proud to wear.
1. Are fingerless gloves easy to make?
Yes! The Fingerless Glove Patterns – TUTORIAL is suitable for beginners and can be completed in just a couple of hours.
2. What fabrics work best for this pattern?
Fleece, flannel, jersey knit, or quilted cottons are great choices for comfort and warmth.
3. Do I need a sewing machine?
No, but it helps. You can sew them by hand using small, even stitches if you don’t have a machine.
4. Can I adjust the size?
Absolutely. Simply trace your hand or use measurements to create a pattern that fits perfectly.
5. Can I make these gloves as gifts?
Yes! Handmade fingerless gloves make thoughtful and practical gifts for any occasion.
6. How do I add lining to the gloves?
Cut an additional set of fabric pieces in a soft material and sew them inside for extra comfort.
The Fingerless Glove Patterns – TUTORIAL is a wonderful project for crafters who love sewing practical and stylish accessories. It’s simple enough for beginners yet versatile enough for advanced creators to personalize. With just a few materials and a bit of creativity, you can make cozy gloves that are both functional and fashionable.
This tutorial has shown you how to select fabrics, cut your pattern, sew the pieces, and add finishing touches that elevate your design. Every pair of gloves you make will be a unique reflection of your craftsmanship and style.
If you enjoyed this Fingerless Glove Patterns – TUTORIAL, share your experience and suggestions in the comments. Your feedback helps inspire more creative sewing and quilting projects for everyone who loves handmade creations!
