Buzzy Bee Block – TUTORIAL

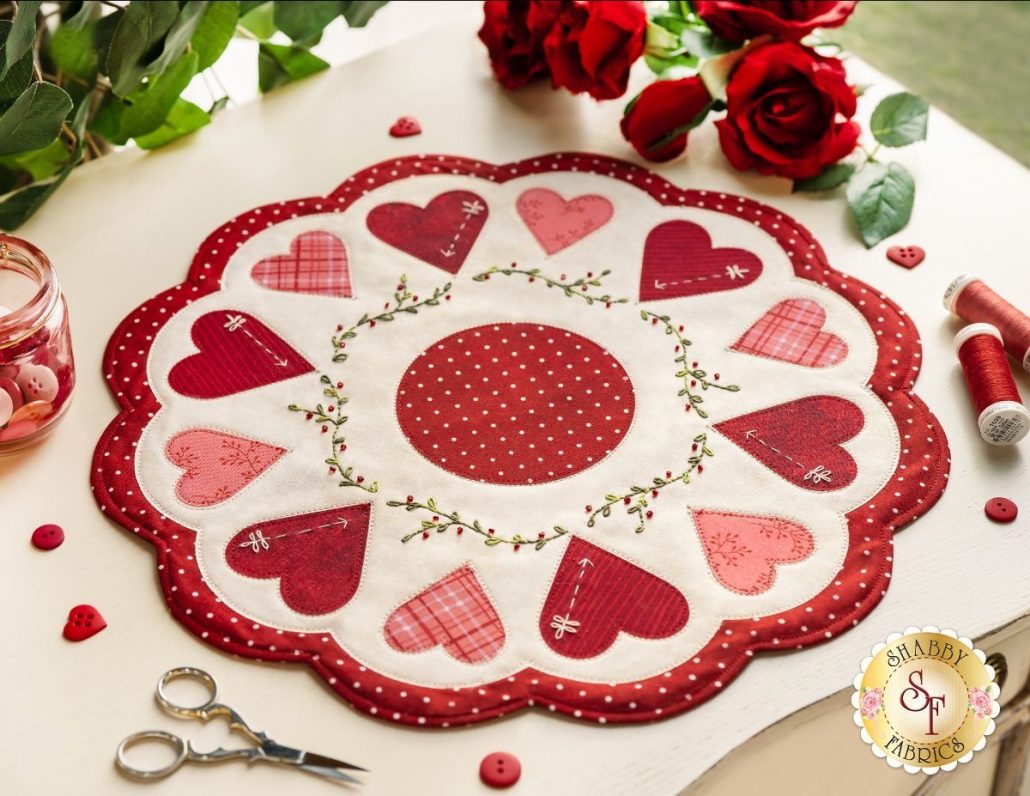
The February Simply Sweet Table Topper – PATTERN is a delightful quilting project perfect for adding a romantic and cozy touch to your dining or coffee table during the month of love. Designed with charming fabrics, playful shapes, and a heartwarming vibe, this pattern is ideal for quilters of all skill levels, from beginners to experienced crafters looking for a quick, rewarding project. Not only does it enhance your home décor, but it also makes a thoughtful handmade gift for friends and loved ones.
Whether you want to create a special Valentine’s Day accent, freshen up your seasonal décor, or simply enjoy a relaxing sewing session, the February Simply Sweet Table Topper – PATTERN provides all the guidance you need to create a beautiful finished piece. With easy-to-follow steps and room for personal customization, it’s the kind of project that sparks creativity while being practical for everyday use.
In this tutorial, we’ll cover everything you need to know to complete the February Simply Sweet Table Topper – PATTERN, including fabric selection, cutting, piecing, quilting, and finishing techniques. By the end, you’ll have not only a gorgeous table topper but also the skills to adapt the design for future occasions.
Selecting the right materials is the first step toward success when making the February Simply Sweet Table Topper – PATTERN. Your fabric choices will determine the mood and visual impact of your finished piece, so take your time exploring patterns, textures, and colors.
Cotton fabrics are a classic choice for quilting, providing durability, easy handling, and a crisp finish. For a Valentine’s theme, consider reds, pinks, creams, and soft whites, perhaps with floral or heart prints for extra charm. If you prefer a more subtle look, muted tones like dusty rose, light gray, or beige can create a sophisticated vibe while still feeling warm and inviting.
Batiks and tone-on-tone prints can also be beautiful for this project. They add depth and variation without overwhelming the design. Choosing fabrics with a mix of small and medium-scale prints will help the pattern details stand out while maintaining visual harmony.
Don’t forget the batting and backing fabric. A lightweight cotton batting works best for a table topper, as it provides structure without making the piece too bulky. For backing, choose something that complements the top without clashing — often a solid color or subtle print works well.
Finally, gather the essential tools: rotary cutter, cutting mat, quilting ruler, sewing machine, thread, pins, and an iron. Keeping everything organized before starting will make the sewing process much smoother and more enjoyable.
When it comes to thread, select a color that blends with your fabrics for a seamless look or a contrasting shade if you want the quilting stitches to stand out.
If you’re making this as a gift, consider adding a personalized fabric label or hand-stitched initials to make it extra special.
Once your materials are ready, the next step in creating the February Simply Sweet Table Topper – PATTERN is precise cutting and piecing. Accuracy here is key to ensuring your blocks line up perfectly and your final topper lays flat.
Begin by carefully following the cutting measurements provided in your pattern. Use a rotary cutter and ruler to ensure clean, straight edges. If you’re new to quilting, double-check each piece before cutting to avoid mistakes that could waste fabric.
Lay out your cut pieces according to the pattern diagram. This will give you a visual preview of how your topper will look and help you decide if you want to swap any fabrics for better contrast.
When piecing, sew with a consistent ¼-inch seam allowance. Press seams open or to one side as instructed — pressing (not ironing) is crucial to keep your blocks flat without stretching the fabric.
Work in sections, completing small block units before joining them into the larger topper layout. This makes it easier to manage and ensures accuracy in alignment.
If your design includes appliqué elements like hearts or floral motifs, this is the stage to stitch them in place. Use fusible webbing to secure the pieces before sewing, and choose a blanket stitch or zigzag for a decorative finish.
Once your quilt top is assembled, give it a final press to prepare for the next stage: layering and quilting.
Quilting is where your February Simply Sweet Table Topper – PATTERN comes to life, adding depth, texture, and durability. The quilting design you choose can either blend subtly with your patchwork or stand out as a decorative feature.
For a beginner-friendly option, simple straight-line quilting works beautifully. You can stitch in the ditch along the seams for a clean, understated effect, or create diagonal lines for added movement.
If you’re feeling more adventurous, free-motion quilting allows for curves, loops, and heart motifs that perfectly match the February theme. Just remember to practice on a scrap sandwich before working on your topper.
Before you begin quilting, layer your quilt top, batting, and backing fabric, making sure all layers are smooth and aligned. Baste the layers together with safety pins or basting spray to prevent shifting.
Start quilting from the center outward to avoid puckering, and take your time to keep stitches even and consistent.
Once the quilting is complete, trim the excess batting and backing, squaring up the edges to prepare for binding.
The final step in your February Simply Sweet Table Topper – PATTERN project is binding and finishing, which neatly encloses the edges and gives your piece a polished, professional appearance.
Cut binding strips from coordinating fabric, typically 2½ inches wide. Join the strips end-to-end with diagonal seams, then press them in half lengthwise.
Attach the binding to the front of your quilt, aligning raw edges, and sew with a ¼-inch seam allowance. Miter the corners for a clean, crisp look.
Fold the binding over to the back and hand-stitch it in place for an elegant finish, or machine-stitch for a faster option.
If you prefer a more decorative touch, consider using a contrasting fabric for the binding or adding a small ruffle for a whimsical, romantic effect.
Give your topper one final press, making sure all seams are crisp and the piece lays flat.
Now your table topper is ready to brighten your dining space or be wrapped up as a heartfelt handmade gift.
Adding a fabric label with your name and date will mark it as a treasured creation, especially if you plan to gift it or keep it as part of your seasonal décor collection.
1. Is the February Simply Sweet Table Topper – PATTERN suitable for beginners?
Yes! This pattern is straightforward, making it ideal for quilters who are new to sewing as well as experienced makers looking for a quick project.
2. Can I change the color scheme?
Absolutely. While pinks and reds are perfect for February, you can adapt the colors for other seasons or occasions.
3. How long does it take to make?
Most quilters can finish this project in one or two afternoons, depending on experience and complexity of quilting.
4. Do I need a special sewing machine?
No, a standard sewing machine works fine. Just make sure you have a walking foot if you plan to do straight-line quilting.
5. Can I resize the topper?
Yes, you can easily adjust the size by adding or removing blocks or borders.
6. What’s the best batting for a table topper?
A lightweight cotton batting is ideal, as it gives structure without being too thick.
The February Simply Sweet Table Topper – PATTERN is a joyful, versatile quilting project that adds a festive touch to your home while being quick and fun to make. From selecting fabrics to adding the final binding, every step allows you to infuse your personal style and creativity. Whether you’re keeping it for yourself or gifting it to a loved one, this table topper will bring warmth and charm to any setting.
PATTERN HERE:
Now that you’ve learned the process, I’d love to hear your thoughts! Share your experience, suggestions, and creative ideas in the comments — your feedback helps inspire future quilting tutorials and keeps our crafting community thriving.