Lake Cabin Quilt Pattern – Tutorial

The Double Windmill Block – Tutorial is a must-learn technique for quilters who love dynamic movement and symmetry in their quilt patterns. This versatile design brings a playful twist to traditional quilting by incorporating rotating shapes that mimic spinning windmills. Whether you’re a seasoned quilter or a confident beginner, this block offers a fun and rewarding experience with stunning results.
This step-by-step Double Windmill Block – Tutorial will walk you through everything you need—from fabric selection to final assembly. It’s a great way to use up scraps or showcase coordinated fabrics for a striking effect. The interlocking design can stand alone or be combined with other blocks for a bold quilt layout.
By mastering the Double Windmill Block – Tutorial, you’ll be adding both movement and structure to your quilting projects. This pattern works well in modern and traditional quilts, making it a favorite among quilting communities worldwide. So, gather your fabrics, ready your rotary cutter, and let’s bring this eye-catching block to life!
Selecting the right fabric is crucial for the Double Windmill Block – Tutorial because contrast is what makes the windmill pattern pop. You’ll want to pick at least two high-contrast fabrics—one light and one dark—for the blades, and a background fabric that lets the design stand out.
Start by deciding on a color palette. You could go with bold and bright for a modern quilt or soft pastels for a vintage feel. Batiks, solids, or small prints work beautifully in this design, especially when aiming for sharp definition between sections.
When laying out your fabrics, consider how the windmill blades will rotate across the quilt top. Arranging fabric swatches on a design board can help you visualize the final product. Take your time at this stage, as it’s key to a harmonious finish.
Another helpful planning step is pre-cutting your fabric into squares or rectangles according to the block size you want. This will streamline your workflow as you piece the block together.
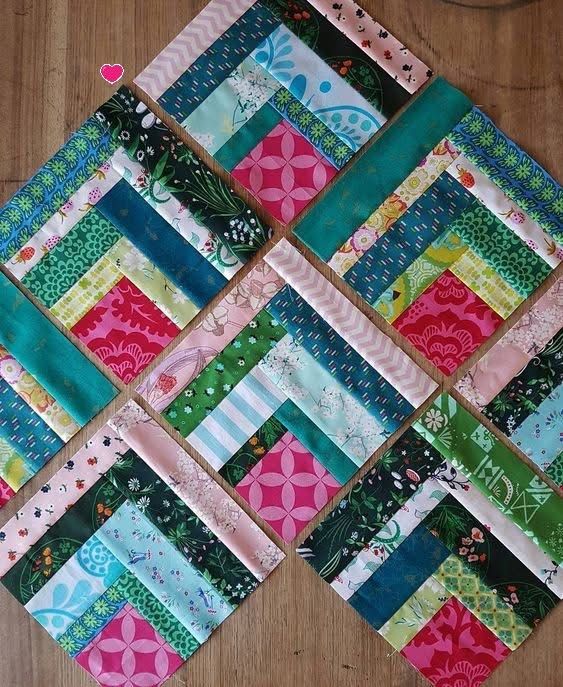
If you’re using scraps, this block is ideal because of its repetitive and geometric nature. It turns even the smallest fabric bits into a unified design, reducing waste and adding a sustainable touch to your quilt.
The planning stage is also perfect for testing layout ideas digitally or on paper. Sketch a few layouts or use digital quilting software to get a better feel for your block’s potential in a full quilt.
The Double Windmill Block – Tutorial begins with precision cutting. Accurate cuts ensure sharp points and well-aligned seams, which are essential in geometric quilt blocks like this one. A rotary cutter, self-healing mat, and clear ruler will make this job much easier.
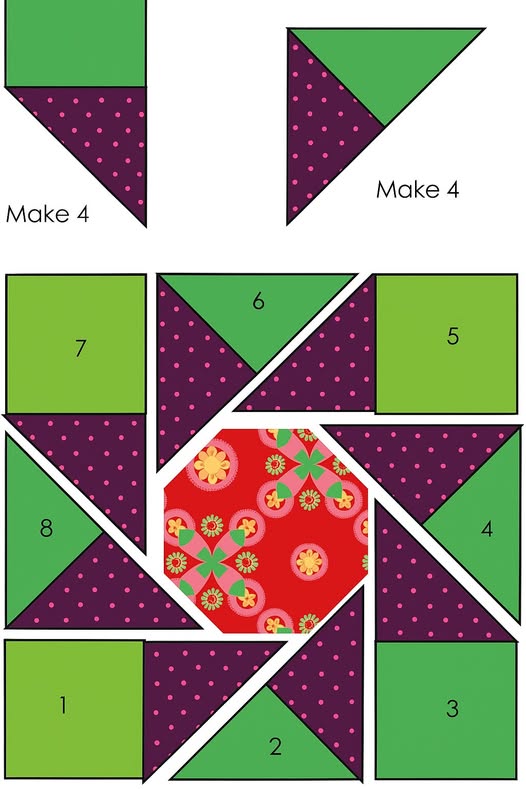
Cut your fabrics into squares or triangles as directed by your chosen block size. Typically, each windmill will require four triangle shapes that rotate around a central point. You’ll also need background pieces to frame the windmill.
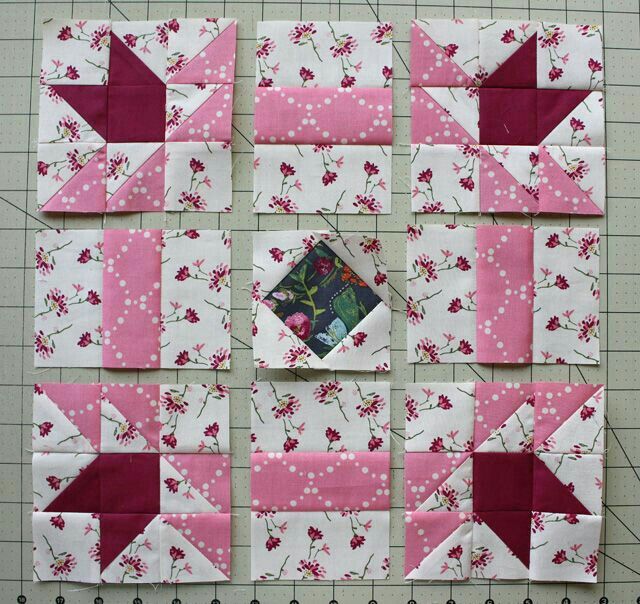
Lay out all your pieces before stitching to verify that the fabric placement forms the windmill illusion. It’s helpful to take a photo of the layout for reference as you begin sewing.
Begin by stitching triangle pairs together, ensuring that points align precisely. Press seams open or to one side based on your preference or pattern instructions—consistent pressing helps the block lie flat.
After assembling the individual units, join them together row by row. Keep pinning and pressing as you go to avoid bulky seams and mismatched corners. Accuracy at this stage really pays off in the final block.
Finally, square up your block with a ruler to make sure it fits correctly with others in the quilt. Trimming edges ensures consistency across blocks and improves the overall quilt alignment during final piecing.
Once your blocks are complete, the Double Windmill Block – Tutorial becomes the foundation for an exciting quilt design. You can choose to repeat the block across the entire quilt or alternate it with solid blocks or other patterns for a mixed look.
If you decide on a repeating layout, rotating some of the blocks can create even more motion across the quilt top. Try alternating block directions for a cascading or pinwheel field effect.
Consider adding sashing between the blocks to give each windmill some breathing room. This can emphasize the shape and make the overall quilt feel more organized and modern.
Borders are another way to finish off your quilt layout. A bold outer border can frame the blocks, while a subtle one can blend in and make the quilt feel more cohesive.
Don’t forget to audition your backing fabric! Choose something that complements the front, as it adds an extra touch of professionalism and harmony to your finished quilt.
When ready to assemble your quilt top, arrange your blocks, sew rows together, and attach borders if desired. The result will be a visually dynamic quilt filled with movement and symmetry—thanks to the unique structure of the double windmill design.
Now that your quilt top is done, it’s time to quilt! The Double Windmill Block – Tutorial pairs well with both straight-line quilting and free-motion designs. Choose a quilting style that complements the sharp angles and dynamic flow of the block.
For straight-line quilting, follow the angles of the windmill to enhance the spinning effect. This approach emphasizes the structure of the block and is great for beginners looking for a clean, modern finish.
If you prefer free-motion quilting, consider echoing the curves of the windmill or adding floral or swirl motifs to soften the geometric lines. This gives your quilt texture and a personalized touch.
Once the quilting is complete, trim the quilt edges and prepare for binding. A contrasting or matching binding will complete the edges and give your quilt a polished look. Don’t forget to label your quilt!
Adding embellishments such as embroidery or hand stitching can also enhance your quilt. Personalizing the windmill centers or corners adds charm and meaning—perfect for gifts or keepsakes.
Lastly, give your quilt a gentle wash and press to relax the fabric and ensure everything is clean and soft. This final step brings all your hard work together into a finished, usable piece.
What size should I cut my fabric for the Double Windmill Block?
That depends on your final block size. Commonly, 5″ or 6.5″ squares are used for beginner-friendly blocks. Always check your pattern for exact measurements.
Can I make this block using only scraps?
Yes! This block is scrap-friendly and perfect for using up leftover fabric pieces. Just make sure you have enough contrast between fabrics for the windmill effect.
Is the Double Windmill Block suitable for beginners?
Absolutely. While it requires precision, it’s great for learning key skills like cutting, piecing, and pressing. Take your time and you’ll do just fine.
How many blocks do I need for a full quilt?
That depends on your block size and desired quilt dimensions. For a lap quilt, you may need around 30–40 blocks. Use a layout calculator to plan accordingly.
What quilting pattern works best for this block?
Both straight-line and free-motion quilting look great. Straight lines can follow the angles of the block, while swirls or echo quilting add movement.
Can I resize the Double Windmill Block for different projects?
Yes! This block can be scaled up or down. Use it for pillows, tote bags, wall hangings, or table runners by adjusting your cut sizes accordingly.
The Double Windmill Block – Tutorial is a fantastic way to bring energy and motion into your quilting. From choosing fabrics to adding finishing touches, this pattern allows for creativity, precision, and a rewarding sewing experience. Whether you’re using scraps or curated prints, this block adapts beautifully to many quilting styles.
We hope this step-by-step guide has helped you master the Double Windmill Block – Tutorial. If you’ve given it a try, we’d love to hear from you! Leave a sincere opinion and suggestions in the comments to help us improve and inspire others. Happy quilting! 🧵💛