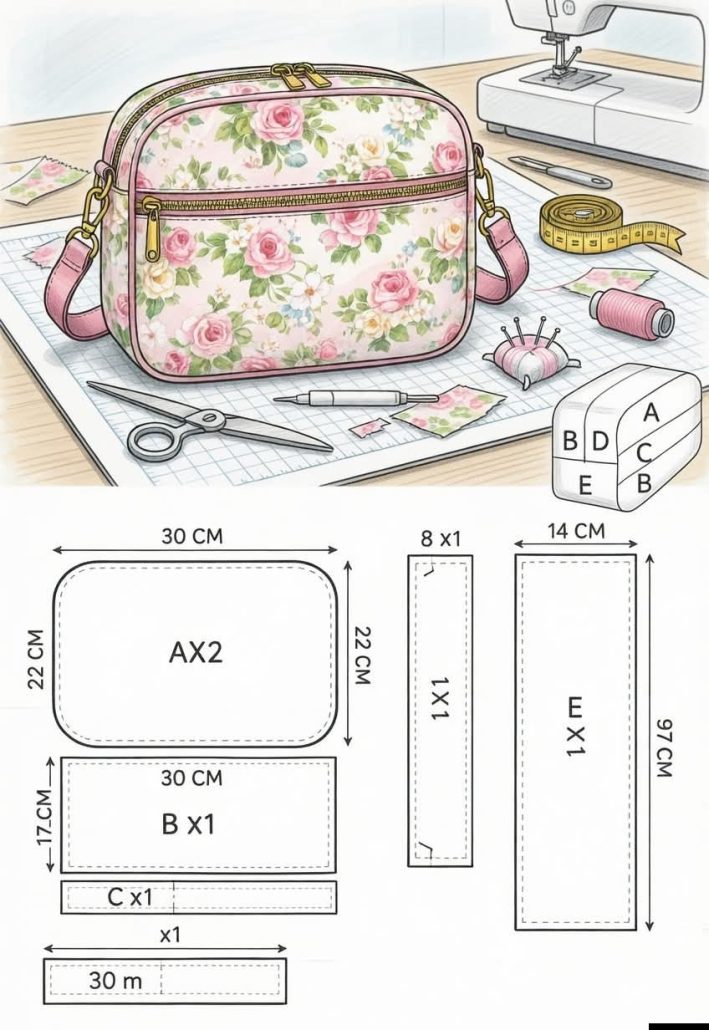
DIY - Zipper Bag - TUTORIAL

The DIY – Zipper Bag – TUTORIAL is a practical and enjoyable quilting project that allows you to create a stylish and functional handmade bag. Zipper bags are perfect for organizing small items such as cosmetics, sewing supplies, craft tools, or everyday essentials.
With the DIY – Zipper Bag – TUTORIAL, you can practice essential sewing and quilting techniques, including installing zippers, working with layered fabrics, and creating clean finishing edges. This project is both beginner-friendly and rewarding, making it a great addition to any sewing skill set.
In this complete guide, you will learn how to create your own DIY – Zipper Bag – TUTORIAL step by step. Whether you are new to sewing or an experienced quilter, this tutorial will help you produce a neat, durable, and beautifully crafted zipper bag.

To begin your DIY – Zipper Bag – TUTORIAL, choose sturdy fabric that is easy to sew. Quilting cotton is a popular choice because it holds its shape well and comes in a wide variety of prints.
You may also combine multiple fabrics to create a patchwork or decorative design.
Basic sewing tools include scissors, pins, a sewing machine, rotary cutter, quilting ruler, and measuring tape.
You will need a zipper that fits the width of your bag.
Batting or interfacing can be used to add structure and durability.
Before starting the DIY – Zipper Bag – TUTORIAL, wash and press the fabric to ensure smooth sewing and professional results.
The DIY – Zipper Bag – TUTORIAL begins by cutting the outer fabric, lining fabric, and any interfacing or batting according to the desired size of your bag.
Carefully measure and cut each piece to maintain symmetry.
If you are creating a quilted exterior, layer the outer fabric with batting and quilt it before assembly.
Press all fabric pieces flat to prepare them for sewing.
Proper preparation ensures your DIY – Zipper Bag – TUTORIAL will assemble neatly and smoothly.
One of the key steps in the DIY – Zipper Bag – TUTORIAL is installing the zipper. Begin by aligning the zipper with the top edge of the outer fabric and sewing it in place.
Attach the lining fabric to the zipper on the opposite side, creating a sandwich with the zipper between layers.
Repeat the process for the other side of the zipper.
Once the zipper is installed, sew the side seams of the bag, leaving the zipper slightly open so the bag can be turned right side out.
Carefully turn the bag through the opening to reveal the finished shape of your DIY – Zipper Bag – TUTORIAL.
Finishing your DIY – Zipper Bag – TUTORIAL properly will give the bag a clean and professional appearance. Begin by trimming excess threads and pressing the seams.
Topstitching around the zipper can strengthen the structure and add a decorative touch.
You can also add features such as small handles, decorative labels, or patchwork panels.
Experimenting with different fabrics, colors, and quilting patterns can create a unique style.
These creative details make every DIY – Zipper Bag – TUTORIAL project one of a kind.
Is this project suitable for beginners?
Yes, the DIY – Zipper Bag – TUTORIAL is beginner-friendly and a great way to learn how to install zippers.
What type of fabric should I use?
Quilting cotton is recommended because it is easy to handle and sew.
Do I need batting or interfacing?
They are optional but help add structure and durability.
How long does it take to complete?
Most zipper bags can be finished in a few hours.
Can I change the size of the bag?
Yes, the dimensions can easily be adjusted to fit your needs.
Is this a good gift idea?
Absolutely. Handmade zipper bags make thoughtful and useful gifts.
The DIY – Zipper Bag – TUTORIAL is a versatile quilting project that combines creativity with practicality. In this guide, you learned how to prepare materials, install a zipper, assemble the bag, and finish it with professional techniques.
With its functional design and customizable style, a zipper bag can be used for organizing many everyday items while showcasing your sewing skills. It’s a simple yet rewarding project for any crafter.
Now it’s your turn to try the DIY – Zipper Bag – TUTORIAL. Share your honest feedback and leave your suggestions—your ideas can inspire even more creative quilting projects!