DIY Travel Makeup Bag

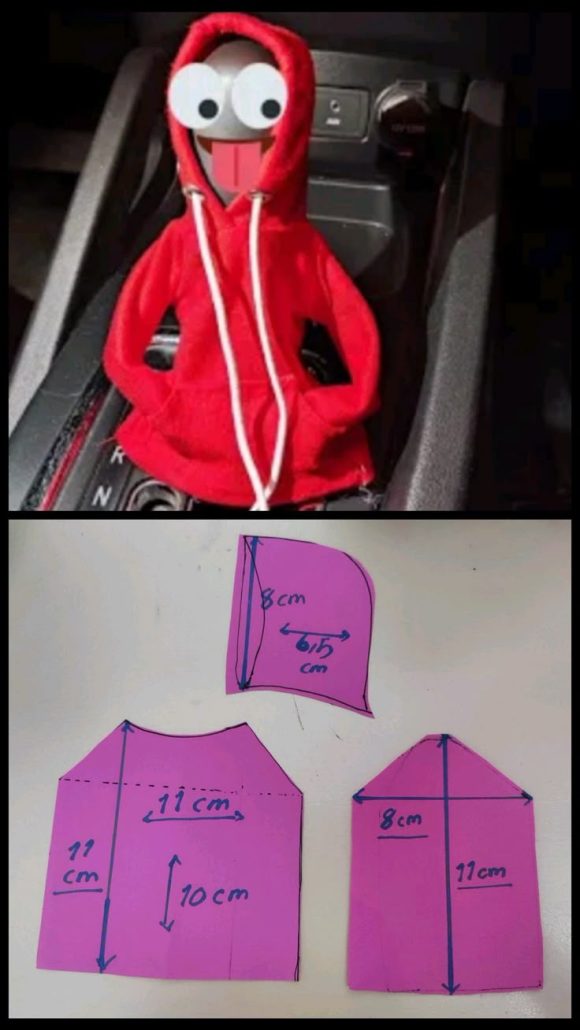
If you love creative sewing projects that blend practicality with style, the DIY Car Gear Hoodie – Tutorial is the perfect pattern for you. This unique quilting-inspired hoodie design allows you to combine your love for sewing with an appreciation for personalized fashion. It’s comfortable, durable, and incredibly fun to make—ideal for anyone who wants to create a wearable piece that reflects both craftsmanship and creativity.
This DIY Car Gear Hoodie – Tutorial takes inspiration from the precision of quilting techniques and combines them with the functionality of modern clothing design. You’ll learn how to cut, assemble, and stitch a hoodie that stands out for its handmade charm and originality. Whether you’re an experienced quilter or a beginner eager to expand your sewing skills, this tutorial provides everything you need to create a unique hoodie that’s stylish and cozy.
The best part is that this project gives you full control over fabrics, colors, and patterns, so every hoodie you make can be completely personalized. It’s perfect for gifting, selling, or simply wearing something made with your own hands.
To get started with your DIY Car Gear Hoodie – Tutorial, you’ll need a few basic sewing supplies. Gather your materials before you begin to make the process smooth and efficient.
You’ll need:
Choose fabrics that are soft, breathable, and slightly stretchy to ensure comfort. Quilting cotton is great for decorative panels, while fleece or jersey adds warmth and coziness. If you want your hoodie to have a quilted look, you can add a layer of lightweight batting between the outer fabric and lining.
Before cutting your fabric, wash and press it to remove any shrinkage or wrinkles. This ensures a professional finish for your DIY Car Gear Hoodie – Tutorial.
Once your materials are ready, it’s time to begin the fun part—assembling your hoodie!
Step 1: Cut Your Fabric
Lay out your fabric and cut all the necessary pieces: front and back panels, sleeves, hood, and pocket. If you’re following a printed pattern, trace and cut carefully according to your size.
Step 2: Add Quilted Details (Optional)
To give your hoodie a unique touch, quilt your fabric before sewing it together. Use a simple straight-line or diamond stitch pattern. This not only adds texture but also gives your DIY Car Gear Hoodie – Tutorial a high-quality, handcrafted appearance.
Step 3: Sew the Shoulder and Side Seams
Pin the front and back pieces right sides together and sew along the shoulders. Then, attach the sleeves and sew the side seams, ensuring all edges align neatly.
Step 4: Create and Attach the Hood
Assemble the two hood pieces by sewing along the curved edge. Attach the hood to the neckline, matching the center seam to the back of the hoodie. For a finished look, add a drawstring or bias tape around the hood opening.
Step 5: Add the Pocket
Cut a rectangular or kangaroo-style pocket and hem the top edge. Sew it to the front of your hoodie, leaving openings on both sides for your hands.
Step 6: Finish with Hem and Cuffs
Fold and hem the bottom edge of the hoodie and the sleeve ends. You can use ribbed knit fabric for a professional finish or simply fold and stitch.
Once complete, press all seams for a crisp look. Your DIY Car Gear Hoodie – Tutorial project is ready to wear!
The DIY Car Gear Hoodie – Tutorial allows endless room for creativity and personalization. You can experiment with different fabrics, prints, and embellishments to make your hoodie truly one-of-a-kind.
This project isn’t just about sewing a hoodie—it’s about expressing your personal style. Whether you prefer a cozy everyday piece or a statement item, the DIY Car Gear Hoodie – Tutorial helps you craft exactly what you imagine.
To ensure your DIY Car Gear Hoodie – Tutorial looks professional and lasts long, follow these helpful tips:
These small details can elevate your finished hoodie from handmade to handcrafted quality.
1. Can beginners make this hoodie?
Yes! The DIY Car Gear Hoodie – Tutorial is beginner-friendly, especially if you follow the steps carefully.
2. Do I need a serger?
A serger helps with clean edges, but a regular sewing machine with a zigzag stitch works perfectly fine.
3. Can I make this hoodie without a pattern?
Yes, you can trace around an existing hoodie that fits well and use it as your template.
4. What fabrics work best?
Fleece, jersey knit, or sweatshirt fabric for comfort; quilting cotton for decorative elements.
5. Can I add a zipper or buttons?
Absolutely! You can convert your hoodie into a zip-up style by adding a front zipper for extra convenience.
6. How long does this project take?
Usually 2–4 hours, depending on your sewing speed and whether you add quilting details.
The DIY Car Gear Hoodie – Tutorial is a fun and fulfilling sewing project that merges quilting artistry with everyday fashion. It’s practical, stylish, and fully customizable—perfect for crafters who love to create functional items that showcase their creativity. Whether you’re sewing for yourself, family, or friends, this hoodie will be a standout piece in any wardrobe.
By following this tutorial, you’ll gain valuable sewing experience and end up with a garment that’s both comfortable and completely unique. So grab your fabric, thread, and sewing machine, and start crafting your very own DIY Car Gear Hoodie – Tutorial today!
PATTERN VIDEO:
If you enjoyed this project, don’t forget to share your results and ideas in the comments. Your feedback inspires more creative tutorials like this one!