Patchwork Cat Cushion – Tutorial

The Disappearing Nine Patch Tutorial is one of the most beloved quilting techniques among beginners and experienced quilters alike. Known for its simplicity, charm, and surprising visual effect, this pattern transforms basic fabric squares into a dynamic and interesting quilt design. Whether you’re looking to practice your cutting and piecing skills or create a fast and beautiful gift, the Disappearing Nine Patch Tutorial offers a user-friendly and rewarding experience.
This pattern also stands out for its flexibility. You can choose soft pastels for a baby quilt, bright prints for a playful throw, or rich tones for an elegant decorative piece. By learning the method presented in this Disappearing Nine Patch Tutorial, you gain a versatile technique that can be adapted to countless quilting projects.
In this article, we will explore how this technique works, what materials you need, practical tips for accuracy, layout ideas, common questions, and more. Let’s begin your creative journey into the delightful world of the Disappearing Nine Patch Tutorial.
The Disappearing Nine Patch method begins with assembling a traditional nine-patch block. This classic arrangement of nine equal squares is one of the foundational skills in quilting. After creating this block, the magic begins when you cut it into smaller sections and rearrange them to form a completely new design. This transformation is the hallmark of the Disappearing Nine Patch Tutorial.
One of the strengths of this technique is its accessibility. Even if you’re a beginner, the steps are straightforward, and mistakes can often be disguised within the final design. This makes the Disappearing Nine Patch Tutorial an excellent option for learning while creating something beautiful.
The method also celebrates creative freedom. You can mix solids and prints or use a coordinated fabric bundle for harmonious results. The design possibilities are nearly endless. With each rearranged block, new patterns emerge, demonstrating the charm of the Disappearing Nine Patch Tutorial.
Because the technique relies on cutting and rearranging, accuracy in sewing and trimming helps ensure clean lines and balanced blocks. However, even slight imperfections add character and uniqueness. That’s one of the reasons quilters love the forgiving nature of this pattern.
It also serves as a perfect scrap-busting project. If your stash is overflowing with leftover squares or charm packs, this pattern puts them to good use in a fun and engaging way.
Ultimately, understanding the concept behind this technique empowers you to experiment with color, value, and layout as you develop your own interpretations of the Disappearing Nine Patch Tutorial.
To begin the Disappearing Nine Patch Tutorial, gather a selection of fabric squares, usually 5″ charm pack pieces or pre-cut squares of your choosing. Using pre-cuts saves time and ensures uniformity, especially helpful for beginners aiming for clean and accurate results.
You will also need basic quilting tools: a rotary cutter, cutting mat, ruler, thread, sewing machine, and an iron. Proper preparation of fabric, including pressing your materials beforehand, contributes to smooth stitching and crisp seams throughout your project.
Selecting fabrics is an enjoyable part of the process. Consider how colors and prints interact when arranged inside a nine-patch block. For example, placing bold prints in the center square can create an eye-catching focal point once the block is cut and rearranged. This intentional fabric placement is a powerful technique within the Disappearing Nine Patch Tutorial.
Before sewing, double-check your quarter-inch seam allowance. Consistency in seam width results in balanced blocks that fit together easily during the final assembly. A quilting foot with a seam guide can help achieve a reliable quarter-inch seam every time.
Pressing your seams either open or to one side is a matter of preference. What matters most is consistency and avoiding bulky intersections. Proper pressing ensures that your Disappearing Nine Patch Tutorial blocks lie flat, making assembly and quilting easier.
Finally, organize your work area. Keep your blocks, tools, and fabric pieces visible and accessible, which helps maintain accuracy and rhythm as you move through each step of this engaging quilting project.
Start by arranging your nine squares into a simple three-by-three layout. Experiment with alternating colors or repeating fabrics to create visual rhythm. This first step is the foundation of the Disappearing Nine Patch Tutorial, so take your time planning your arrangement.
Sew your squares together row by row, and then stitch the rows to form one complete nine-patch block. Pay attention to seam alignment as this contributes to a polished look. After sewing, give the block a good press to prepare for the transformation.
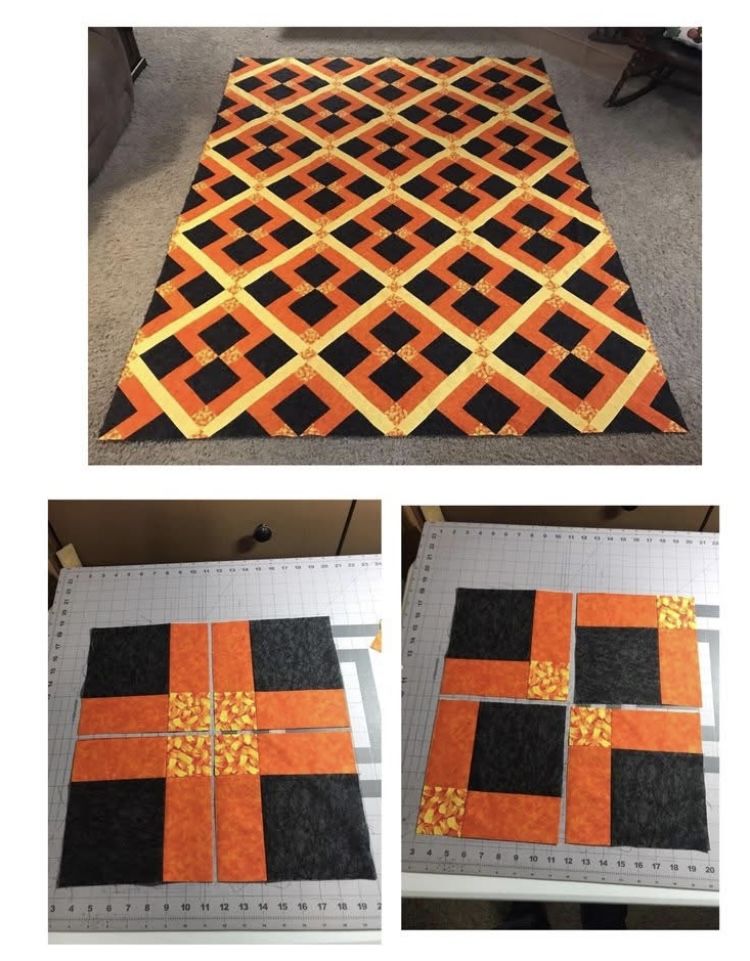
Next comes the exciting part: cutting the block. Using your rotary cutter and ruler, slice your nine-patch vertically down the center and then horizontally, dividing the block into four smaller sections. This simple cut dramatically changes the look of the block and is the key technique in the Disappearing Nine Patch Tutorial.
Once cut, rotate and rearrange the smaller units to create a new pattern. You can flip corners, switch positions, or keep them as-is for a more subtle rearrangement. Each variation produces a unique layout, making this step creative and fun.
Sew the four sections together with care, nesting seams when needed for cleaner intersections. As the block reforms into its new design, the transformation becomes fully visible, showcasing the magic of the Disappearing Nine Patch Tutorial.
Press the completed block and repeat the process to make as many blocks as desired. When finished, join them together in a layout that complements the movement and colors in your quilt for a cohesive and striking final result.
One of the best aspects of the Disappearing Nine Patch Tutorial is the vast number of layout possibilities. You can rotate blocks randomly for a playful and scrappy style or align them with intention for a more structured design.
Experimenting with color value, such as placing darker tones in the center or corners of each original nine-patch, can create visual movement throughout the quilt. Contrast plays a powerful role in helping your finished quilt stand out.
Borders can also enhance your quilt’s appearance. Adding a narrow inner border followed by a wider outer border frames your blocks beautifully. This not only adds size to your quilt but also brings harmony to the overall design.
When your top is complete, choose a backing fabric that complements your quilt’s palette. A contrasting backing adds a fun surprise, while a coordinated print creates a cohesive feel. The backing fabric plays an important role in the tactile and visual experience of your finished quilt.
Batting selection affects the warmth and drape of your quilt. Consider whether your Disappearing Nine Patch Tutorial project will be decorative or practical when choosing between cotton, polyester, wool, or blended batting types.
Finally, bind your quilt with a fabric that ties everything together. Whether you choose a solid, stripe, or print, the binding adds a polished edge to your piece and completes your creative journey with satisfaction.
What size squares are best for this pattern?
Most quilters prefer 5″ charm squares, but you can use any size as long as all pieces are uniform.
Is the Disappearing Nine Patch suitable for beginners?
Yes, it’s one of the most beginner-friendly quilting patterns due to its simple construction and flexible design.
Can I use scraps instead of pre-cuts?
Absolutely. The Disappearing Nine Patch Tutorial is an excellent scrap-busting project and works well with leftover fabric pieces.
How many blocks do I need for a full quilt?
This depends on your desired size. Small throws may need around 12–20 blocks, while larger quilts require more.
Do fabrics need to match perfectly?
Not necessarily. The charm of this pattern is that it looks beautiful even with varied prints and colors.
Should seams be pressed open or to the side?
Either method works. Choose the option that gives you the flattest and most comfortable seams.
The Disappearing Nine Patch Tutorial is a delightful quilting technique that combines simplicity with surprising visual impact. Throughout this article, you learned how to construct the basic nine-patch, cut and rearrange the block, explore creative layout ideas, and finish your quilt with confidence. Whether you’re a beginner or an experienced quilter, this pattern offers endless possibilities and joyful results.
I hope this guide has inspired you to try this wonderful quilting method. If you enjoyed the tutorial, please leave your honest opinion and share any suggestions you may have. Your feedback helps inspire future creative content!