
Autumn Lattice Quilt – PATTERN


The Crochet Hanging Flowers – TUTORIAL is a beautiful and creative project that combines elegance, texture, and playful design into a charming decorative piece. Whether you’re adding a handmade touch to your home, preparing a special gift, or seeking a relaxing new crochet project, this pattern offers endless possibilities. The timeless appeal of flowers paired with the versatility of crochet makes this tutorial a favorite among crafters. In this article, you will learn everything you need to start and complete your own Crochet Hanging Flowers, with clear guidance, SEO-optimized content, and tips for achieving the best results.
Creating Crochet Hanging Flowers is not only fun but also a great way to use leftover yarn and experiment with different color combinations. The project is easy to customize, making it suitable for every season—from bright summer palettes to soft holiday tones. With the right techniques, you can transform these crochet blooms into wall decor, nursery decorations, keychains, or gifts for all ages.
In this complete guide, you’ll discover how to craft each flower, assemble them, and give them the delicate hanging effect that makes this project so unique. Let’s explore the full Crochet Hanging Flowers – TUTORIAL in detail so you can create your own beautifully handcrafted decoration.
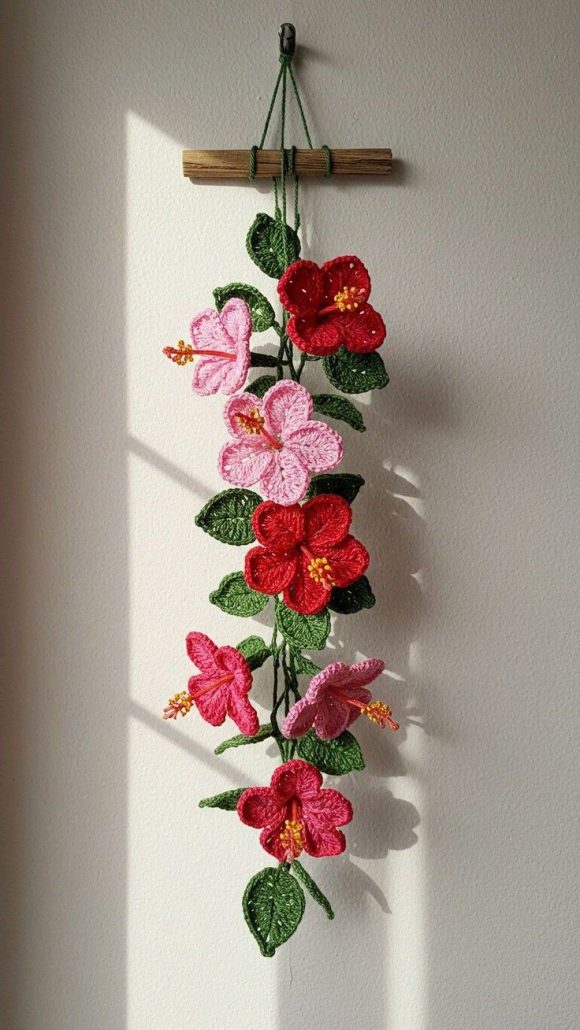
Each set of Crochet Hanging Flowers is built from simple motifs that come together to form lightweight and charming decor.
The flowers are usually crocheted individually, which allows for endless personalization depending on your preferred style and color choices.
The assembly is what gives the pattern its magic—the movement and harmony of the flowers as they hang gracefully.
This section will help you understand the structure of the pattern before starting your project.
With a basic grasp of the techniques, even beginners can complete this tutorial confidently.
By the end of this section, you’ll know exactly what to expect and how the pattern comes together.
Creating this project doesn’t require much, which makes it perfect for beginners and experienced crocheters alike.
Most crafters choose lightweight yarn such as cotton, as it provides crisp stitch definition for each petal.
A small or medium hook size is typically ideal, allowing you to create delicate and well-shaped flowers.
You may also add beads, tassels, or small pearls to personalize your hanging flowers even more.
A tapestry needle is essential for weaving in ends and attaching pieces securely.
With these simple materials gathered, you are ready to bring your Crochet Hanging Flowers – TUTORIAL to life.
Start by crocheting the center of the flower, usually made with a magic ring or a tight circular base.
Once the center is formed, you will build the petals using simple stitches such as single crochet, half-double crochet, or double crochet.
Repeat the petal sequence around the center, making sure the tension remains even to keep the shape symmetrical.
After completing the flowers, create the leaves if the pattern includes them—these add realism and charm.
Next, crochet or braid the cords that will hold the flowers in place when hanging.
Finally, assemble everything carefully, adjusting the length and arrangement until you’re satisfied with the final look.
One of the greatest joys of this project is its versatility—these flowers can enhance nearly any space.
Hang them in nurseries for a whimsical and soft decorative touch.
Use them as seasonal decorations during spring, summer, or holiday celebrations.
Combine different types of flowers and leaves to create unique arrangements.
You can also gift them as handmade ornaments, bookmarks, or bag charms.
The Crochet Hanging Flowers – TUTORIAL opens the door to unlimited creativity and personalization.
1. Is this pattern suitable for beginners?
Yes! The stitches are simple and repetitive, making it an excellent project for new crocheters.
2. What kind of yarn should I use?
Cotton or lightweight yarn works best for well-defined flowers and clean hanging cords.
3. How many flowers should I make?
You can make as many as you want—three, five, or even more depending on the size of the decoration.
4. Can I use leftover yarn?
Absolutely. This project is perfect for using scrap yarn in different colors.
5. How do I attach the flowers for hanging?
You can use crochet cords, braided yarn, or even thin ribbons for a decorative effect.
6. Can I add beads or tassels?
Yes! Embellishments make your hanging flowers even more unique and artistic.
7. How long does it take to finish?
Most crafters finish it in a few hours, depending on how many flowers they make.
8. Are these safe for children’s rooms?
Yes, as long as they are hung securely and out of reach of very young children.
9. Can I wash the hanging flowers?
Yes. If made with cotton yarn, they can be hand-washed gently.
10. Can I sell items made from this tutorial?
Most patterns allow it, but always check the designer’s policy.
Creating the Crochet Hanging Flowers – TUTORIAL is a wonderful way to explore creativity while crafting a charming decorative piece. Throughout this article, you learned what materials you need, how to construct each flower, and various ideas for displaying your finished project. This pattern is accessible, customizable, and rewarding for crocheters of all skill levels.
If you enjoyed this guide, please leave your honest opinion and share any suggestions you may have for future tutorials. Your feedback helps improve the content and inspire new ideas!
