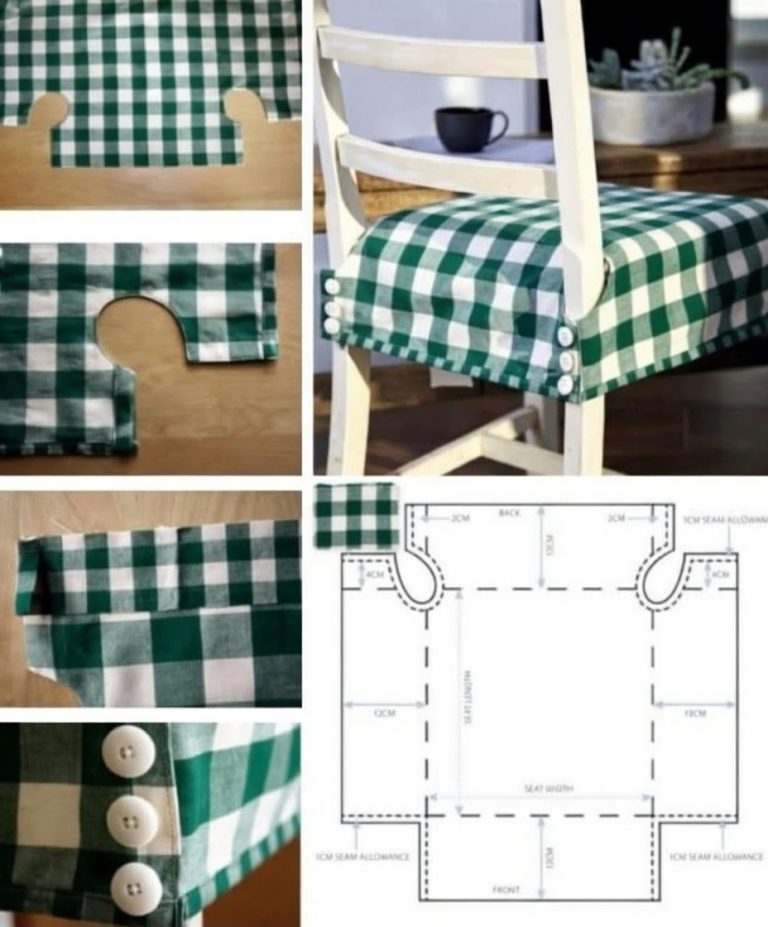
Sewing a Chair Cover - PATTERN

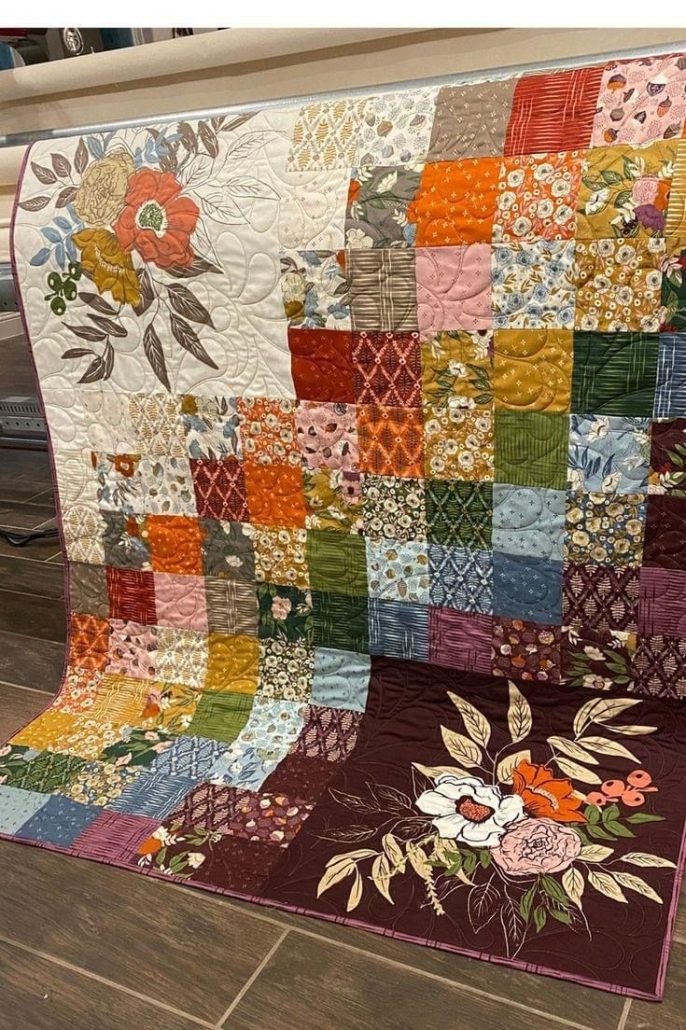
The Color Patch Cascade Quilt – TUTORIAL is a vibrant and inspiring project for quilters who love color transitions and visual movement. This quilt pattern stands out for its dynamic arrangement of hues that flow from one tone to another, creating a mesmerizing cascade effect. Whether you’re a beginner or an experienced quilter, this pattern offers a delightful experience that merges color theory and textile art.
In this guide, you’ll learn step-by-step how to make your own Color Patch Cascade Quilt, from choosing fabrics to assembling the final product. By following this tutorial, you’ll gain the confidence to create a truly unique and eye-catching quilt that will become a centerpiece in any room.
The Color Patch Cascade Quilt – TUTORIAL emphasizes simplicity in technique but sophistication in result, making it the perfect blend of accessible crafting and artistic expression.
The success of your Color Patch Cascade Quilt – TUTORIAL project begins with fabric selection. Choosing the right fabrics allows you to create that seamless color cascade effect that gives the quilt its charm.
Start by selecting a color palette that includes multiple shades of the same hue, such as light blue to navy or soft pink to deep red. This gradient approach is what creates the signature cascade.
Next, gather fat quarters or scraps in each selected shade. Solid fabrics work beautifully for this quilt, but you can also include subtle prints for added texture without overwhelming the cascade effect.
Make sure to arrange your fabrics in color order before cutting. This planning step helps ensure a smooth transition when you start sewing the pieces together.
When choosing fabric types, stick with high-quality 100% cotton quilting fabric. This will ensure consistency in texture and durability after washing.
Don’t forget the background fabric. A neutral such as white, cream, gray, or black can help the colors pop and maintain the cascade focus.
Lastly, consider your backing and binding fabrics. A fun print for the back adds personality, while a binding that complements the color cascade helps frame the design cohesively.
To bring the Color Patch Cascade Quilt – TUTORIAL to life, cutting and organizing your pieces with precision is essential. Your quilt’s overall flow relies heavily on clean cuts and thoughtful layout.
Begin by cutting your fabrics into squares or rectangles of uniform size. Common sizes are 4.5″ or 5″, depending on your desired quilt dimensions and level of detail.
Label your pieces according to their color gradient position. Using sticky notes or arranging them in a grid on a design wall can help you visualize the cascade pattern clearly.
Organize your pieces row by row, focusing on smooth transitions between each shade. You may want to snap a photo of the layout before you start sewing to keep a reference handy.
It’s helpful to stack your pieces for each row separately and label them. This step will make assembly faster and prevent confusion later on.
If you’re incorporating prints, try alternating them strategically so they don’t cluster or disrupt the overall cascade look.
Accuracy in cutting ensures that your quilt top will line up cleanly when you start sewing. Taking the time to cut and organize correctly will save hours in piecing and trimming later.
Sewing the quilt top is the heart of the Color Patch Cascade Quilt – TUTORIAL, and it’s where your cascade really comes to life. Working methodically here ensures a smooth, flowing result.
Begin with the first row, sewing pieces together with a consistent seam allowance—typically ¼ inch for quilting. Press the seams to one side or open, depending on your preference.
Continue assembling each row in sequence. Double-check the order of your colors as you go to maintain the gradient effect.
Once all rows are complete, begin sewing them together. Align your seams carefully to ensure a uniform and polished quilt top.
After sewing each row, press the seams before adding the next one. Pressing as you go helps keep the quilt top flat and manageable.
Take breaks between sections to evaluate the overall cascade flow. If something feels off, it’s easier to adjust early on than after the top is fully assembled.
Once your top is finished, give it a final pressing and square it up. A clean, straight edge will make layering and quilting easier in the next steps.
Now that your quilt top is ready, it’s time to quilt and bind your Color Patch Cascade Quilt – TUTORIAL. This final stage brings durability, texture, and a sense of completion to your work.
Begin by making your quilt sandwich: layer the backing fabric, batting, and quilt top. Smooth each layer and secure with basting spray or pins.
Choose a quilting design that complements the cascade. Straight-line quilting or echo stitching can enhance the flow of the pattern without distracting from the color transitions.
If you prefer free-motion quilting, consider gentle curves or waves that mirror the cascade effect. Just be sure your stitching doesn’t overpower the color play.
Start quilting from the center outward to prevent shifting. Take your time and adjust your quilt frequently to avoid puckers.
After quilting is complete, trim the excess batting and backing so everything is flush with your quilt top. Then, attach your binding using your preferred method—machine or hand-stitched.
Finally, give your finished quilt a gentle wash and dry to soften it and remove any markings. Now, your Color Patch Cascade Quilt is ready to display or gift!
What size is the Color Patch Cascade Quilt?
The size can vary based on the number of squares used. A common layout might be 60″ x 75″, but you can scale up or down easily.
Do I need special tools to make this quilt?
No, standard quilting tools—rotary cutter, ruler, mat, sewing machine, and iron—are sufficient.
Is this tutorial suitable for beginners?
Yes! The Color Patch Cascade Quilt – TUTORIAL uses simple piecing and straight-line sewing, making it perfect for new quilters.
Can I use printed fabrics instead of solids?
Absolutely. Just make sure the prints don’t overpower the color cascade effect. Tone-on-tone or small prints work best.
How do I maintain the cascade effect during assembly?
Carefully plan your layout and label each row. Taking a photo of your layout can help you stay on track.
What quilting style works best for this pattern?
Straight-line quilting is ideal for beginners, but free-motion quilting with soft curves can add a flowing effect to match the cascade.
In this Color Patch Cascade Quilt – TUTORIAL, we explored every step from fabric selection to final binding. You learned how to build a color gradient, cut and organize your pieces, assemble the quilt top, and quilt the finished product with care. This project is a perfect opportunity to play with color and improve your quilting skills at the same time.
TUTORIAL VIDEO:
We hope this guide inspired you to create your own cascade masterpiece. If you found this tutorial helpful, please leave your honest feedback and feel free to share any suggestions for future patterns or improvements. Happy quilting!