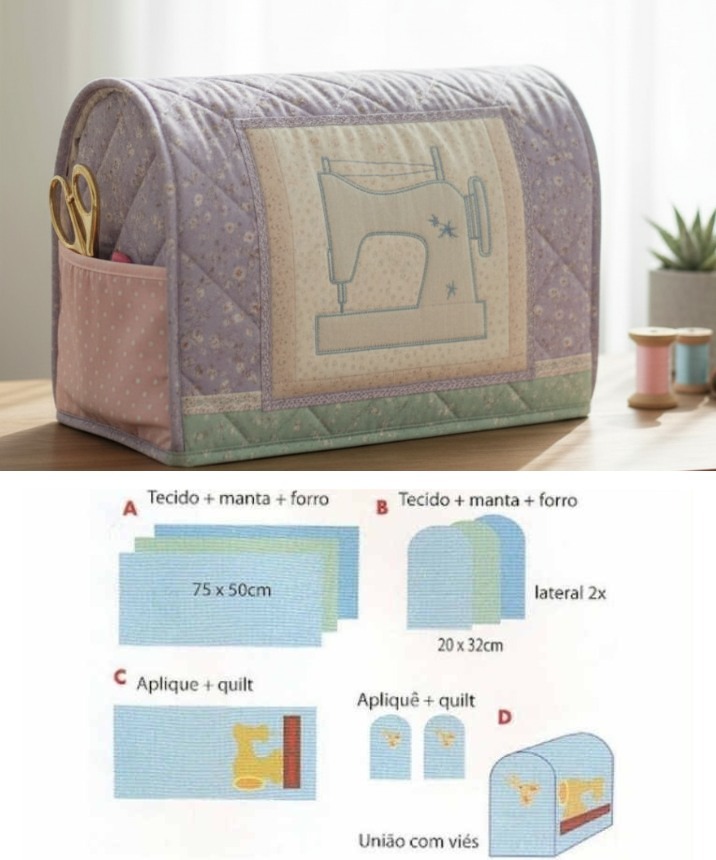
Bluebird Patchwork Tote Bag Tutorial

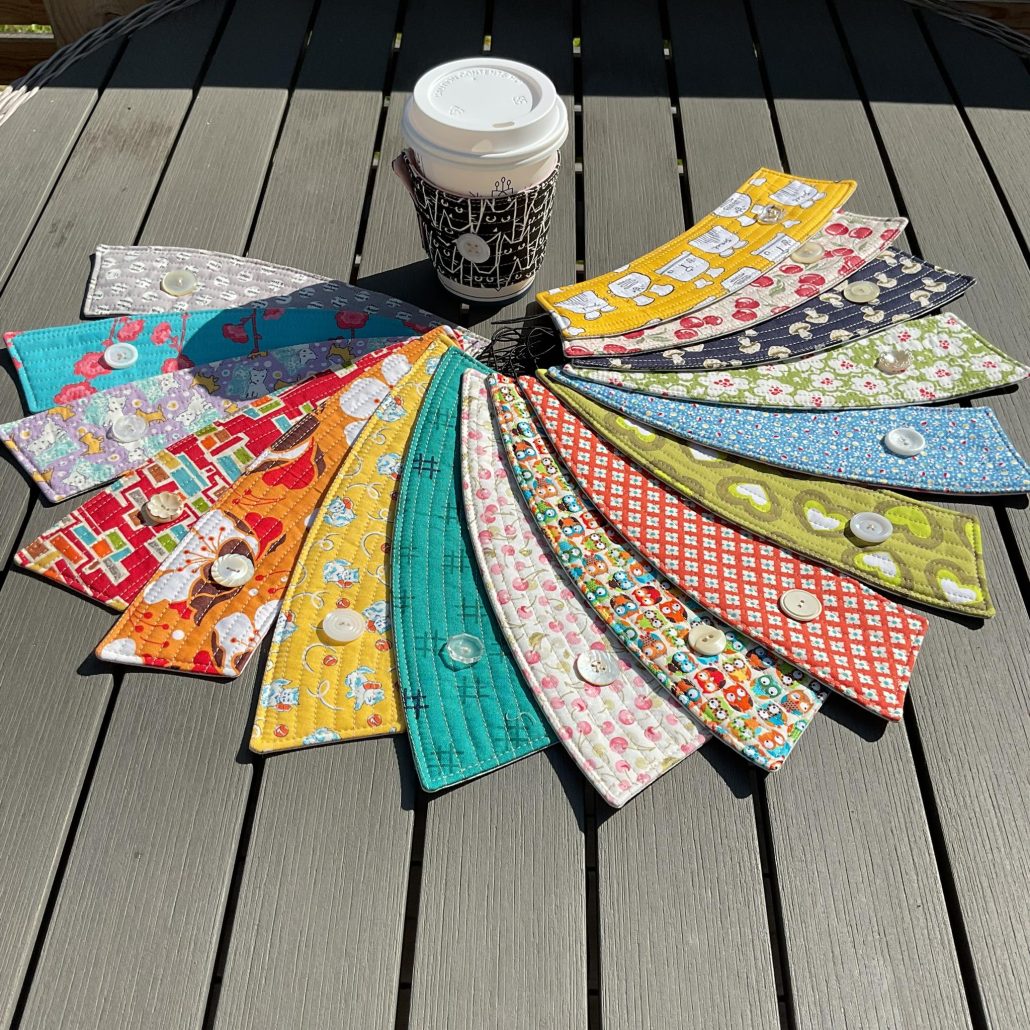
Creating a handmade quilted item doesn’t always require a full-sized blanket or complex patchwork. This Coffee Cup Sleeve – Pattern is the perfect introduction to quilting in a compact, practical, and stylish way. Ideal for quilters of all levels, this project is not only beginner-friendly but also incredibly rewarding.
In this tutorial, we’ll walk you through everything you need to know to make your own quilted coffee sleeve—from material choices to stitching tips.
The best part about the Coffee Cup Sleeve – Pattern is that it combines functionality with creativity. Whether you’re making one for yourself, gifting it to a fellow coffee lover, or even planning to sell at local craft markets, this little project will warm your heart as much as your drink. Let’s begin this cozy and eco-friendly journey into mini quilting!
The first step in any quilting project is selecting the best materials. With the Coffee Cup Sleeve – Pattern, you’re working on a smaller scale, which means you can get creative with scraps or leftovers from larger projects.
Quilting Cotton: This is your go-to fabric. It’s easy to work with, washable, and holds its shape well. Choose two coordinating prints—one for the outside and one for the lining.
Batting: A thin layer of cotton or polyester batting gives the sleeve structure and insulation. Avoid thick batting as it can make the sleeve too bulky to wrap around a cup.
Thread: High-quality cotton or polyester thread in a matching or contrasting color. This adds both durability and decorative flair.
Velcro or Button: To secure the sleeve around your cup, you’ll need either a small piece of hook-and-loop tape (Velcro) or a button with a loop.
Optional Embellishments: Add a quilted label, appliqué, or a little embroidery to personalize the final product.
When selecting your fabrics and materials, consider the recipient’s style if you’re making it as a gift. Floral, geometric, or even novelty coffee-themed prints are all popular choices.
Once you have all your materials ready, it’s time to cut and prepare the components of the Coffee Cup Sleeve – Pattern. Accurate measuring at this stage ensures a neat, professional-looking finish.
Measure the Cup: A standard coffee cup sleeve is about 10 inches wide and 3 inches tall. Add ¼ inch seam allowance on all sides. You’ll need to cut two fabric pieces (front and lining) and one batting piece to these dimensions.
Layering the Pieces: Place the fabric pieces right sides together, and then lay the batting on the bottom. This sandwich will be turned right side out after stitching.
Pin or Clip the Layers: Keep the pieces aligned with sewing clips or pins, especially around the curves or corners.
Stitch Around the Edges: Sew using a ¼ inch seam allowance, leaving a 2-inch opening on one side for turning. Backstitch at the beginning and end to secure the seams.
Clip the Corners: Trim any bulk from the seam allowances and clip the corners to allow for sharp turns when flipping right side out.
After flipping, use a point turner or a blunt pencil to gently push out the corners, then press flat with an iron to prepare for topstitching.
Now that your sleeve is constructed, it’s time to quilt it! This step enhances the look of the Coffee Cup Sleeve – Pattern and adds that charming handcrafted detail quilters love.
Topstitching: Start by topstitching around the entire edge of the sleeve, about ⅛ inch from the edge. This closes the turning hole and keeps everything crisp.
Quilting the Body: Use straight lines, diagonal lines, or even free-motion stitching to quilt the body of the sleeve. This not only adds style but also secures the batting inside.
Attaching Closures:
Test the Fit: Wrap the sleeve around your coffee cup and adjust the closure placement as needed. It should fit snugly but not tightly.
Add Decorative Touches: Now is a great time to add those final embellishments—hand embroidery, appliqué shapes, or even your signature quilt label.
One of the joys of quilting is the freedom to personalize every project. The Coffee Cup Sleeve – Pattern is no exception, offering endless possibilities to suit different tastes and occasions.
Seasonal Themes: Create sleeves for different seasons—spring florals, summer lemons, autumn leaves, or cozy winter plaids.
Gifting Ideas: These sleeves make perfect gifts for teachers, coworkers, or coffee-loving friends. Pair with a reusable cup or a café gift card for a thoughtful presentation.
Selling at Craft Fairs: If you enjoy selling handmade items, these sleeves are great sellers. They’re inexpensive to make, fast to finish, and popular among eco-conscious buyers.
Kid-Friendly Options: Make smaller versions for kids’ hot chocolate mugs or use playful prints to create a fun collection for the whole family.
Machine Washable: Thanks to the quilting cotton and durable stitching, these sleeves are completely washable. Just toss them in with your regular laundry and they’ll last for many coffee dates to come.
Pattern Variations: Try a patchwork version with small scraps, or create a reversible sleeve with two different fabrics. Add lace, rickrack, or ribbon for an extra pop of texture.
No matter how you design yours, a quilted coffee cup sleeve is a lovely daily reminder of your creativity and the joy of handmade items.
Q: What size should my coffee sleeve be?
A: A typical size is 10 inches wide by 3 inches tall, but it can be adjusted slightly depending on the cup size. Always test fit on your preferred cup before adding the closure.
Q: Can I use fusible batting instead of regular batting?
A: Yes! Fusible batting can help hold the layers in place as you sew and quilt, making the process a bit easier, especially for beginners.
Q: Is this project suitable for beginners?
A: Absolutely. The Coffee Cup Sleeve – Pattern is perfect for beginners because it requires only basic quilting skills and minimal fabric. It’s also a fast project with a satisfying finish.
Q: How do I clean my quilted sleeve?
A: Most quilted sleeves made with cotton fabric and batting are machine washable. Use cold water, a gentle cycle, and air dry to preserve color and shape.
Q: Can I make this sleeve without batting?
A: While possible, it’s not recommended. Batting adds structure, insulation, and that lovely quilted feel. Without it, your sleeve may be too flimsy and less heat-resistant.
Q: How do I make a patchwork version of this pattern?
A: Simply piece together small squares or strips of fabric until you reach the desired sleeve size. Then proceed with the same steps, using your patchwork piece as the front fabric.
The Coffee Cup Sleeve – Pattern is more than just a simple project—it’s a creative outlet, a useful everyday accessory, and a perfect way to practice quilting techniques. From selecting fun fabrics to adding personalized embellishments, every part of this project allows your creativity to shine.
Whether you’re making one as a thoughtful gift or a personal treat for your morning routine, you’ll find joy in every stitch. If you’ve tried this pattern, let us know what you think! Share your feedback, your favorite fabric combos, or any ideas for variations—we’d love to hear from you and see what you’ve created! 💬🧵✨