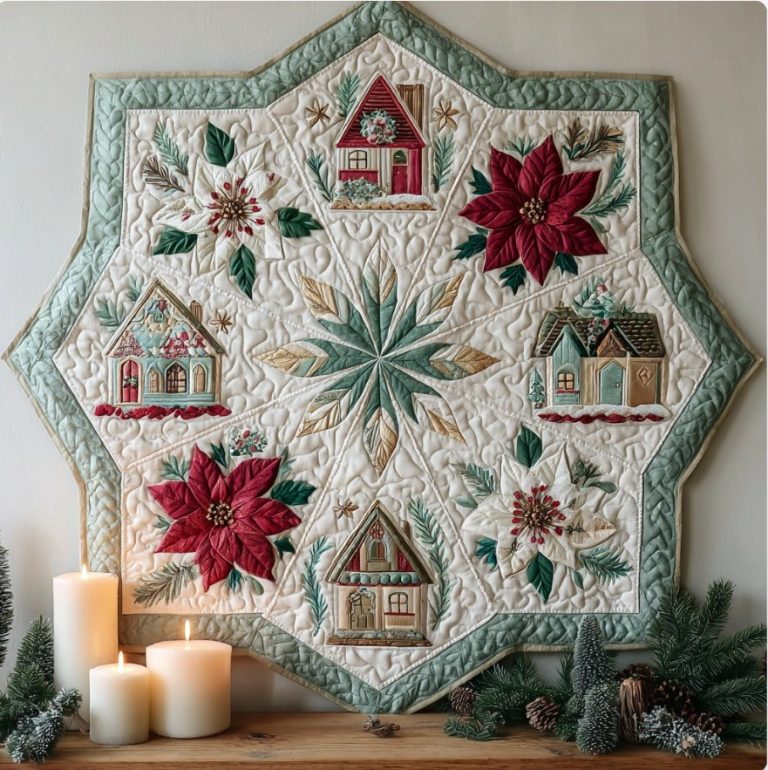
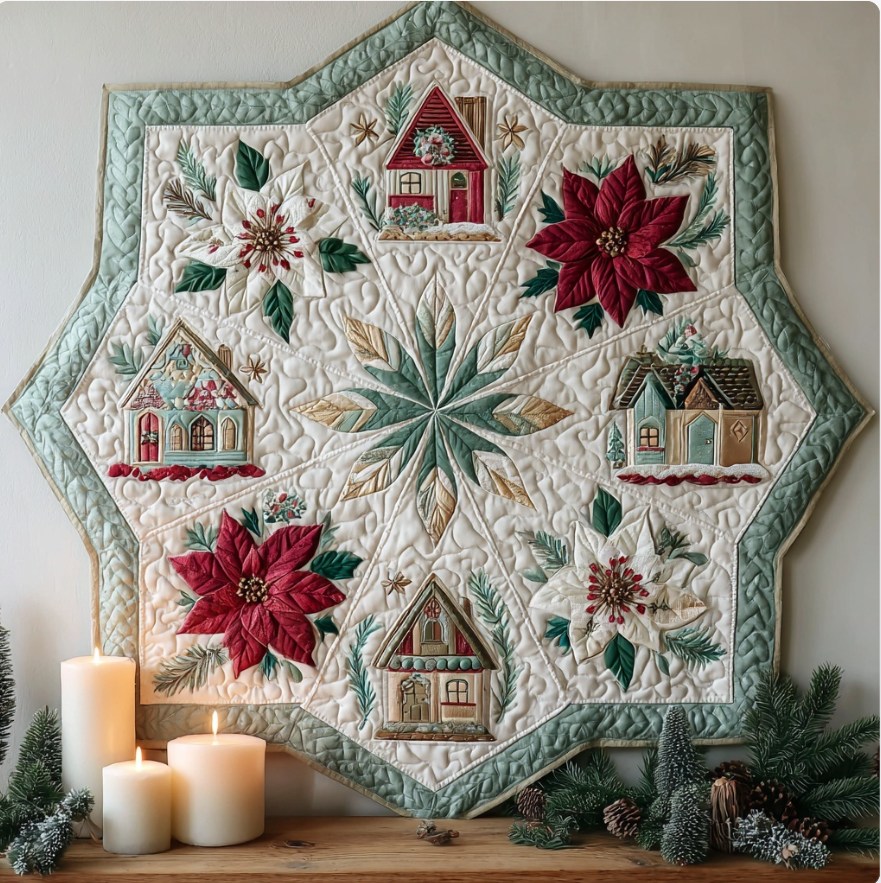
Christmas Quilt – TUTORIAL


The Christmas Quilt – TUTORIAL is the perfect project to fill your home with warmth and festive charm during the holiday season. Whether you are making it for yourself, as a heartfelt gift, or to decorate your living space, this quilt captures the essence of Christmas through color, texture, and creativity. With every stitch, you’ll bring together patterns that tell a story of joy, comfort, and celebration. Designed to be accessible for quilters of all skill levels, this project blends traditional quilting techniques with a modern holiday flair, resulting in a timeless piece that will be cherished for years to come.
Creating a Christmas Quilt – TUTORIAL is not just about sewing fabric; it’s about crafting a keepsake that embodies the spirit of giving and togetherness. Each block and pattern can represent a different holiday theme—snowflakes, stars, holly leaves, or even small Christmas trees—making the finished quilt a reflection of your personal style and festive spirit. The beauty of this project lies in its versatility. You can make it as a throw, a wall hanging, or even a bed-sized quilt to snuggle under during cold December nights.
This tutorial is designed to guide you step by step through the process, from choosing fabrics and cutting pieces to assembling and quilting your masterpiece. Using simple techniques, vibrant fabrics, and a touch of imagination, the Christmas Quilt – TUTORIAL will inspire you to create something both beautiful and meaningful this holiday season.
Before you start, gather all the necessary materials. You will need a variety of festive fabrics—reds, greens, whites, and golds are classic Christmas choices. Adding a few metallic or patterned prints with snowflakes, holly, or stars will give your quilt extra sparkle. Choose high-quality cotton for durability and comfort. You’ll also need batting, a backing fabric, a rotary cutter, ruler, cutting mat, and your sewing machine.
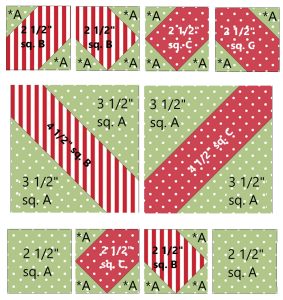
Begin by planning your quilt’s design. Sketch out how you want your blocks to look, or use a pattern layout as a reference. This helps you visualize color placement and balance. The Christmas Quilt – TUTORIAL allows you to customize block sizes and arrangements, so feel free to mix and match different designs to make your quilt unique.
Next, press your fabrics to remove wrinkles before cutting. This ensures more precise cuts and accurate seams. Always double-check your measurements to maintain consistency across your blocks. Precision is key to achieving clean lines and perfect alignment in your final quilt.
Label each fabric piece as you cut. Keeping your pieces organized saves time and helps prevent mistakes when assembling. Use small sticky notes or safety pins to mark each section clearly.
When selecting thread, choose a shade that blends nicely with your dominant fabric color. Neutral colors like cream or light gray work well for most holiday fabrics. Ensure your sewing machine is cleaned and ready to go with a fresh needle before beginning.
Lastly, set up your workspace in a comfortable, well-lit area. Having good lighting and enough space to lay out your fabrics will make your quilting experience much smoother and more enjoyable.
The fun truly begins when you start piecing together your quilt top. The Christmas Quilt – TUTORIAL encourages creativity and flexibility, so you can combine various shapes and motifs. Try classic star blocks, nine-patch designs, or log cabin variations to add texture and interest. The contrast between red and green fabrics creates a lively, festive look that instantly brings holiday cheer.
Start by sewing smaller fabric pieces into units before combining them into larger blocks. Press your seams after each step to ensure smooth assembly. Pay close attention to color balance—spread out dark and light fabrics evenly across the quilt for harmony and depth.
If you’re new to quilting, chain piecing is a helpful technique to speed up the process. This involves sewing multiple fabric pairs in a continuous line without cutting the thread in between. It saves time and thread while keeping your blocks consistent.
Once all blocks are finished, lay them out on a flat surface or design wall. Step back and take a look at the arrangement. Adjust as needed to achieve an appealing composition. This is your chance to ensure the colors flow beautifully and no patterns clash.
When satisfied with your layout, start sewing the blocks together row by row. Keep the seams aligned for a professional finish. After joining the rows, press the quilt top one final time to set the seams flat.
Adding a border is optional, but it frames the quilt nicely and gives it a finished appearance. A deep green or golden border can add elegance, while a patterned one can highlight the playful side of Christmas.
Once your quilt top is ready, prepare the quilt sandwich by layering the backing fabric, batting, and quilt top. Smooth out each layer carefully to avoid wrinkles or puckers. Use safety pins or basting spray to hold everything securely in place.
The Christmas Quilt – TUTORIAL allows for flexibility in quilting styles. You can opt for simple straight-line quilting, echoing the seams, or go for a more intricate free-motion design featuring swirls, stars, or holly leaves. Your quilting stitches add not only durability but also texture and dimension to your finished piece.
If you prefer hand quilting, use contrasting thread to create visible stitches that complement your design. Hand quilting adds a cozy, traditional charm that pairs beautifully with the Christmas theme.
Trim the edges once quilting is complete. Prepare your binding strips by folding them in half lengthwise and pressing. Attach the binding by sewing it to the quilt’s edges, folding it over, and hand-stitching the back for a clean, professional finish.
Add a personalized touch by sewing a fabric label on the back of your quilt. Write your name, the date, and a short holiday message. It turns your creation into a treasured keepsake that can be passed down through generations.
Finally, give your quilt a gentle press to smooth out any wrinkles. Admire your work and enjoy the satisfaction of having created something both beautiful and meaningful with your own hands.
Now that your Christmas Quilt – TUTORIAL is complete, there are many ways to display or gift your masterpiece. Drape it over your sofa or bed to bring instant holiday warmth to your home. It also makes a stunning backdrop for festive photos or a cozy throw to enjoy while sipping hot cocoa by the fireplace.
If you plan to give it as a gift, wrap it beautifully with a satin ribbon and include a small handwritten note. A handmade quilt carries love and thoughtfulness that no store-bought item can match.
Quilts like this one are also great for charity drives or holiday auctions. Your craftsmanship can bring joy and comfort to someone in need during the season of giving.
Consider making smaller versions of your quilt, such as table runners or wall hangings, to decorate different areas of your home. Using leftover fabric from your main project keeps your decorations coordinated and waste-free.
Taking care of your quilt properly ensures it lasts for many Christmases to come. Wash it gently in cold water and air dry or tumble dry on low heat. Store it in a dry, clean place when not in use.
Most importantly, take pride in your work. Every stitch represents time, patience, and creativity—qualities that make handmade quilts so special and enduring.
Is the Christmas Quilt – TUTORIAL suitable for beginners?
Yes, this tutorial is designed to be easy to follow, with clear steps for quilters of all levels. Beginners can start with simpler blocks and progress as they gain confidence.
What size is the finished quilt?
The size depends on how many blocks you choose to include. A small throw might measure around 50×60 inches, while a bed-sized version can be 70×90 inches or larger.
Can I use non-traditional Christmas colors?
Absolutely! Try using icy blues, silvers, and whites for a winter wonderland theme or warm neutrals for a rustic holiday look.
What type of batting should I use?
Cotton or cotton-blend batting is ideal for a cozy feel. Polyester batting adds loft if you prefer a fluffier quilt.
How can I make the quilt more festive?
Incorporate metallic fabrics, embroidered accents, or applique motifs like stars or ornaments to enhance the holiday look.
Can I machine wash the finished quilt?
Yes, but always use a gentle cycle and mild detergent. Avoid bleach, and consider air drying to preserve the colors and stitching.
Do I need a walking foot for quilting?
A walking foot helps feed layers evenly, especially when quilting straight lines. It’s highly recommended but not mandatory.
Can I make matching accessories?
Yes! You can use leftover fabric to create matching cushion covers, table runners, or stockings to complete your Christmas decor.
How long does it take to complete the quilt?
Depending on your pace and the design’s complexity, it can take anywhere from a few days to a few weeks.
Can I personalize this quilt as a family heirloom?
Definitely. Add names, dates, or holiday messages to the back label to turn your quilt into a cherished family keepsake.
Conclusion
The Christmas Quilt – TUTORIAL is more than a sewing project—it’s an opportunity to celebrate the season through creativity and craftsmanship. From selecting fabrics to stitching the final seam, every step brings you closer to creating a meaningful piece that radiates warmth and joy.
Whether you keep it as a festive centerpiece or gift it to a loved one, your handmade quilt will spread the magic of Christmas for years to come. If you enjoyed this tutorial, share your thoughts and suggestions below. We’d love to hear your experience and see your beautiful creations!

