
Autumn Lattice Quilt – PATTERN


The Christmas Ornaments Made with Scraps – TUTORIAL is a wonderful and sustainable way to bring warmth and creativity to your holiday season. This project allows quilters to transform leftover fabric pieces into stunning handmade decorations that shine with charm and character. By repurposing scraps, you can create one-of-a-kind ornaments that tell a story through every stitch, color, and texture. Whether you are new to quilting or an experienced crafter, this tutorial helps you make the most of your materials while adding a personal, artistic touch to your Christmas décor.
Creating Christmas Ornaments Made with Scraps is not only an enjoyable project but also an eco-friendly one. Instead of discarding fabric remnants from previous quilting projects, this tutorial encourages you to reuse them in a meaningful and decorative way. The result is a collection of ornaments that reflect your creativity and bring the cozy feeling of handmade art to your festive celebrations.
These ornaments make perfect gifts, tree decorations, or even holiday garlands. They capture the spirit of Christmas and showcase the beauty of quilting in miniature form. If you’re searching for a fun and sustainable project that celebrates craftsmanship and tradition, this Christmas Ornaments Made with Scraps – TUTORIAL will inspire you to start sewing today and make your holidays even more special.
The Christmas Ornaments Made with Scraps – TUTORIAL is about giving new life to leftover fabric pieces by transforming them into festive keepsakes. This technique blends creativity, sustainability, and the timeless art of quilting. Each ornament becomes a tiny quilted masterpiece, filled with color and texture, perfect for decorating your tree or gifting to loved ones.
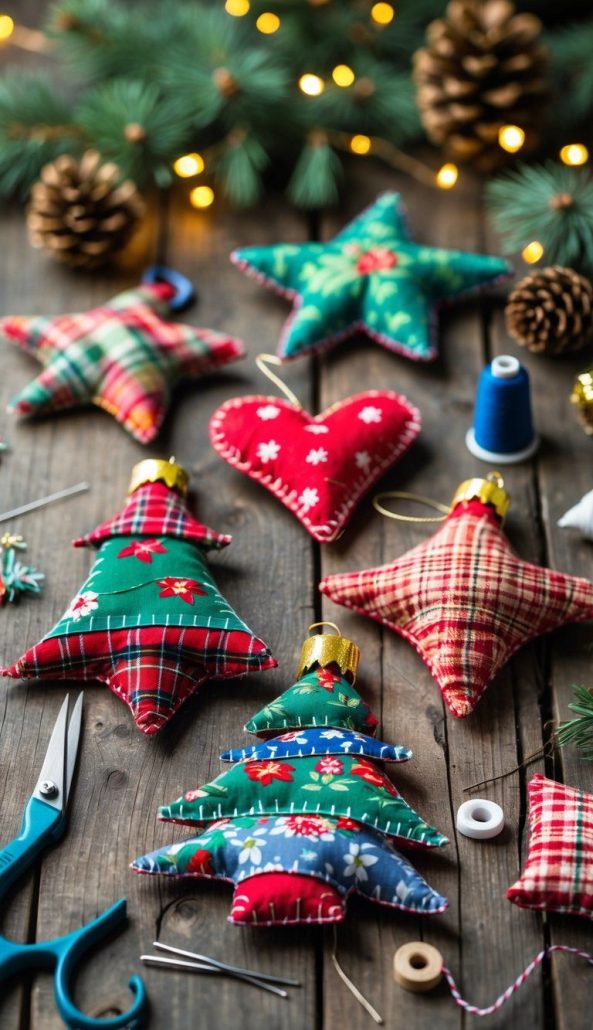
One of the joys of this project is its flexibility. You can design stars, hearts, bells, or mini trees using the scraps you already have at home. There’s no strict rule—just imagination and joy in creating something beautiful. The charm lies in combining various prints, patterns, and fabrics into cohesive little designs that sparkle with holiday spirit.
The Christmas Ornaments Made with Scraps – TUTORIAL teaches you how to use basic quilting techniques on a small scale. It’s an excellent way for beginners to practice stitching, cutting, and assembling fabric, while experienced quilters can experiment with new color palettes and textures.
These ornaments are not only visually delightful but also emotionally meaningful. They carry the memories of past projects—tiny fragments of quilts made for friends, family, or personal use. Turning those leftover pieces into ornaments brings sentimental value to your decorations, making each one truly unique.
Moreover, creating handmade ornaments strengthens the spirit of giving. When you gift someone an ornament made from your own scraps, you share a piece of your artistry and care. The Christmas Ornaments Made with Scraps – TUTORIAL embodies the essence of handmade love during the holiday season.
Finally, this project is quick and relaxing. You can complete several ornaments in an afternoon, making it ideal for group crafting sessions, family activities, or quiet evenings by the fireplace with a cup of tea and your sewing kit.
Before you begin the Christmas Ornaments Made with Scraps – TUTORIAL, gather all the essential materials. Having the right supplies will help you create professional-looking ornaments while keeping the process smooth and enjoyable.
Start with fabric scraps of various colors and textures. Cotton fabric works best because it’s easy to sew, durable, and comes in a wide variety of festive prints. Try to include patterns like plaids, polka dots, stars, or snowflakes to match the Christmas theme.
You’ll need batting or felt as a base layer to give your ornaments structure and a soft feel. For a quilted look, lightweight batting adds just the right amount of puffiness and dimension.
Prepare your sewing machine or hand-sewing kit with matching or contrasting threads. Depending on your preference, you can sew the ornaments using a machine for precision or hand-stitch for a rustic, homey finish.
Gather basic tools like scissors, pins, and a ruler. Fabric glue can also be handy for attaching embellishments or closing small openings neatly.
Optional items include ribbons, beads, lace, or buttons for decoration. These small details can elevate your Christmas Ornaments Made with Scraps and make them even more charming.
Lastly, don’t forget a loop of thread or ribbon to hang your ornaments. It’s a simple finishing touch that turns your project from a quilted piece into a beautiful Christmas decoration ready to shine on your tree.
Now that your materials are ready, let’s go through the process of creating these lovely ornaments using the Christmas Ornaments Made with Scraps – TUTORIAL. Follow these steps to ensure your project turns out beautifully.
Start by choosing a shape for your ornament. Popular designs include stars, hearts, circles, stockings, or small trees. You can draw your templates on paper or use cookie cutters as guides for even shapes.
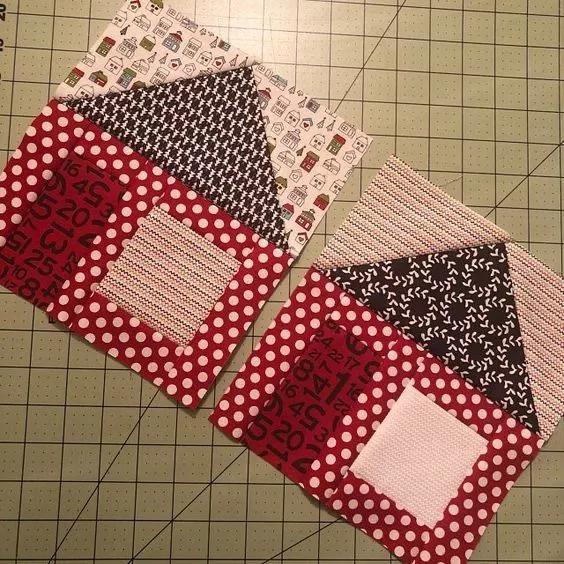
Cut two identical pieces of fabric for each ornament shape—one for the front and one for the back. Then, cut a piece of batting slightly smaller than the fabric pieces to go in between. This will give your ornament a soft, quilted texture.
Next, arrange your scraps on the front piece creatively. You can use a patchwork design, strips, or small squares to build interesting color patterns. Sew or glue the scraps in place, overlapping them slightly for a cohesive look.
Once the top layer is ready, assemble the ornament by placing the front and back fabric pieces right sides together, with the batting on the outside. Sew around the edges, leaving a small opening for turning it right side out.
Turn your ornament right side out, press gently with an iron, and close the opening with a few hand stitches or fabric glue. This step completes the structure of your ornament.
Finally, add decorative details such as ribbons, lace, or buttons. Sew a small loop at the top so you can hang your handmade masterpiece on your Christmas tree. Repeat these steps with different shapes and fabrics to create a full collection of beautiful, eco-friendly ornaments.
The Christmas Ornaments Made with Scraps – TUTORIAL offers endless opportunities for creativity. Once you master the basic method, you can explore various ideas to make each ornament distinct and memorable.
Try creating a set of themed ornaments, such as a collection of stars in gold and white or a series of hearts using red and green fabrics. Themed sets make wonderful gifts and look cohesive on a Christmas tree.
You can also personalize your ornaments by adding initials or embroidered names. This transforms them into thoughtful keepsakes for family and friends, especially when gifted during the holidays.
Experiment with different textures by combining fabrics like velvet, satin, or linen scraps alongside cotton. The contrast in materials adds depth and luxury to your ornaments.
Add a touch of sparkle by sewing on sequins or metallic thread. These details reflect the lights on your Christmas tree, making your ornaments shimmer beautifully.
If you prefer a rustic aesthetic, use burlap or neutral-toned fabrics and embellish with small wooden buttons or twine loops. This gives your ornaments a cozy farmhouse feel.
Finally, consider turning your ornaments into gift tags or small decorative garlands. By attaching them to gifts or stringing them together, you can spread handmade charm throughout your holiday decorations.
1. Do I need quilting experience to make these ornaments?
Not at all! The Christmas Ornaments Made with Scraps – TUTORIAL is beginner-friendly and uses basic sewing techniques. Even if you’re new to quilting, you’ll find it easy to follow.
2. What kind of fabric scraps work best?
Cotton fabrics are ideal due to their durability and ease of handling. However, you can mix in other materials like felt or linen for texture and contrast.
3. Can I make these ornaments by hand instead of using a sewing machine?
Yes! Hand-sewing gives a charming, homemade touch to each ornament. Use a simple running stitch or blanket stitch for best results.
4. How long does it take to complete one ornament?
Each ornament takes about 30 minutes to 1 hour, depending on the complexity of your design and decorations.
5. Can I wash the finished ornaments?
It’s best to spot clean them gently with a damp cloth. Avoid soaking, as the ornaments may lose their shape or embellishments.
6. Are these ornaments good for gifts?
Absolutely! Handmade Christmas Ornaments Made with Scraps make wonderful, thoughtful gifts that carry sentimental and eco-friendly value.
The Christmas Ornaments Made with Scraps – TUTORIAL is more than just a sewing project—it’s a celebration of creativity, sustainability, and holiday spirit. By turning your leftover fabrics into stunning handmade decorations, you create not only beauty but also meaningful memories. Each ornament tells a story, stitched together with love and care.
Start your collection today and bring warmth and personality to your Christmas décor. Don’t forget to leave your honest opinion and suggestions below — your feedback inspires new tutorials and keeps the creative community thriving!


