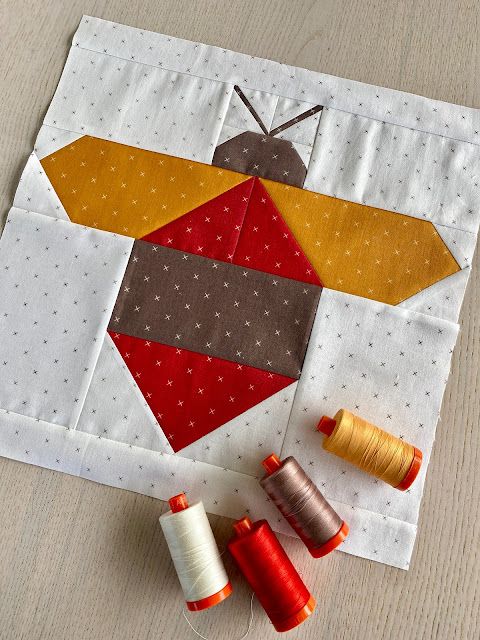
Buzzy Bee Block – TUTORIAL

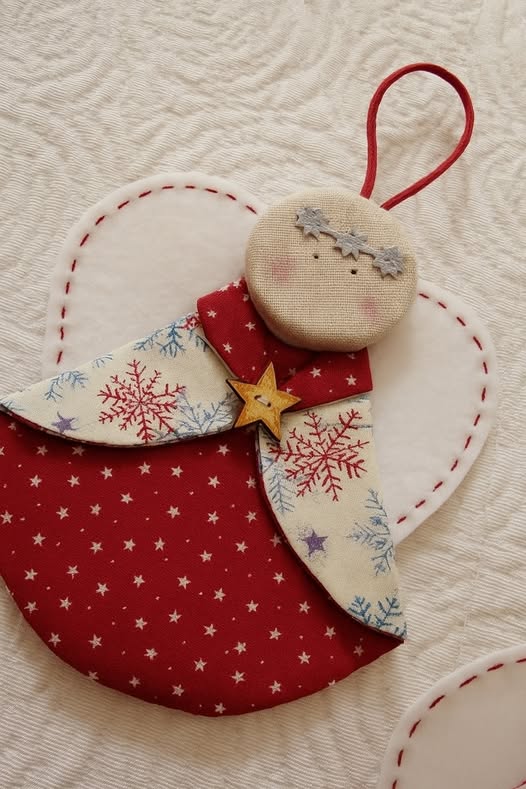
The holiday season is the perfect time to bring warmth, love, and creativity into your home, and what better way to do that than with this Christmas Angel – Pattern Tutorial? Whether you are an experienced quilter or just beginning your journey, this delightful project will fill your heart with festive joy. Creating your own Christmas angel is not just about crafting; it’s about expressing the spirit of the season through art and fabric.
This Christmas Angel – Pattern Tutorial teaches you how to design a beautiful angel that can serve as a wall hanging, table decoration, or even a centerpiece for your Christmas tree. The combination of soft tones, elegant shapes, and delicate details makes it a timeless piece. You’ll learn how to mix fabrics, cut accurately, and sew with precision to achieve a stunning result that you’ll treasure for years to come.
Using this guide, you’ll discover that even intricate-looking projects can be manageable when broken down into simple steps. The tutorial is designed to help you follow along easily while enjoying every moment of the creative process. By the end, your handmade angel will stand as a beautiful reminder of your skills and the warmth of the Christmas spirit.
Before starting, gather all the necessary materials. Preparing everything in advance ensures a smooth workflow and helps you avoid interruptions. For this Christmas Angel – Pattern Tutorial, you’ll need cotton fabric in festive colors, batting for structure, thread, needles, scissors, and optional embellishments like lace or ribbon.
Choosing the right fabric is key to creating a visually appealing angel. Soft pastels or traditional Christmas colors like gold, white, red, and green work beautifully. The contrast between fabrics enhances the wings and gown, giving your angel depth and dimension.
Make sure your cutting tools are sharp and your workspace is well-lit. A rotary cutter and mat will help achieve clean lines, making the sewing process easier. Keep all small accessories in a tray to avoid losing them during the project.
If you’re using a sewing machine, ensure it’s clean and threaded correctly before you begin. For hand sewing, use strong thread and a fine needle that easily passes through multiple layers of fabric. Precision in preparation makes your final piece look professional and neat.
Some quilters love to personalize their Christmas Angel – Pattern Tutorial project with embroidery or beading. Feel free to add special touches that represent your unique style. Handmade details make your angel even more meaningful.
Lastly, set aside a calm, distraction-free space where you can focus entirely on your craft. Quilting is both creative and meditative, so make it a relaxing experience.
Start by cutting all your fabric pieces according to the pattern. The main body, wings, and halo each have distinct shapes that need careful cutting. Follow the measurements provided in the Christmas Angel – Pattern Tutorial closely to ensure accuracy.
Once all pieces are cut, begin assembling the body of the angel. Sew the front and back together, leaving a small opening for turning. Press your seams flat for a neat finish before adding the wings. Ironing between steps enhances the final look.
Attach the wings by aligning them with the shoulders of the angel’s body. Use pins to hold them in place before sewing. The wings are often the most eye-catching part, so ensure they are symmetrical and properly aligned.
Next, focus on the head and halo. You can use fabric, felt, or even metallic thread to create a glowing effect. The Christmas Angel – Pattern Tutorial allows you to be creative—experiment with different materials for a more personalized touch.
When assembling all parts, take your time with the finishing touches. Use small, hidden stitches to close openings and reinforce seams. A well-finished edge gives your angel a polished appearance.
Finally, embellish your angel as you wish. You can add sequins, beads, or lace around the wings and dress for extra sparkle. Every tiny detail contributes to the charm of your creation.
Once your angel is complete, there are endless ways to display it. Hang it on your Christmas tree, mount it on a wall, or place it on a table as a festive centerpiece. The Christmas Angel – Pattern Tutorial ensures your creation fits beautifully into any holiday decor.
For a rustic or vintage style, choose fabrics like linen or muslin and muted tones such as cream, beige, or dusty pink. These soft hues evoke a nostalgic charm. Add wooden beads or twine to complement the aesthetic.
If you prefer a more glamorous look, go for metallic fabrics and shimmering threads. Gold and silver tones reflect light beautifully and make your angel stand out during evening gatherings.
You can also create a collection of angels in different sizes to decorate various areas of your home. Small ones can adorn wreaths or garlands, while larger ones can be used as wall art. The versatility of this Christmas Angel – Pattern Tutorial makes it a wonderful addition to your holiday projects.
Another idea is to personalize each angel with the names of family members. Embroidering initials or dates makes it a memorable keepsake for years to come.
Lastly, consider gifting your handmade angel. A quilted Christmas angel is a heartfelt present that carries both love and effort, making it one of the most cherished gifts for the holidays.
When working with intricate shapes like wings and halos, take your time sewing around curves. Go slow and steady for smooth lines. The Christmas Angel – Pattern Tutorial is easy to follow, but patience ensures the best results.
Pressing your fabric after each step can’t be emphasized enough. It keeps everything flat and manageable, helping you maintain crisp edges and accurate seams.
Don’t skip pinning or basting layers before stitching. This helps prevent the fabric from shifting and ensures your angel’s body and wings stay aligned.
If you’re a beginner, practice on fabric scraps first. Getting comfortable with small stitches and curves will build confidence before you start on the final piece.
For a softer look, use batting sparingly. Too much thickness can make the angel stiff, while a light layer gives it a gentle, airy appearance.
Lastly, enjoy the process! Crafting your Christmas Angel – Pattern Tutorial is about expressing creativity and sharing the warmth of handmade art. Take pride in each stitch and every decision you make along the way.
1. Can I make the Christmas Angel without a sewing machine?
Yes, absolutely! This project can be done entirely by hand. Just make sure to use small, tight stitches for durability.
2. What fabric works best for the angel?
Cotton fabric is ideal because it’s easy to work with and holds its shape well. However, feel free to use satin or linen for a more elegant finish.
3. How long does it take to make one angel?
Depending on your experience, it usually takes between 2 to 4 hours to complete. Adding embellishments may take a bit longer.
4. Can I wash my fabric angel?
Yes, but hand washing is recommended. Avoid using bleach or hot water to preserve the colors and structure.
5. Is this tutorial beginner-friendly?
Definitely. The Christmas Angel – Pattern Tutorial is simple enough for beginners and enjoyable for experienced crafters.
6. Can I resize the pattern?
Yes, you can enlarge or shrink the pattern to make angels in different sizes. Just keep proportions consistent.
Creating your own angel using this Christmas Angel – Pattern Tutorial is a heartwarming and fulfilling experience. You’ve learned how to select fabrics, assemble the parts, and add your unique touches to make it truly special.
Whether for personal decor or as a gift, your handmade angel embodies creativity and the spirit of Christmas. We’d love to hear your thoughts—leave a sincere opinion or suggestion about this project below and share how your angel turned out!