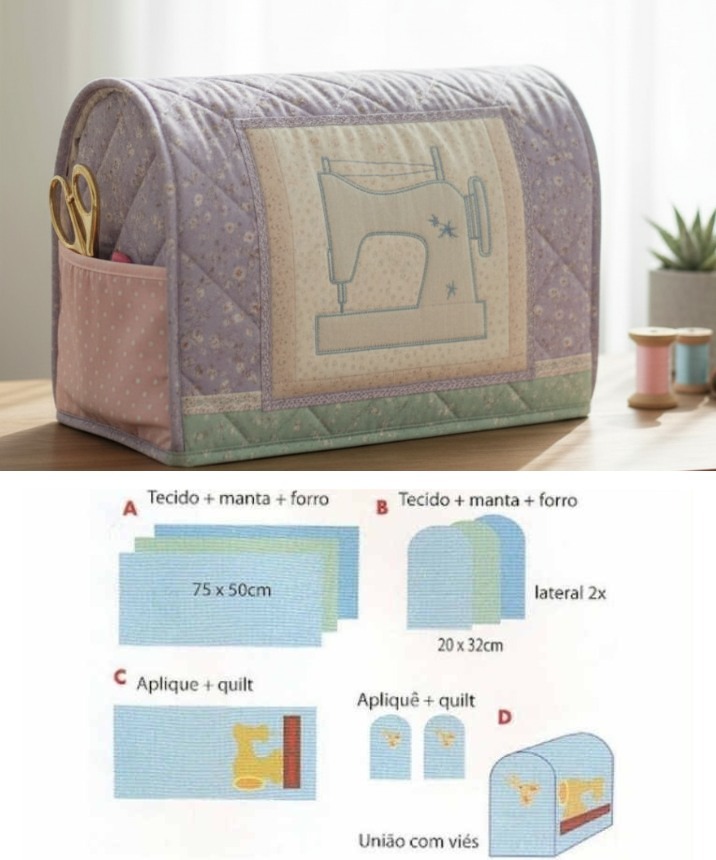
Lake Cabin Quilt Pattern – Tutorial

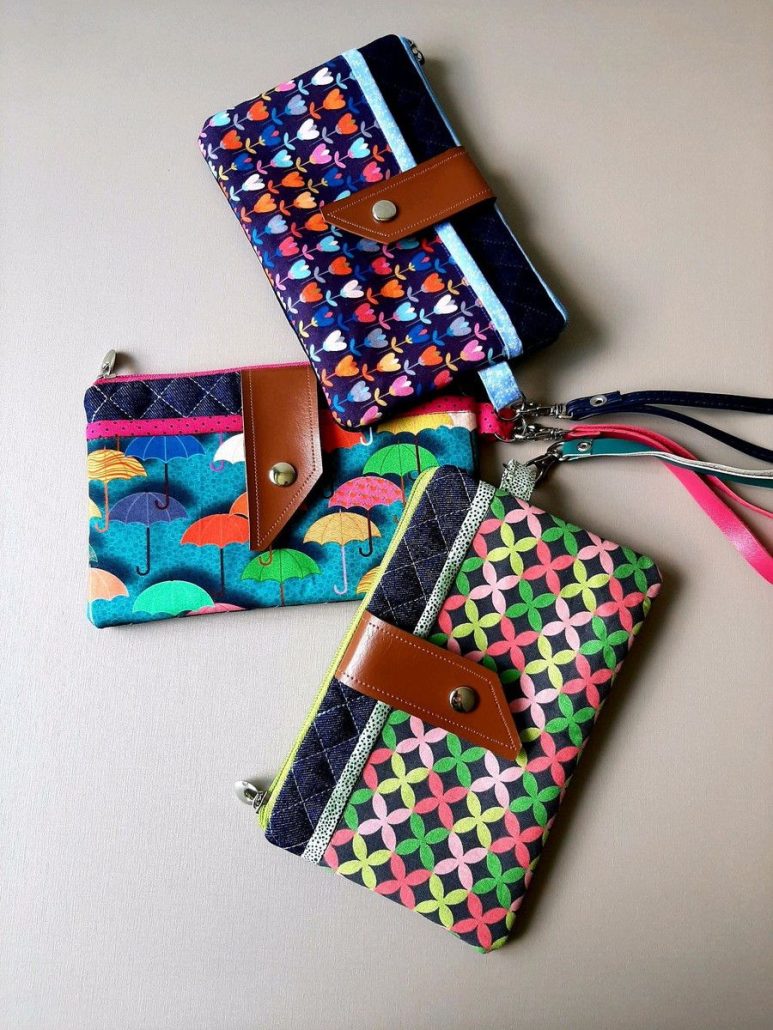
If you’ve been searching for a fun and functional project to sew, the Cell Phone Wallet – Tutorial is a must-try. This beginner-friendly quilt pattern combines creativity and utility, helping you craft a stylish wallet that safely holds your smartphone, cards, and cash. With step-by-step guidance and room for customization, it’s the perfect introduction to quilting for everyday use.
Using this Cell Phone Wallet – Tutorial, you can turn fabric scraps into something genuinely useful. Whether you’re headed out for errands or want a lightweight alternative to your regular bag, this quilted wallet is ideal. You’ll get the joy of sewing something beautiful while solving a real-world need.
Designed with simplicity in mind, this free quilt pattern includes video or photo instructions for visual learners, making it a great project for weekend sewing. All you need is your favorite fabric, basic sewing tools, and a little bit of time to create a wallet that’s as unique as you are.
To begin your Cell Phone Wallet – Tutorial, gather a few simple materials you may already have at home. A fat quarter or fabric scraps work perfectly for this small yet impressive project. Choose durable cotton fabrics that can handle daily use.
You will also need fusible interfacing or lightweight batting to give the wallet structure and padding. This helps your phone stay safe while adding that quilted texture we all love. Don’t forget a coordinating lining fabric to make the inside just as pretty as the outside.
Other essentials include a zipper or snap for closure, thread that matches your fabric, and a walking foot or regular presser foot on your sewing machine. If you’d like to make a wristlet version, include a swivel clasp and a small strip of matching fabric for the strap.
Most tutorials, including this quilt pattern, provide optional variations. You can add card slots, a zippered coin section, or a back pocket. Feel free to adjust dimensions to fit larger phones or additional compartments.
Make sure to press your fabric well before cutting and use a rotary cutter for clean lines. Accuracy matters even in small projects like this because it ensures your wallet turns out polished and well-fitted.
Organizing everything before you start makes the sewing process smoother and more enjoyable. Once materials are ready, you’re set to bring this Cell Phone Wallet – Tutorial to life!
This quilt pattern is broken down into manageable steps, making it easy even if you’re new to sewing. Start by cutting your outer fabric, lining, and interfacing according to the measurements provided in the tutorial.
Fuse the interfacing to the wrong side of your outer fabric. This stabilizes the material and provides structure for the wallet body. If using batting, baste it to the fabric before quilting.
You can now quilt the outer panel using straight-line quilting, free-motion stitches, or a decorative design of your choice. Quilting adds texture and makes the project more visually appealing. Take your time and enjoy the process.
With the exterior quilted, it’s time to prepare the pockets. Fold and topstitch any card holders or inner flaps. Attach them to the lining following the layout provided in the tutorial. Double-check placements so everything aligns neatly.
Now, install the closure. If using a zipper, pin it carefully between the outer and lining fabrics before sewing. If you prefer a snap, mark the placement and secure it firmly using snap tools or hand stitching.
Sew all layers together, turn the wallet right side out, and give it a final press. Topstitch around the edges for a crisp finish. You’ve just completed your very own Cell Phone Wallet – Tutorial!
One of the best things about this quilt pattern is how customizable it is. You can easily change fabrics, add embellishments, or modify the interior layout to suit your needs.
Try using themed fabrics to match seasons or hobbies. For instance, floral prints for spring, or bold geometric designs for a more modern look. You could even add your initials or monogram with embroidery.
Want more functionality? Add a keyring loop, or sew in a mesh pocket to hold earbuds or small items. These upgrades elevate your wallet into a multi-use organizer.
Adjust the size of the wallet to accommodate different phone models. This pattern is easily scalable; just add a quarter inch around the base dimensions to allow for larger screens or thicker phone cases.
Add color contrast by using different fabrics for the strap or pockets. This helps you use up fabric scraps and adds personality to the finished piece. Patchwork versions can also give the wallet a charming quilted look.
For extra durability, consider using vinyl or laminated cotton for the exterior. These materials are water-resistant and easy to wipe clean—perfect for on-the-go use.
By personalizing this Cell Phone Wallet – Tutorial, you turn a simple sewing project into a signature accessory that reflects your style and creativity.
The Cell Phone Wallet – Tutorial is more than just a sewing exercise—it’s the start of many thoughtful gifts and functional accessories. Handmade wallets like these make perfect presents for birthdays, holidays, or as teacher appreciation gifts.
You can quickly sew several in one day by batch-cutting and assembling them assembly-line style. Personalize each wallet with fabric that suits the recipient’s personality, adding that extra handmade touch.
Selling your creations at craft fairs or online shops is also a great idea. These wallets are trendy and practical, often sought-after for their blend of beauty and utility. Offering a range of colors and patterns can attract different audiences.
For daily use, this quilted wallet works wonderfully when you need to travel light. Carry it during walks, grocery runs, or keep it in your main bag as an easy grab-and-go pouch.
Parents can use it as a mini emergency kit holder, and teens love it as a stylish phone pouch. There’s no limit to how useful this quilt pattern can be across all age groups.
With the right branding, you can even turn your sewing hobby into a small business. This simple wallet, made with love and fabric, has real market value and practical benefits.
Q: Is the Cell Phone Wallet – Tutorial suitable for beginners?
A: Yes! It’s perfect for those just starting out. The instructions are clear and easy to follow, with visual guides to help every step of the way.
Q: What kind of fabric should I use?
A: Quilting cotton is the best choice due to its durability and ease of handling. You can also use canvas or linen blends for a sturdier wallet.
Q: Can I resize the pattern to fit my phone?
A: Absolutely! Simply adjust the height and width based on your phone’s dimensions. Don’t forget to add seam allowance when resizing.
Q: How do I make the wallet more secure?
A: You can use a zipper, magnetic snap, or Velcro for closure. Adding interfacing or foam stabilizer will also make it sturdier.
Q: Can I wash the quilted wallet?
A: Yes, if you use washable fabrics and thread. Handwashing and air drying are recommended to maintain the structure and stitching.
Q: Can this project be made without a sewing machine?
A: While it’s easier with a machine, it’s possible to hand sew. It will take more time but is a great way to improve your stitching skills.
The Cell Phone Wallet – Tutorial is the perfect blend of functionality, creativity, and personalization. Whether you’re crafting one for yourself or as a gift, this quilt pattern makes the process both enjoyable and rewarding. You’ve learned how to gather materials, follow the step-by-step guide, customize the design, and even explore its many uses.
PATTERN HERE:
We’d love to hear your thoughts—did you try this pattern? Leave a comment with your honest opinion or suggest what pattern you’d like to see next. Happy quilting!